Tag: diy project (page 3 of 4)

Create a Purse from an old VHS Tape

Create a Purse from an old VHS Tape

What do you do with all those old VHS tapes? Why you create a purse! Perfect way to add some interest to your outfit!

Hello Everyone!

I am almost embarrassed to admit, but I still have a lot of VHS tapes laying around my house. I hate to toss them, but I have no way of playing them (I don’t even own a VHS player…) So what do I with this pile of tapes? I decided to create a purse!

I will admit that is project did not turn out exactly how I envisioned it. But it did turn out cute and the next one will be better! In the instructions I will tell you what I did and how I will make it better next time, that way you can create it at home with out all my struggles, lol

create a diy vhs purse

Materials:

  • VHS tape
  • screw driver
  • cutters
  • fabric, buttons, trim
  • super glue

Instructions:

create a diy vhs purse

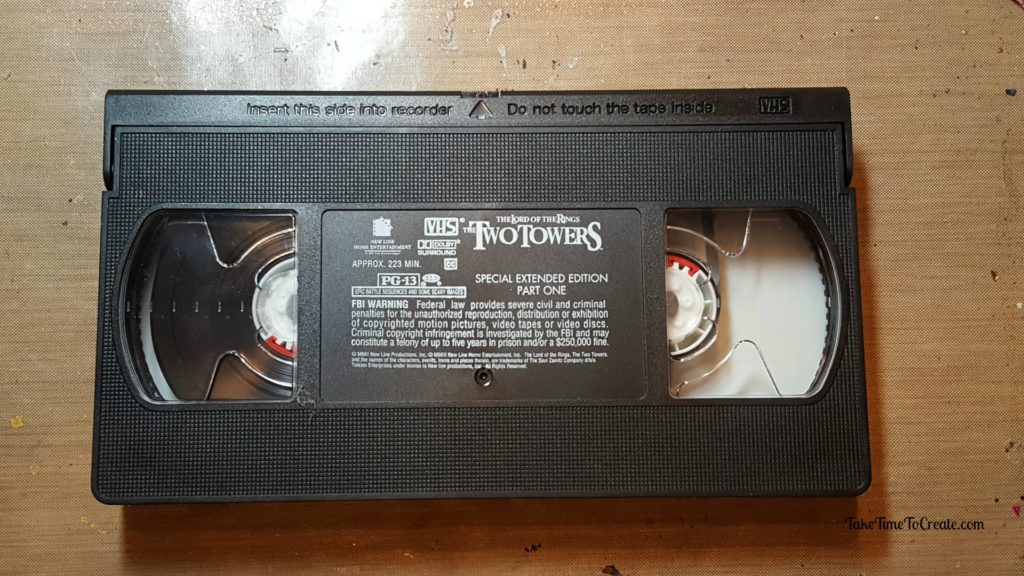
First you find an old VHS tape. If you no longer have one in your stash you can find them at thrift stores, or ask around I am sure someone has one somewhere.

create a diy vhs purse

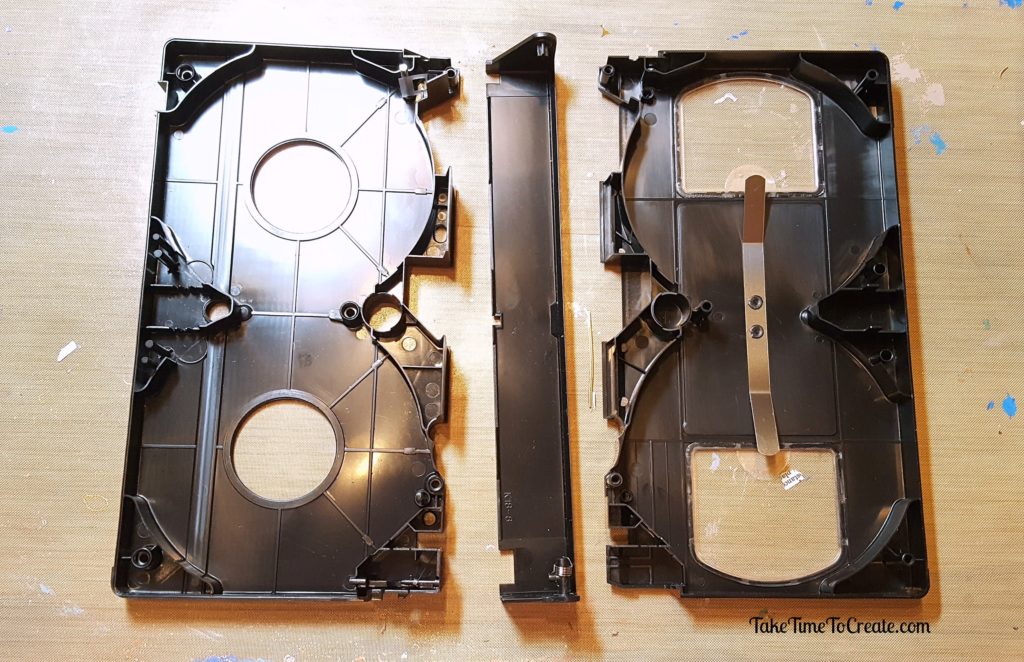
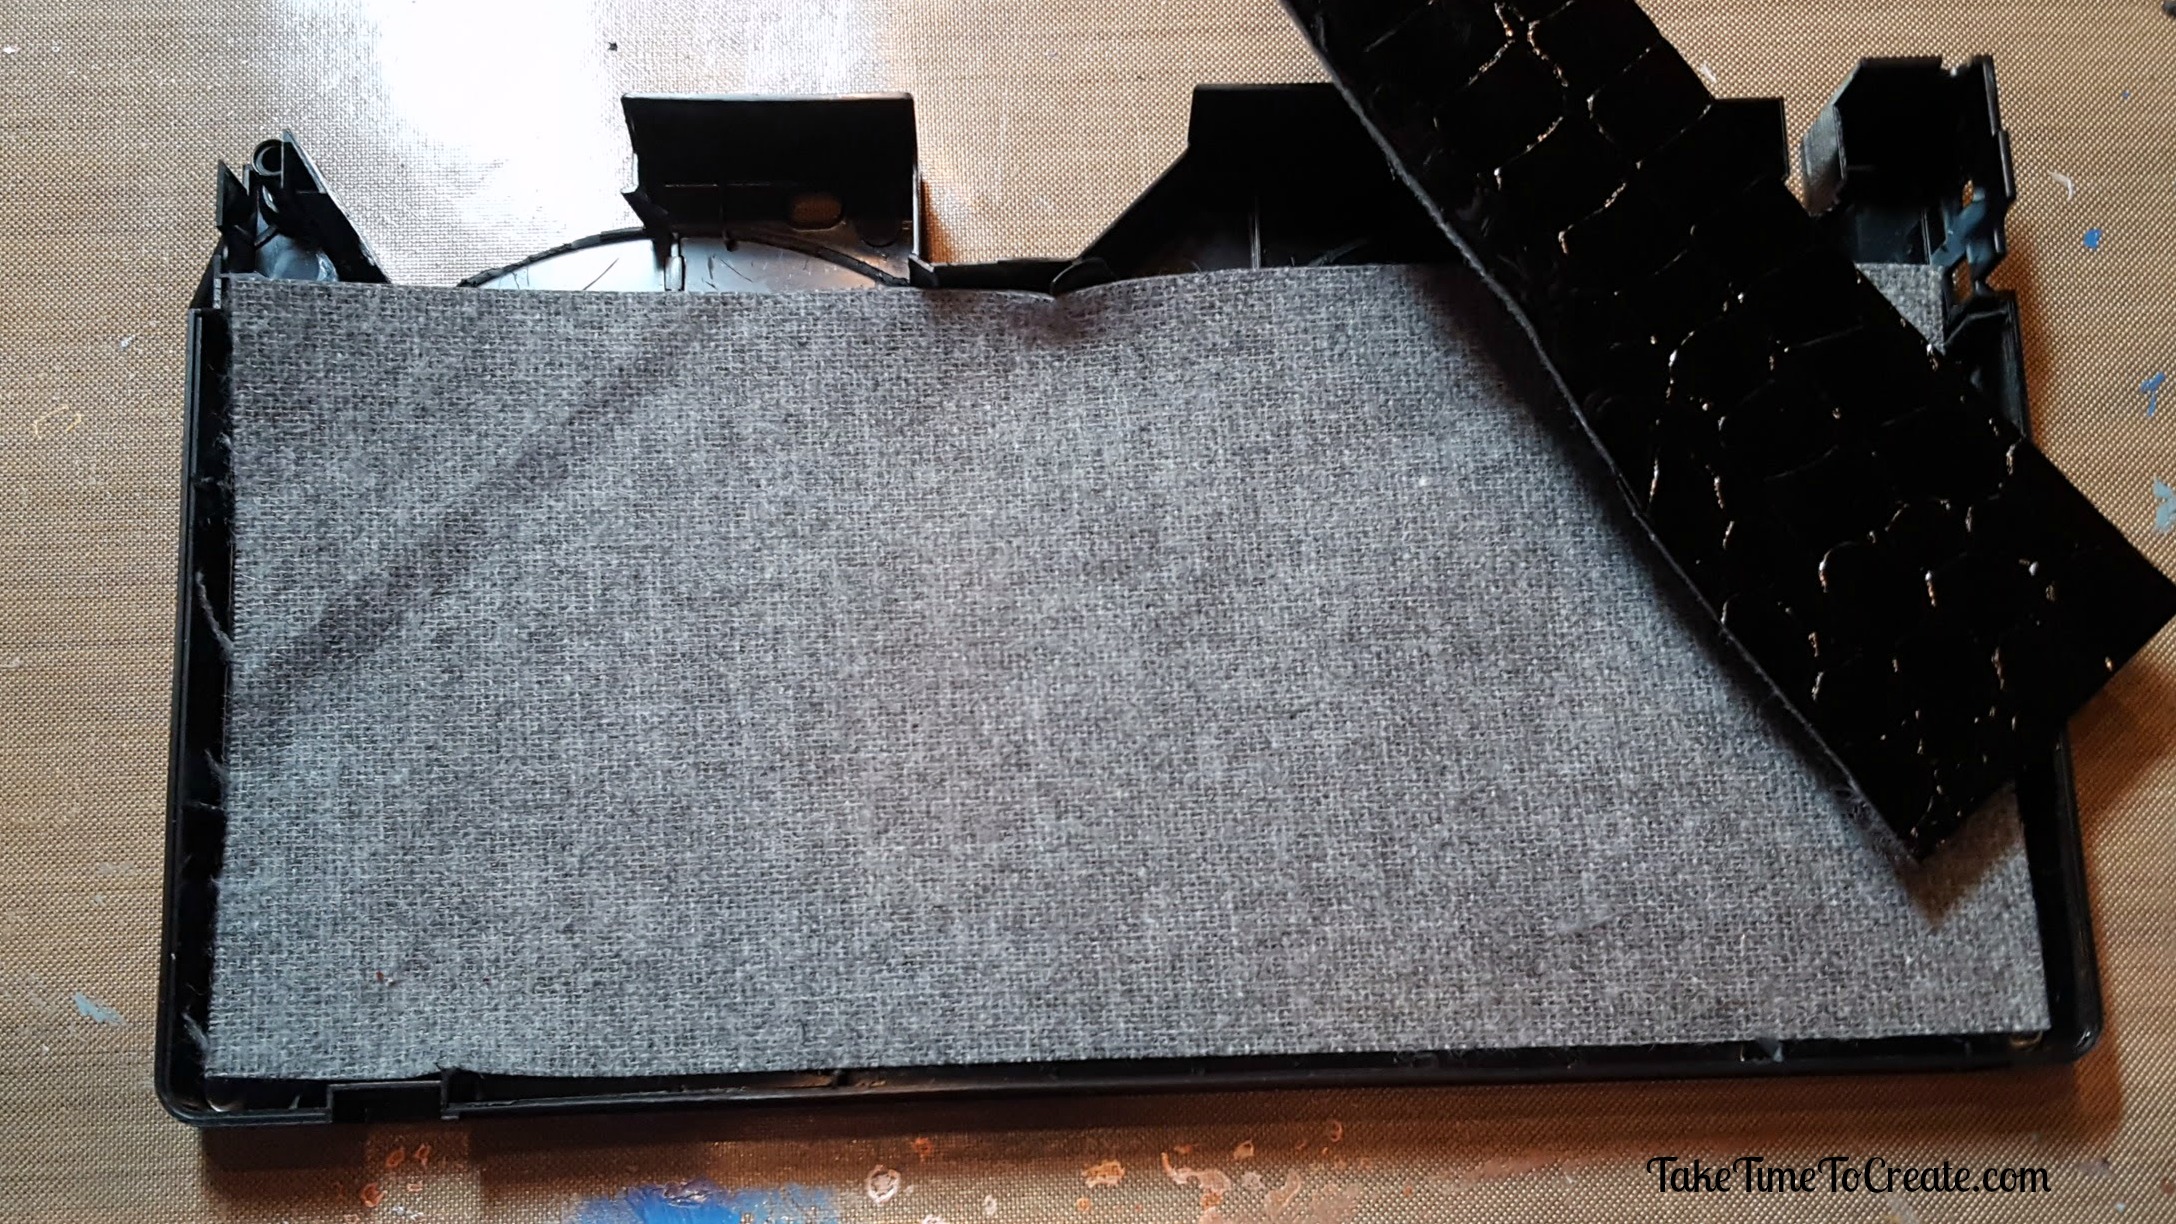
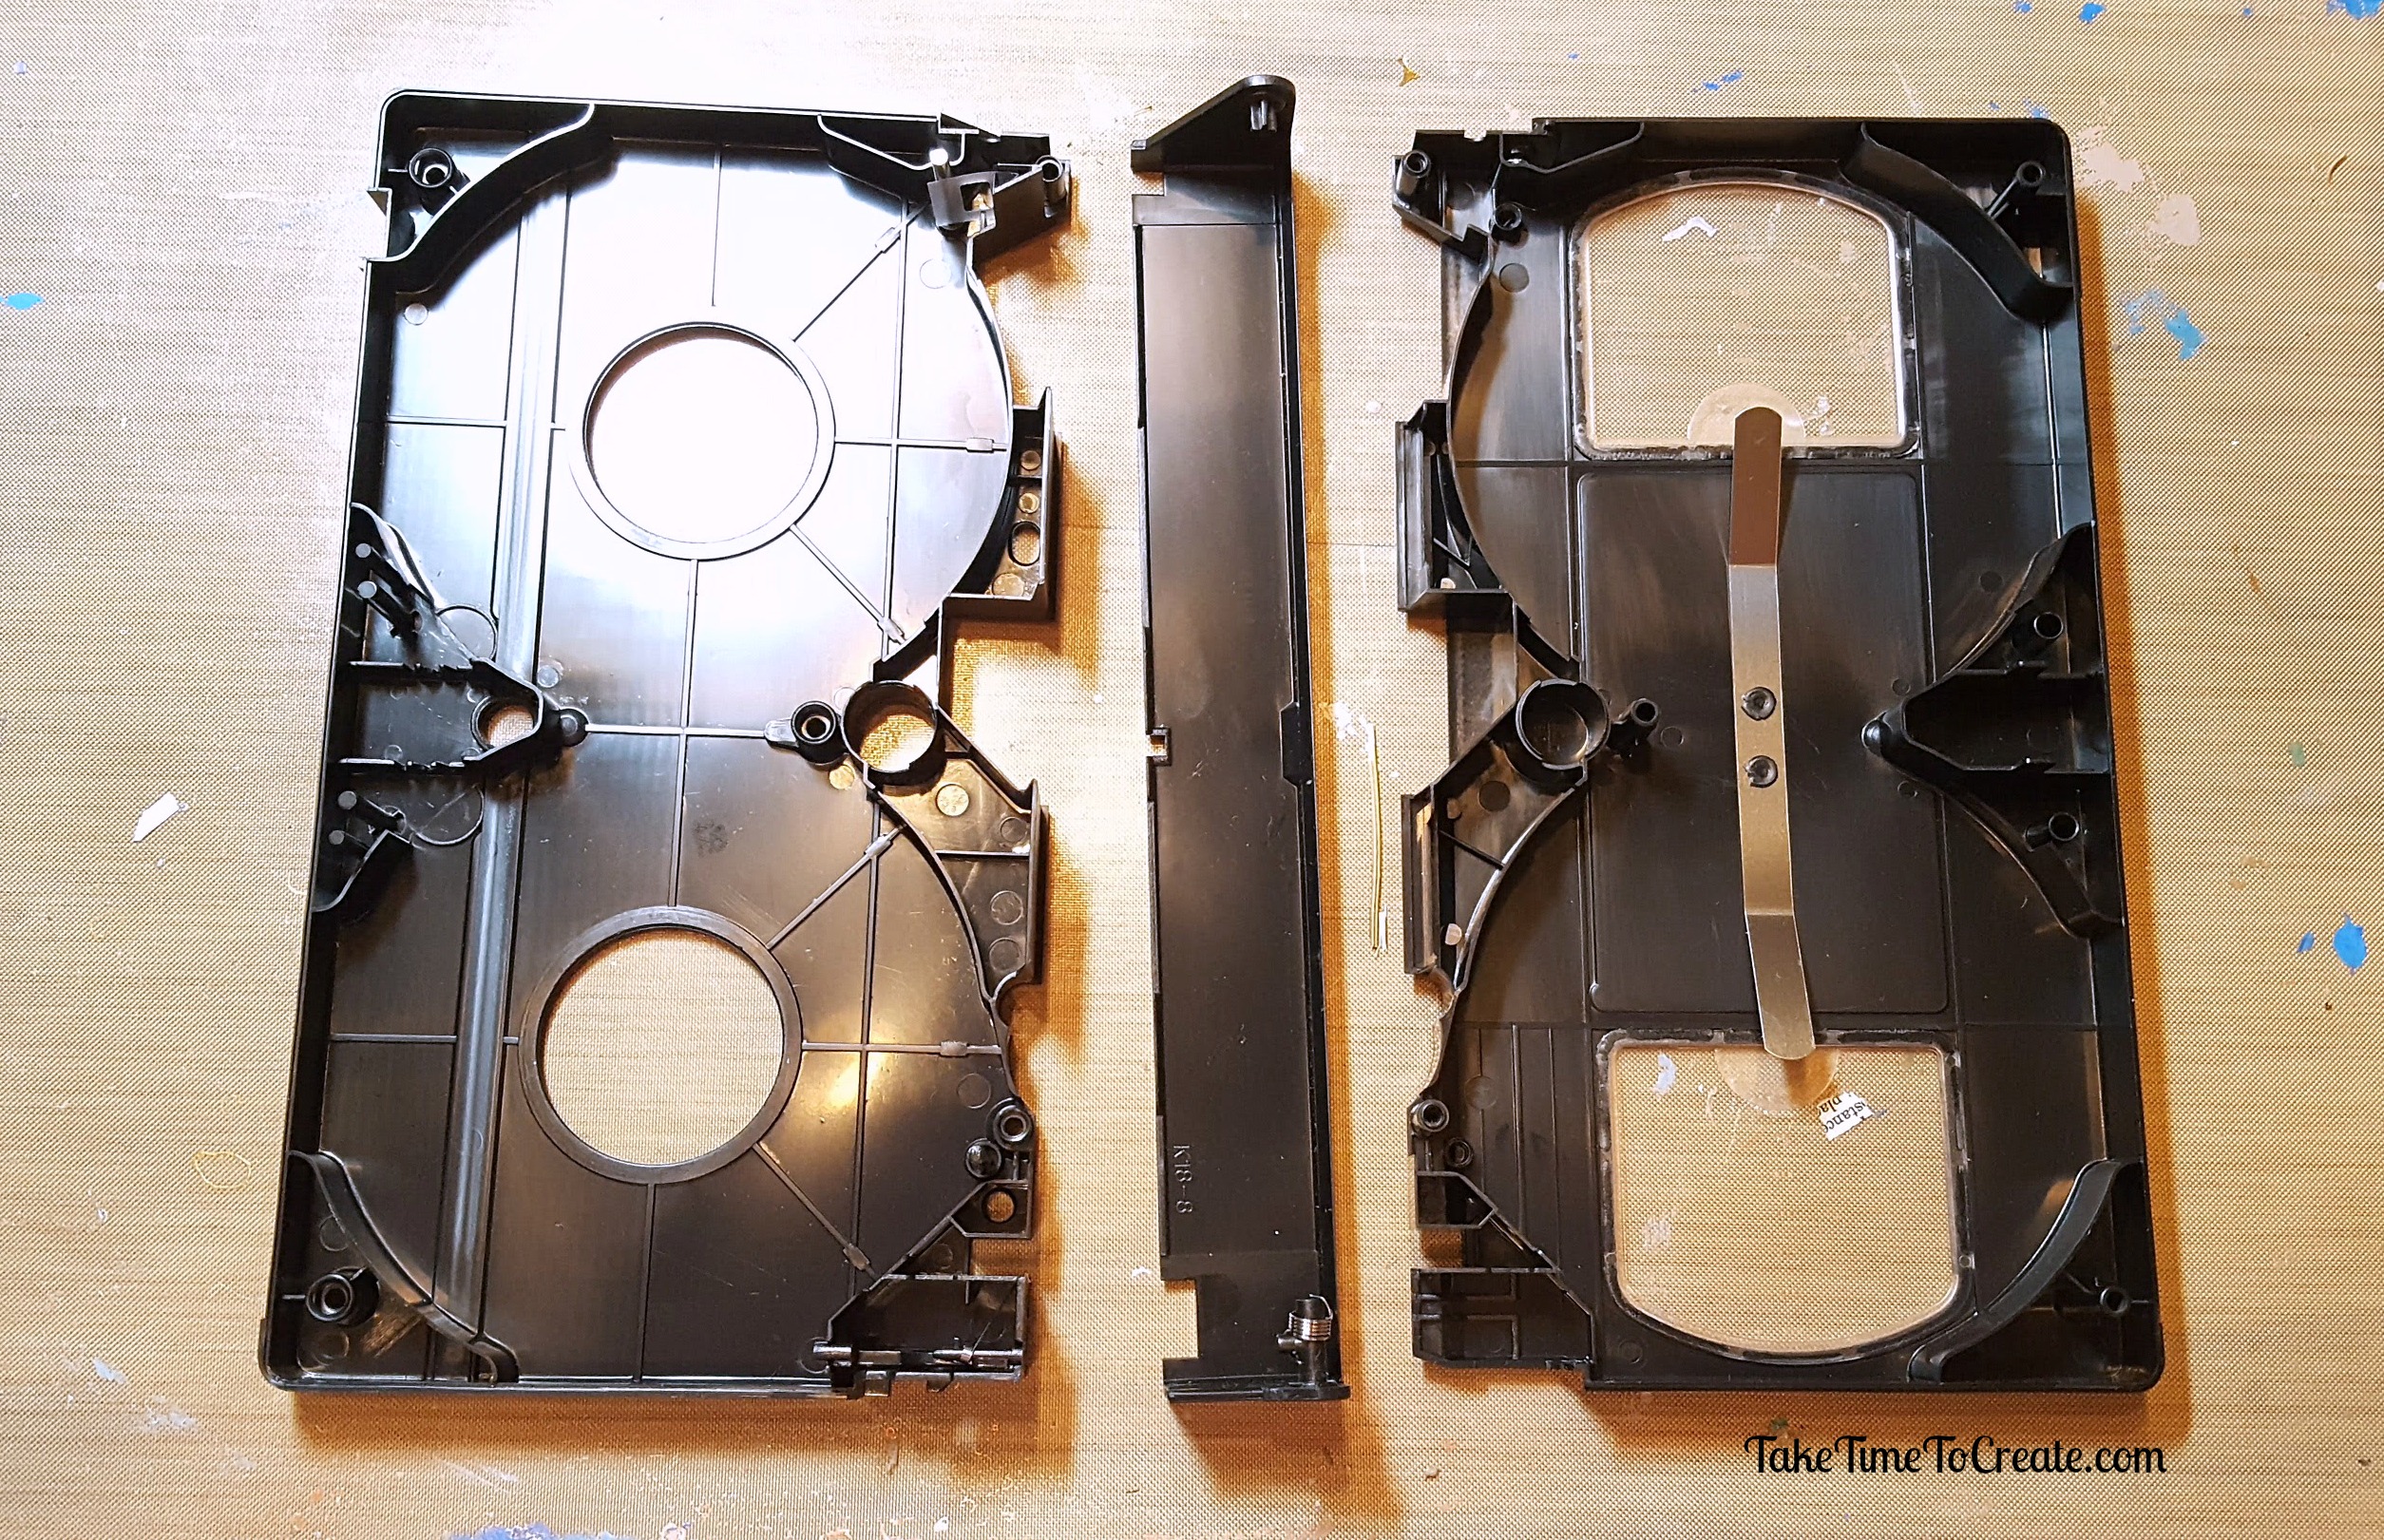
This is the fun part. Unscrew all the screws and open the tape. Take out the innards and safe them, they will work great for a mixed media project. Next you want to cut off the plastic bits that are sticking up. This is one area that I messed up, I cut too much off the bottom and it doesn’t seal (there is a tiny hole in the bottom. Just be careful and you should be good.

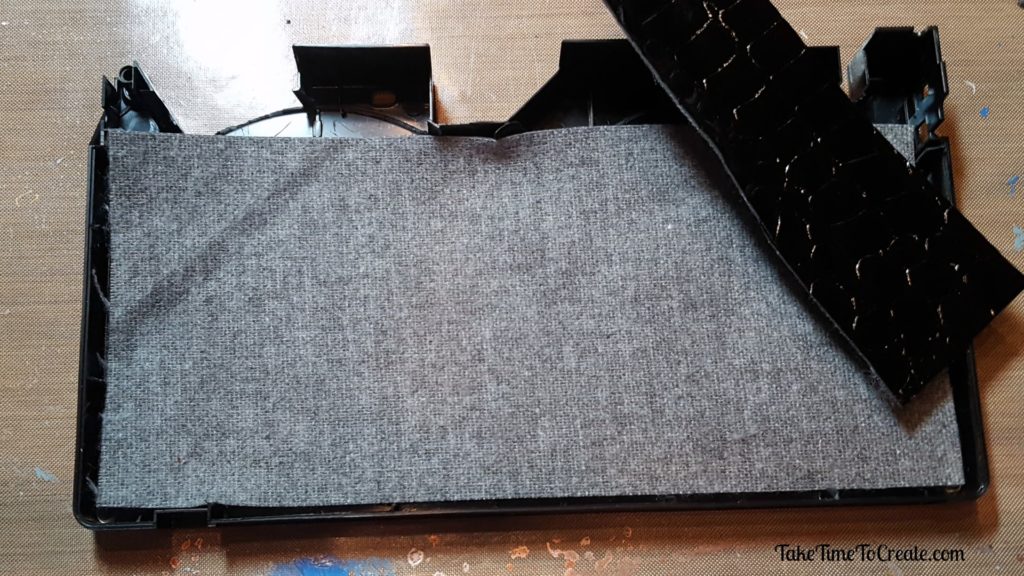
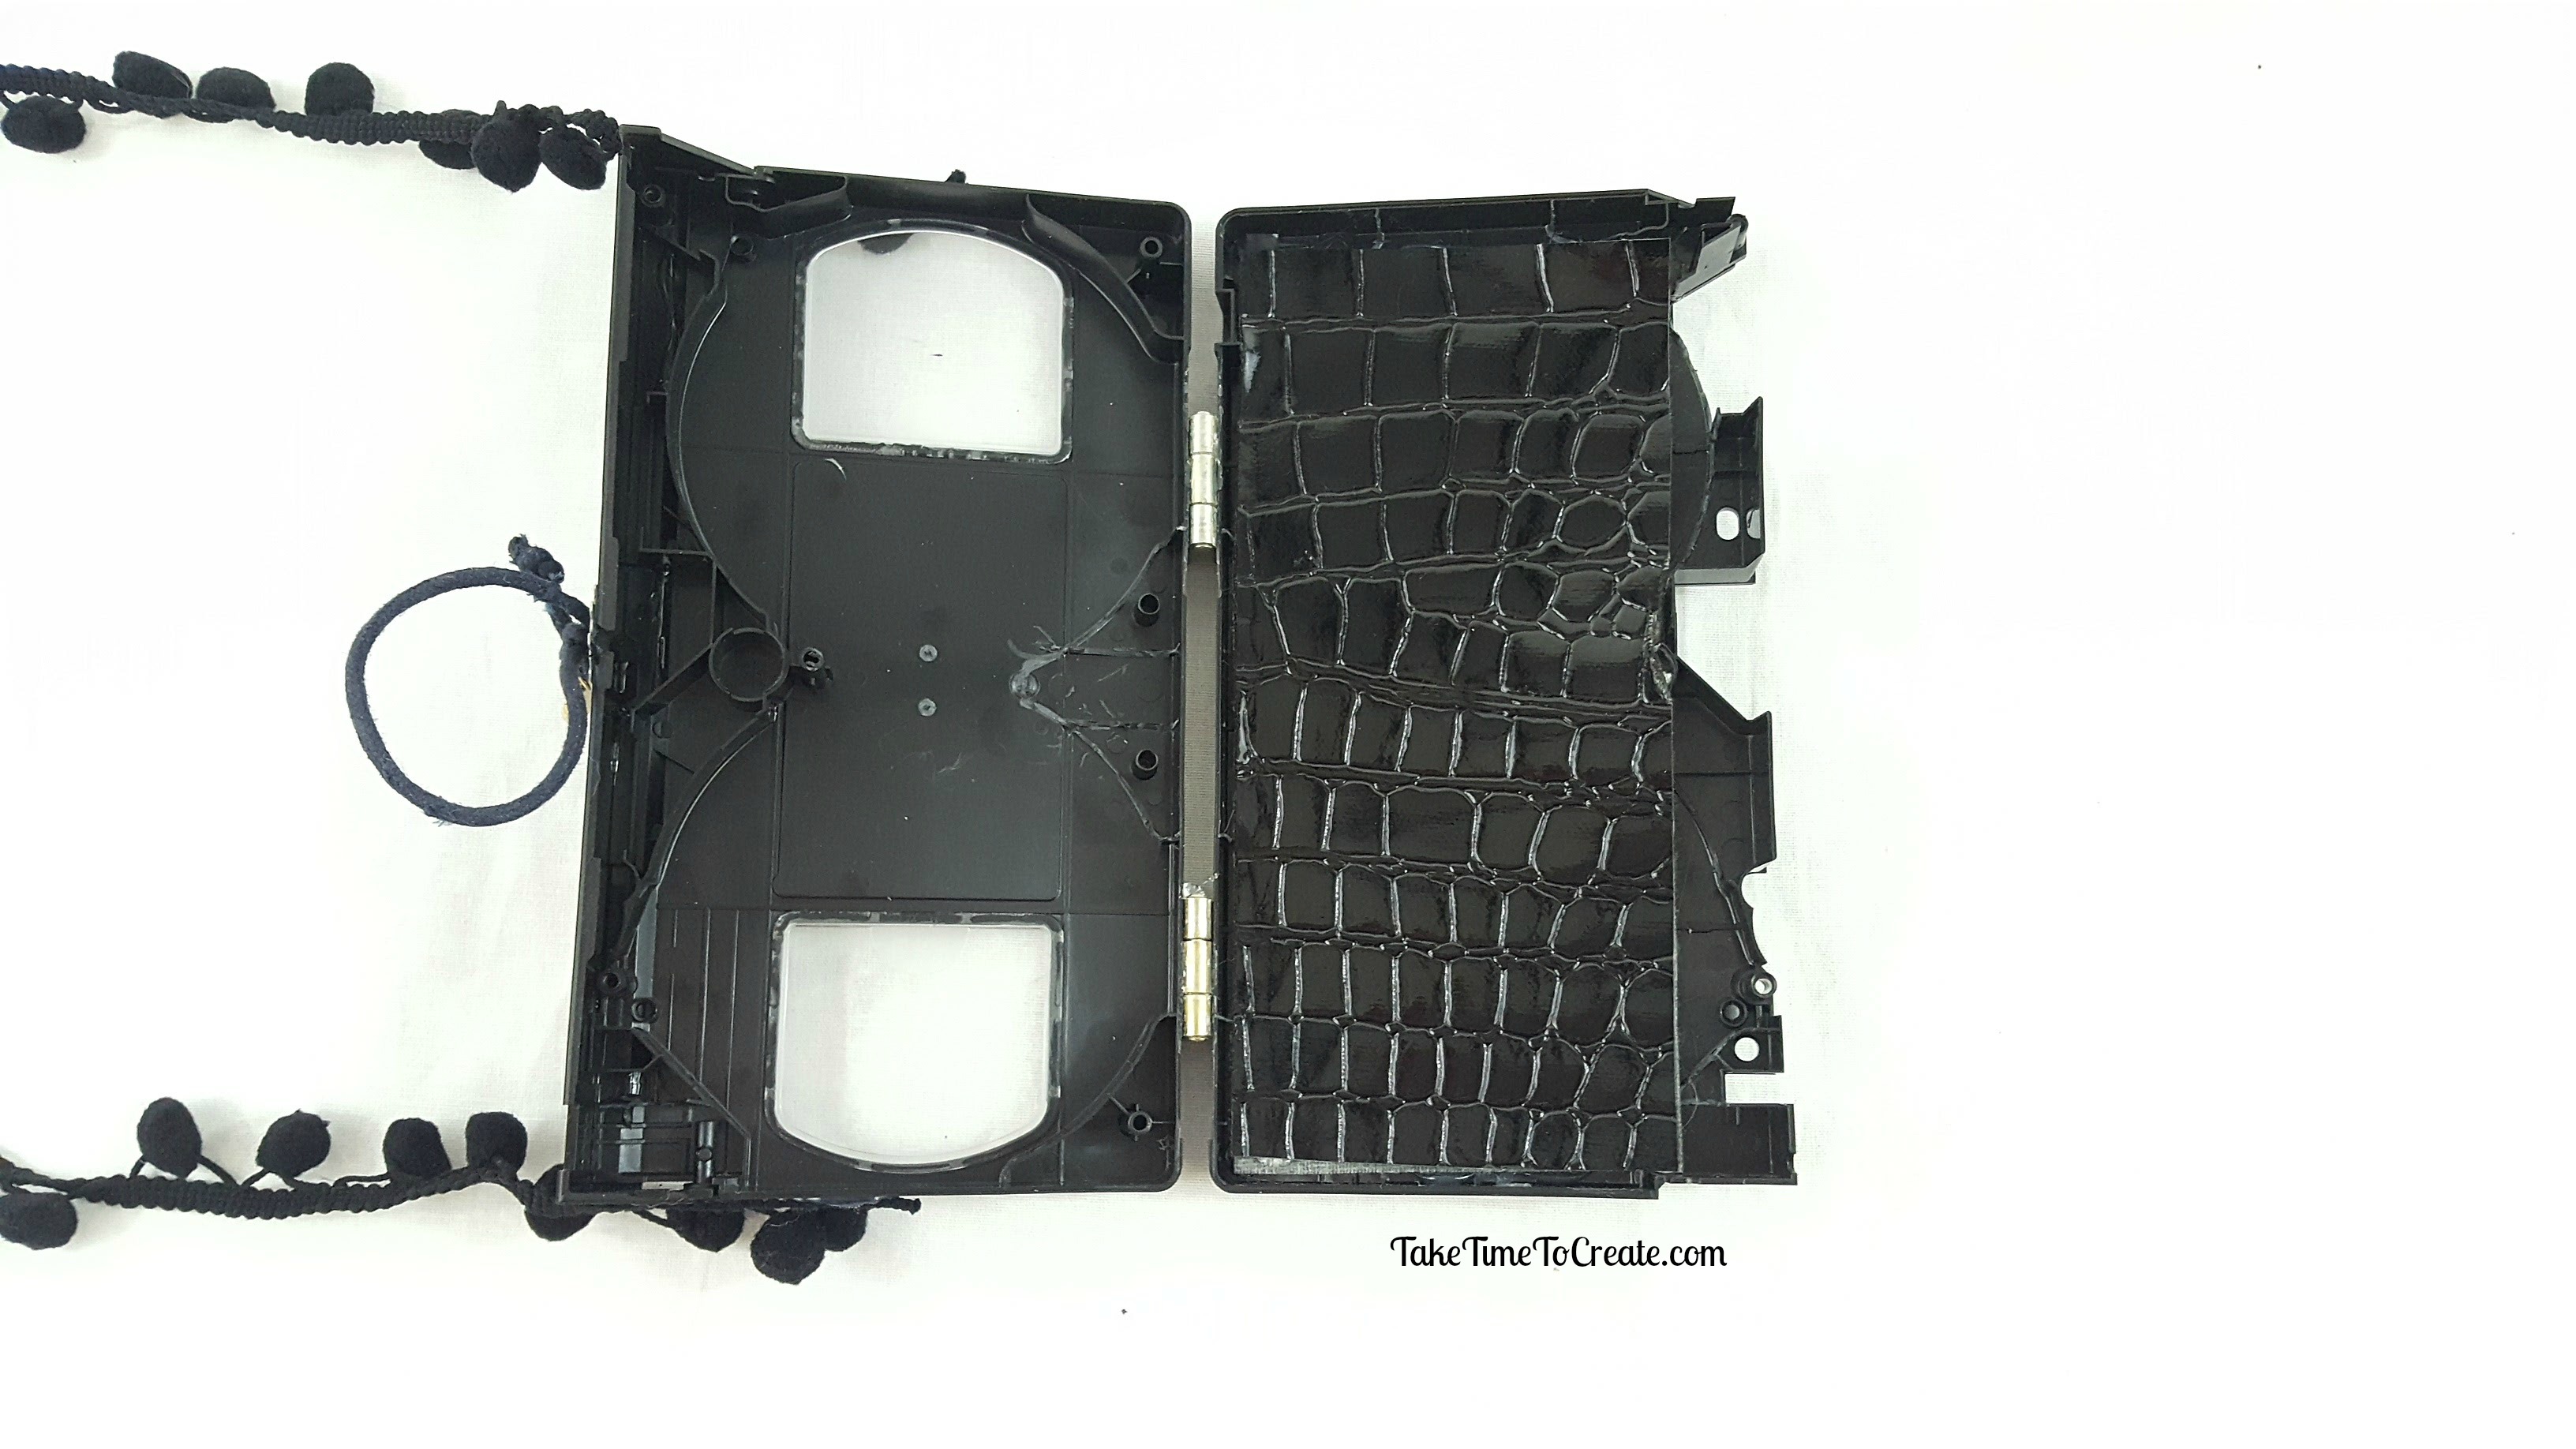
Then I glued some faux leather fabric on one side, in hindsight I probably should have glued it to both sides, but I wanted to see the clear windows still. I think I can make this a little better next time.

create a diy vhs purse

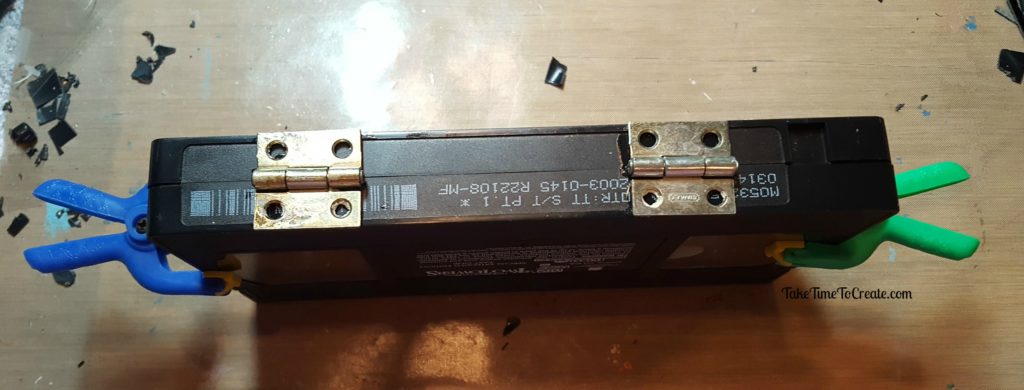
Glue hinges so that you can open and close your purse. Try not to glue your fingers to the tape, lol (I may or may not have done the, lol) Also try not to glue the hinge shut, it takes a lot of careful prying if you happen to glue the hinge (once again I may or may not have done the, lol)

create a diy vhs purse

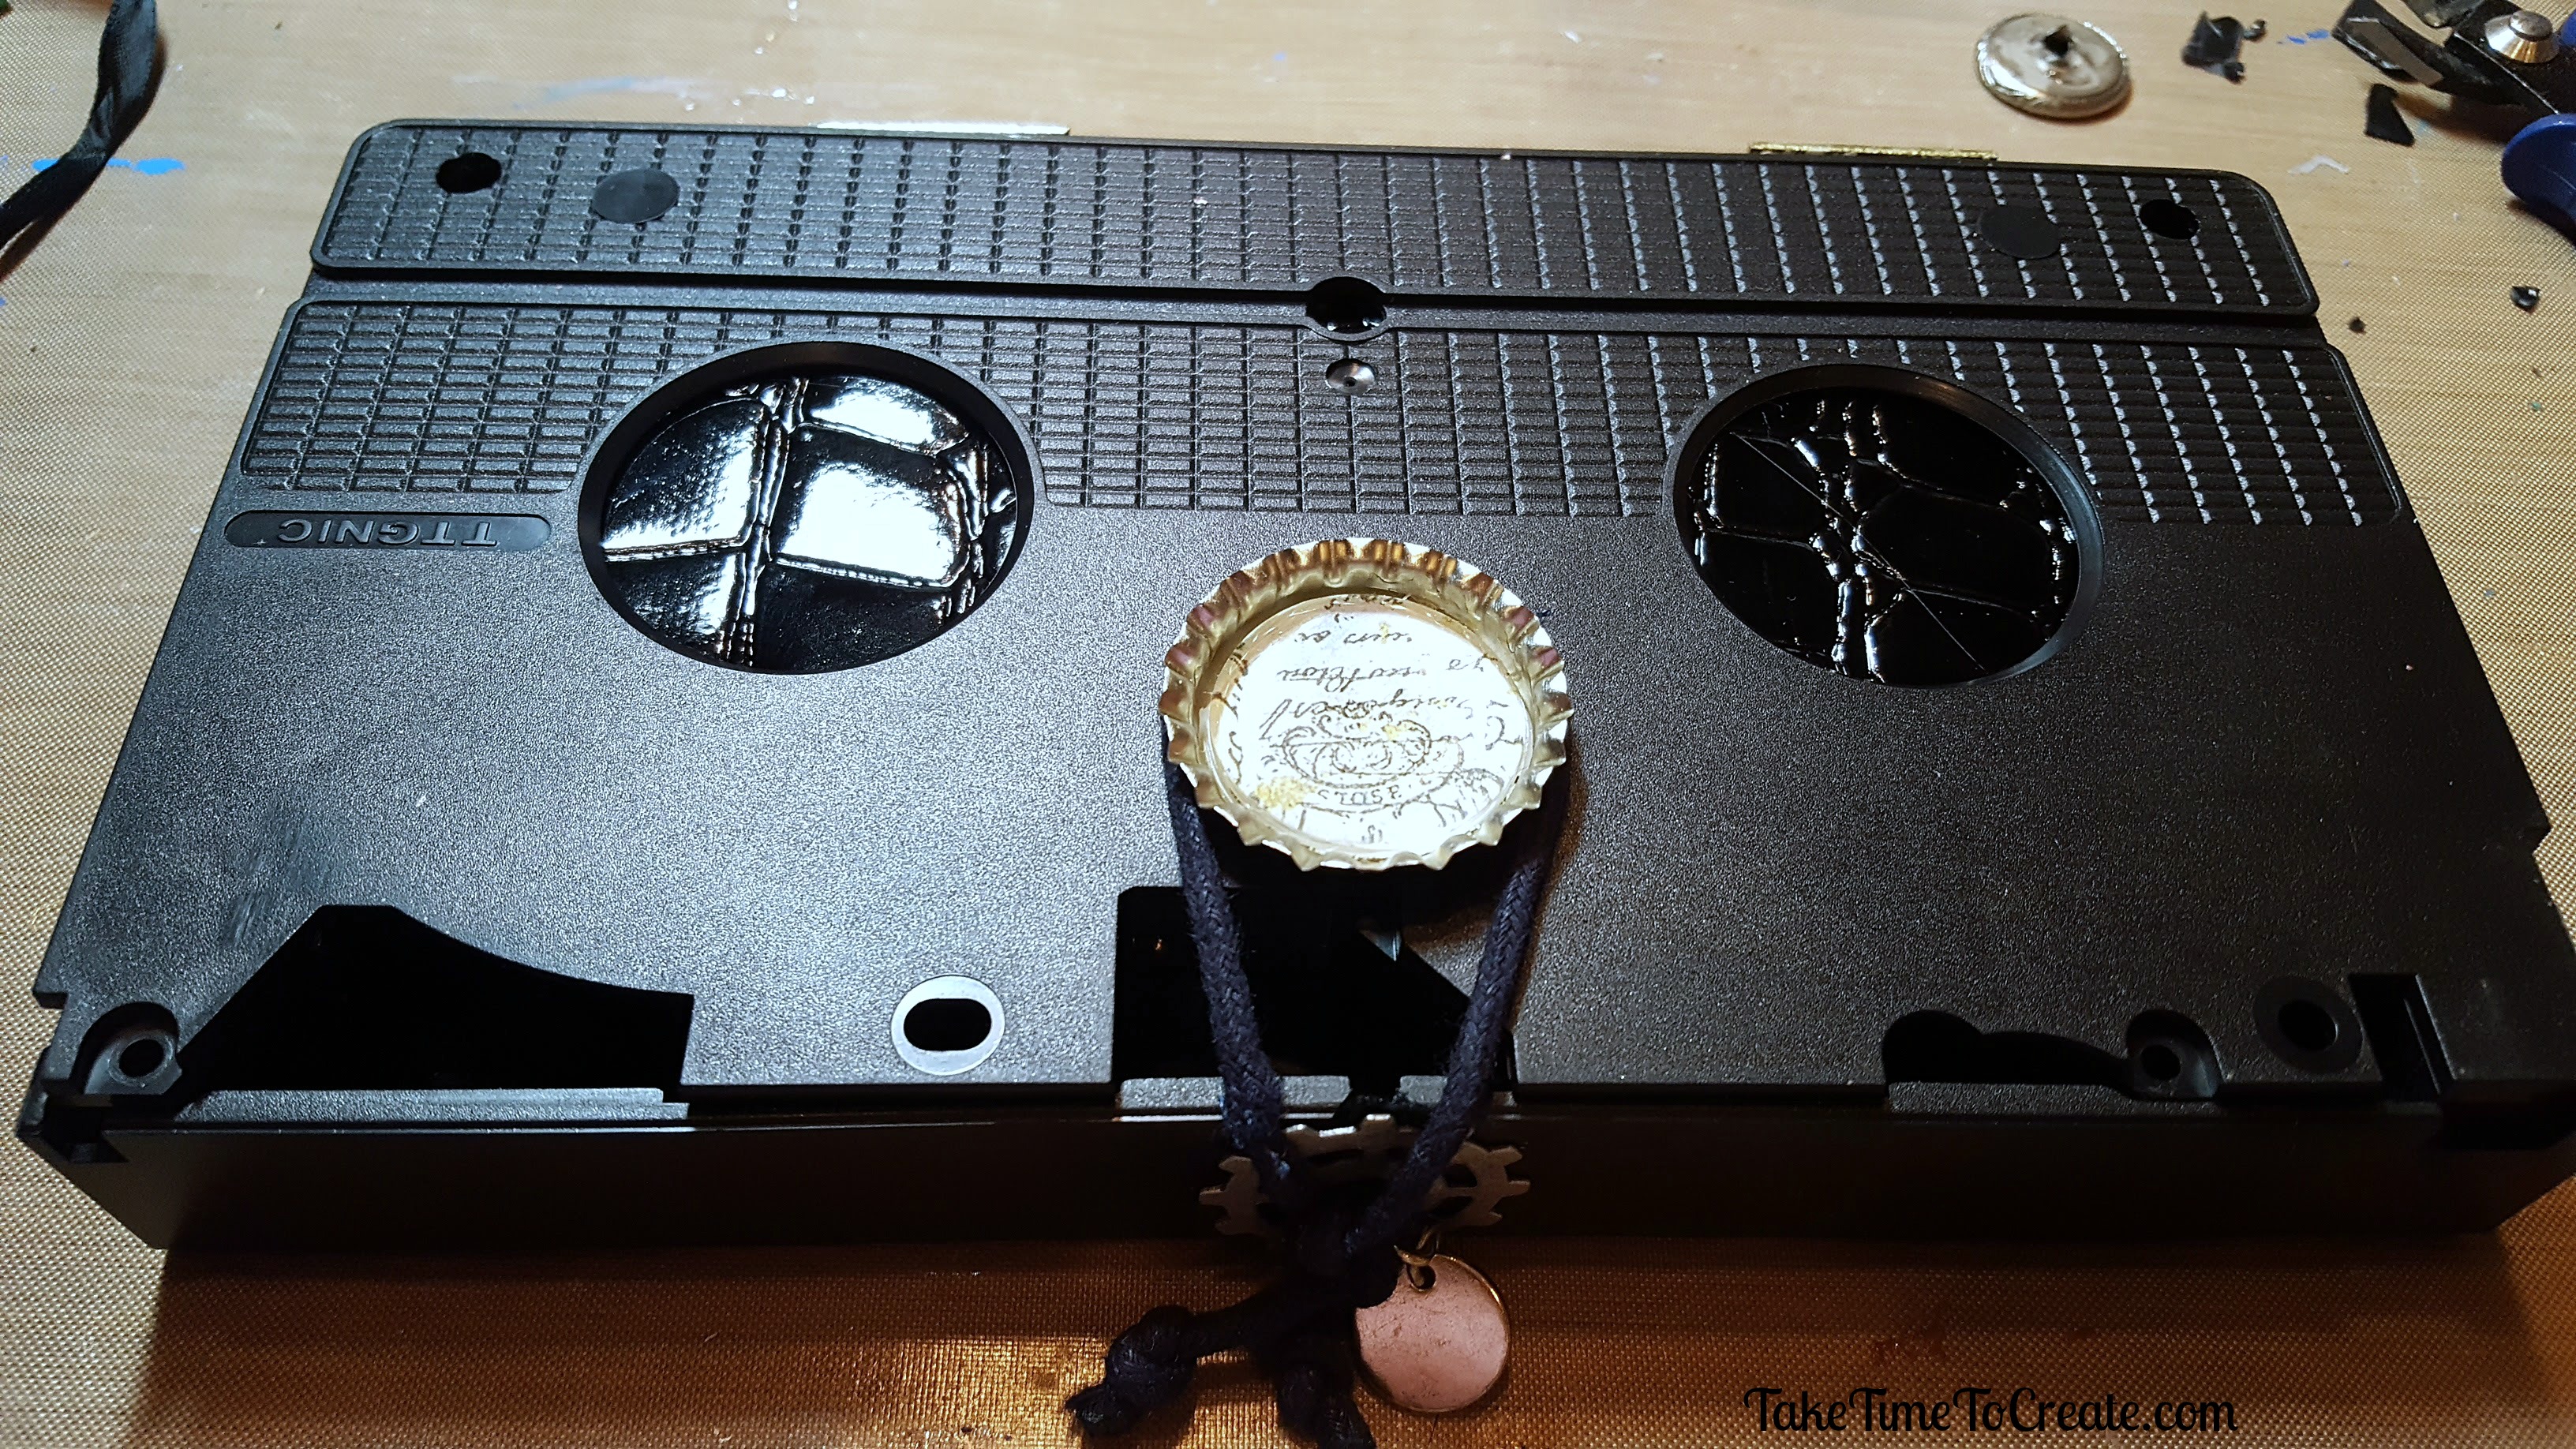
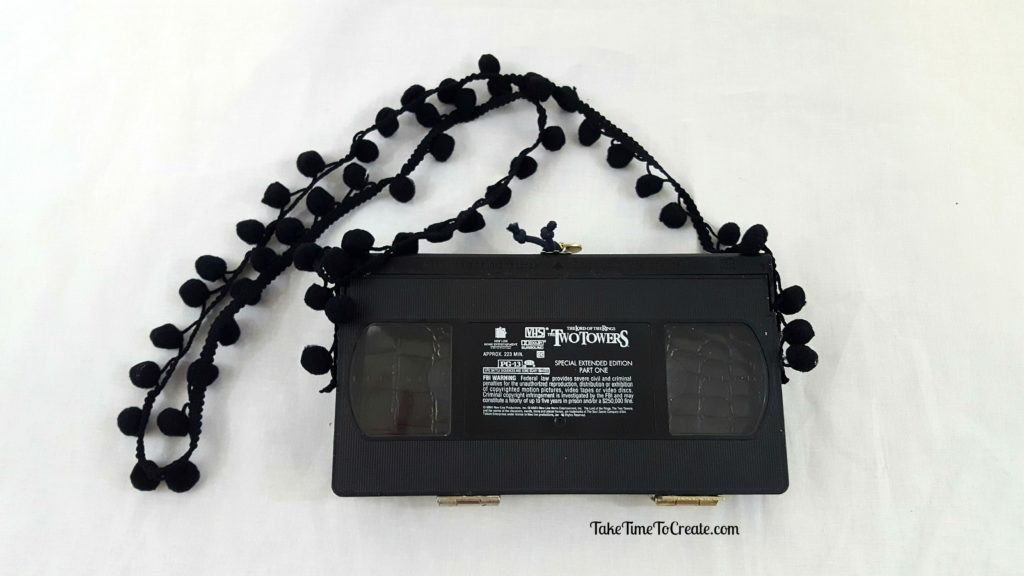
Then I added a decorated bottle cap and some string to secure the purse closed. Next time I will use elastic, but this works. Also next time I will add fabric to the sides so the tape doesn’t lay flat when open, it will help keep everything contained. Add a strap, I wanted mine to look a little funky so I added pom-pom trim.

create a diy vhs purse

create a diy vhs purse

Overall I am happy with how this turned out, and I am excited to make improvements to version 2.  What are you doing to up cycle your VHS tapes?

The post Create a Purse from an old VHS Tape appeared first on Take Time To Create


Galaxy Mixed Media Canvas

Galaxy Mixed Media Canvas

Mixed media is perfect to showcase a galaxy. With found objects, and paint you too can create your own galaxy.

Hello Everyone!

It has been a while since I last posted, and I am sorry for the long absence, I was traveling for work.

But now I am back and  want to show you a mixed media project that I have been working on for a while. It didn’t turn out how I anticipated, but I love the final results! I just went with the flow and this is what I ended up with.

galaxy mixed media canvas

Start with a black canvas and add all your goodies. I added an old educational film, some plastic bits I had laying around, large plastic gems, metal pieces, bottle caps, there is an old record on the very bottom, plastic coins. For interest and texture I stenciled some stars and swirls in the background and added some tea from a tea bag.


galaxy mixed media canvas

Cover everything in black gesso to get the canvas ready to become a galaxy

galaxy mixed media canvas

Before I even started painting I watched tons of videos on You Tube on how to paint a galaxy. I incorporated a variety of techniques, and I kept working on it until I was happy.

Then I went to town painting. I added layers and layers of  acrylic paint and used some DIY acrylic sprays. When I was finally happy I splattered white paint all over to make it look like stars. And I added some metal shavings and old necklace pieces to bring in some more metal elements.

I am not sure it looks like a galaxy, about half the people I have shown it to thinks it looks like the moon. I am good with both views, in the end I am happy with how it turned out.

galaxy mixed media canvas

galaxy mixed media

What do you think Galaxy or Moon? Now I have been thinking about doing an underwater mixed media, I think what will look awesome!

The post Galaxy Mixed Media Canvas appeared first on Take Time To Create.

Project has been entered into the following design challenges:


DIY Harry Potter Drawstring Backpack

DIY Harry Potter Drawstring Backpack

A trip to Universal Studios isn’t complete with out this DIY Harry Potter Drawstring Backpack!

Hello Everyone!

Next month we will have the opportunity to go to Universal Studios Hollywood!!!  I am so excited! In great anticipation I decided to make a Harry Potter drawstring backpack that will be perfect to carry my wallet, camera, and sunglasses.  I decided to use this simple design that I found on the internet. Everyone know what book this is in reference to without being to obvious, lol

I have made drawstring backpacks before, you can see that post here: Cinderella backpack

My son is such a good sport being my model, lol.


diy harry potter drawstring backpack

Materials:

  • backpack (you can find a similar one here: bag)
  • Gold Sharpie (you can find it here: sharpie)
  • Graphite paper (you can find it here: paper)
  • Clip art from internet

Instructions:

The first thing you do is find an image that you would like to trace (just about any image will do) and print it in the size you need.

Spread out your bag and decide where you want your design.


diy harry potter drawstring backpack

Place the graphite paper on the bag then place the image over the graphite. Trace the image with a pencil so that the image will show up on the bag. Press hard and do over it a few times if needed.

diy harry potter drawstring backpack

Once you like the image take the papers off and set them aside.

Put a piece of cardboard in the bag to prevent the sharpie from bleeding to the other side

Now it is time to start drawing the image with a sharpie.

diy harry potter drawstring backpack

Fill it all in  and clean up the edges. Now you are ready to rock your new bag, and you don’t have to wait to wear it at Universal, this is a bag that can be worn all the time!


diy harry potter drawstring backpack

The post DIY Harry Potter Drawstring Backpack appeared first on Take Time To Create.

This post contains affiliate links, thank you for your support!

Merry Christmas and Happy New Year

Merry Christmas and Happy New Year

Merry Christmas and Happy new year to all  my wonderful followers. Because of you I have had a wonderful, fun year and I am excited for next year!

Hello Everyone!

As this year comes to a close I wanted to take a moment and say thank you for making this year pretty great. I had so much fun creating new thing and making tutorials for you enjoy.

I think every blogger says this, but in my case it is true, but I have the best followers! You guys are fun and supportive! Whether you follow me here on the blog or on my other social platforms you guys are just the best!

I will close this year with a pic of a collage that I have on my desk. I love this quote from Curly Girl (if you don’t know who that is  you have to follow her. Her designs are wonderful, I love them! You can find her here: Curly Girl Designs)

I took this quote from a planner, “We must take every opportunity to make the most of our very remarkable life,” and made a quick collage. I love having it near my work area as a perfect reminder that this is all pretty remarkable.

Have a safe holiday season and I will see you in the new year with new projects, ideas, and tutorials, and a You Tube Channel! Yikes, yes I am going to start a You Tube Channel to help demo even more things. (I will admit I am a little nervous about this, but it will be fun!)

So many new things for the new year! It is going to be amazing!

See you in 2017!

Linda


Easy DIY Gift Ideas

Easy DIY Gift Ideas

Need a last minute gift? Here is a list of easy DIY gift ideas that will help you check everyone off your list.

Hello Everyone!

Are you at a loss as to what to get or make some of the people on your list? I have the same problem, I get craft-blocked (kinda like writer’s block, but for crafting, haha) when it comes time to make a gift.

So I thought I would go back through my posts and compile and easy list for you reference, easy gift ideas at your finger tips. These gift are great not only for Christmas but for Birthdays, Easter, Weddings, House warming, and almost any occasion.

Just click on the link and it will take you the post with all the details you need to make your own DIY gifts.

  1. Button Magnets. Vintage buttons glued on a magnet make a really cute gift.
  2. Wood Burn Coaster. This gift is fun to personalize with initials or something they like. Just burn in the design, seal it and add felt and you have a gift that will be treasured.
  3. Gift Bag Art. There are a lot of wonderful gift bags at the Dollar Store. Just cut to size and frame and you have a gift that can fit almost any occasion
  4. Vases. Empty jars and beverage containers make wonderful gifts when they are all decorated with raffia, jute, flowers, and rhinestones. 
  5. Christmas Mason Jars. These jars are a very versatile gift just by changing out the flower on top, add candy to the jar and you are good to go. 
  6. Agate Coasters. These coasters are a beautiful addition to any home and are super easy. Just paint on the edge with a paint pen and add felt the bottom. 

The post Easy DIY Gift Ideas appeared first on Take Time To Create.

Santa Mixed Media Canvas

Santa Mixed Media Canvas

Christmas is almost here, and this Santa mixed media canvas is perfect for your holiday decor.

Hello Everyone!

Lately I have been inspired to make mixed media canvases, and with Christmas fast approaching I have the perfect subject for my art.

I had this beautiful paper and glittery star that became the focal point, the rest was just details.

Now I will be honest, I didn’t take any pictures of me actually doing the mixed media, but I think I can explain well enough and as always please ask if you have questions.

I really enjoy making mixed media canvases, all inspired by Finnabair.

Materials:

  • 12x 12 canvas (I got mine at Michaels, but you can always get one on Amazon here: Canvas)
  • Paper (I don’t remember where I got this beautiful paper by KaiserCraft, St Nicholas Collection, Papa Noel,  but you can find great paper just about anywhere)
  • Large star (I found mine at the Dollar Store. It was just so beautiful that I couldn’t pass it up. )
  • Large letter, glitter, beads, and other do-dads, stickles, acrylic paint, stencil
  • Mod Podge, modeling paste, Mica Powder, clear gesso, clear spray sealer

Instructions:

Trim your paper to fit your canvas and spread Mod Podge on the canvas.  Place your paper on the canvas, smooth out. I turned my canvas over and let it dry overnight.

santa on canvas

Starting with santa paper on canvas

The next day I covered my paper with clear gesso to give it some tooth. Then I applied modeling paste with a swirl stencil to add some detail (you can’t really see it, but it is there.)

Then I sprinkled on mica powered and spread it around.  (I am in love with these Prima Marketing mica Powders. You can find the colors I used here: Gold, Copper, Pale Silver)

mica Powders

I am in love with these Prima Marketing mica Powders

Once that was all dry I went to town. I added modeling paste to the star and glued it to the center.

I highlighted the stencil with painted and I painted around the edges with a shimmery white color.

Then I added the letters (they were pink, but I painted them and added glitter)

I added the large gems and small beads and micro beads with globs of modeling paste. Then I poured on lots of glitter to stick the the modeling paste (I figured that Christmas decor needs a lot of glitter)

santa mixed media canvis

Our santa mixed media canvis is coming together

I added rows of pearl beads, and key metal elements, and I added stick details to the star. Once everything is dry I sprayed it with a clear sealer, the mica powder is not adhered to anything and it will wipe away, so the sealer is necessary.

Christmas star close-up

a close-up of our Christmas star

I really like how this turned out. I think it is an interesting piece.

Christmas star

Close-up of our Christmas star

santa mixed media canvas

finished santa mixed media canvas

What holiday should I make a mixed media for next? New Years? Easter? Valentine Day?

This post Santa Mixed Media Canvas appeared first on Take Time To Create


If you enjoyed this post, make sure you Follow Take Time To Create so you don’t miss out on other great posts.

Follow Take Time To Create on WordPress.com


This post contains affiliate links

diy-pillows-burlap-coffee-sacks

Sewing Craft Project Burlap Pillows

Used burlap coffee sacks make for a great sewing craft project… they also make make great pillows. They are fun and unique and perfect for any decor.

Hello Everyone!

sewing craft project burlap pillow case

Finished burlap pillow case

Today is a cold, wintry day and I am inclined to stay inside all day (I do have to go to work, but when I get home I am going to snuggle down and say warm) anyway, as I think about staying home I am reminded of this sewing craft project I did where I made pillows from Burlap sacks. I did this a while ago, but I still love them so much. I think they are perfect for my decor. 

Materials:

  • You will need the used burlap sacks that is used for coffee. I originally purchased mine on eBay, but I did find some on Amazon. You can use this link: Burlap Coffee Sacks.  There are a lot of vendors for these sacks so you have your pick! But they usually come with random patterns, I don’t think you are able to pick your pattern. So keep that in mind when purchasing. 
  • Pillow form. I found mine at Ikea, they have the best prices for pillow forms
  • Needle and thread, or sewing machine. 
burlap sacks

This sewing craft project starts with burlap bags

Instructions:

Cut your sack to the dimensions of your pillow form. If you want the pillow to look more full then cut the sack a bit smaller. (I have to be honest here, I didn’t actually sew these pillows. My fabulous mom sewed them for me. haha, I don’t know what I would do without her.)

Once it is cut, pin the right sides together and sew the right sides together. Leave a little hole so you have room to put your pillow form in. 

Stuff your pillow and stitch the hole. 

finished sewing craft project

Here is another finished pillow

That is it, very easy to make a custom pillow for your home. You can use this technique for almost any fabric.  I love how easy it is to update your decor, and reusing items that might otherwise land in the landfill is a double awesome!

BTW if you are wondering how I painted my couch green you can check out this old post: Painted Couch

burlap-pillows-3

This post DIY Pillows from Burlap Coffee Sacks appeared first on Take Time To Create


If you enjoyed this post, make sure you Follow Take Time To Create so you don’t miss out on other great posts.

Follow Take Time To Create on WordPress.com


This post contains affiliate links.


Painted Christmas Houses

Painted Christmas Houses

You can find these really cute ceramic houses just about anywhere, with just a little paint and glitter they are ready to be put on display. 

My finished Christmas houses on display

Hello Everyone!

December is rolling along and it is time for me to think about decorating. The tree is up, and if you follow me on Instagram you probably have seen our tree by now. (@taketimetocreate).

With any holiday I always feel the need to create some new items. This year I made some painted Christmas houses.  I found the unfinished ceramic houses at our creative reuse center Who Gives A Scrap (I love that place!) With a little paint and glitter they were ready to go.

Materials:

  • Ceramic House (You can get these at a creative reuse center, craft stores, and sometimes the thrift stores will have some unfortunutally painted ones that need an update)
  • Paint and glitter found at the craft store. I really liked this paint, it was white with a little pearl look to it. Perfect for Christmas.

paint-and-glitter

Instructions:

Take your plain ceramic house and paint on a layer of white paint. You can always spray paint the houses, but I just decided to hand paint instead.  This is what it looks like before the paint.

(btw, The houses did come with detailed instructions to paint the house in all the colors, but I did not want to take the time to do any detailed painting. haha. So white paint here I come. )

Painted Christmas houses before glitter

My Painted Christmas houses before glitter

Add the paint. This is what it looks like with the paint. Go over everything, all the little details. Don’t forget the inside of the windows.  Touch up where ever you forgot.

Painted Christmas houses before glitter

My Painted Christmas houses before glitter

Then I decided to add some glitter detail to the snow and trees. Just pick a clear holographic glitter that goes with your paint. I put a layer of mod podge on then sprinkled it with glitter.

add glitter painted Christmas houses

Adding Glitter to the painted Christmas houses

Once they are dry they are ready to be put on display.

I think they turned out really cute. You can put lights in the bottom, but I didn’t have any. So this weekend I will pick up some and then they will look even better!

painted Christmas houses on the mantle

Close-up of the painted Christmas houses on the mantle

painted Christmas houses

Here are the finished painted Christmas houses


Subscribe via WordPress


The Take Time To Create Crafting Blog RSS Feed

Subscribe via Email

Enter your email address to subscribe to this blog and receive notifications of new posts by email.


Other Ways To Follow


The Take Time To Create Crafting Blog RSS Feed

Subscribe to my RSS feed

The Take Time to Create Crafting Blog Facebook Page

Follow me as Facebook

The Take Time to Create Crafting Blog Etsy Shop

Check out my my Etsy Shop

The Take Time To Create Crafting Blog Pinterest Board

Visit my Pinterest Board

Other Ways To Follow


The Take Time To Create Crafting Blog Instagram

Follow me on Instagram

The Take Time To Create Crafting Blog Twitter Feed

Follow me on Twitter

The Take Time To Create Crafting Blog Email

Send Me an Email


Organization- Adding Metal Strips for easy organization

Hello Everyone! In any craft room organization is key. It is important to know what you have, and where it is so you can complete your projects easily with minimal headache. These metal strips will help you achieve your craft room organization goals.

Metal Strips for Craft Room Organization

My finished Metal Strips

I don’t know about you, but I have all these little odds and ends that are all over my crafting area. I use them all the time, but I didn’t have a good way to store them I wanted them close by, but out of the way.  I know, that sounds like a contradictions in terms, lol.  My strips are on the wall right above my work table. Perfect reaching distance.

Metal Strips for Craft Room Organization

Another view of my craft room organization

This is such an easy project, just grab some metal strips from the hardware store.

Drill holes so you can attach it to the wall. Secure the strips to the wall.

Add all your little bins!

Different containers for my craft room organization

Different containers on the metal strips

The little clear plastic tubs I found at the dollar store (you can see it online here) Just add a magnet to the lid and you are good to go. Just make sure the glue dries overnight before hanging it full of stuff.

The metal tubs I also found at the dollar store (here) They are great! With a clear lid and lots of space they are perfect for your metal strip. Just make sure the paper sticker of off the magnet, it will attached better without the sticker.

I added magnets to some of my other odds and ends like wire and micro beads.

Round containers for my craft room organization

Round containers for my craft room organization

Now I have everything on hand, but it is out of the way.

I think this is a great solution for all these little bits and pieces. Now it is time to add some more strips for the rest of my do-dads.

What is your favorite organizational technique?

This post Organization- Adding Metal Strips for easy organization appeared first on Take Time to Create


This post contains affiliate links

Subscribe via WordPress


The Take Time To Create Crafting Blog RSS Feed

Subscribe via Email

Enter your email address to subscribe to this blog and receive notifications of new posts by email.


Other Ways To Follow


The Take Time To Create Crafting Blog RSS Feed

Subscribe to my RSS feed

The Take Time to Create Crafting Blog Facebook Page

Follow me as Facebook

The Take Time to Create Crafting Blog Etsy Shop

Check out my my Etsy Shop

The Take Time To Create Crafting Blog Pinterest Board

Visit my Pinterest Board

Other Ways To Follow


The Take Time To Create Crafting Blog Instagram

Follow me on Instagram

The Take Time To Create Crafting Blog Twitter Feed

Follow me on Twitter

The Take Time To Create Crafting Blog Email

Send Me an Email

DIY Ornaments from Magic Towels!

Hello Everyone! With the holidays right around the corner it is time to start thinking about decorating. And since we are on a crafting blog, this post is about DIY Ornaments. This is an easy project that takes magic towels and turns them into ornaments and it is fun to do with the kids. 

DIY Ornaments - Dory

My Finished Dory DIY Ornament

I hope you had a wonderful relaxing Thanksgiving holiday. We had a great time, we went to Florida for the week and it was perfect. Stay tuned, I will do a travel journal about the resort we stayed at.

With Christmas right around the corner I thought I would start doing some holiday crafts and today’s is a DIY ornament.

Materials for your DIY Ornaments:

  • Magic Towels (I used a Dory one and an Avengers one, and I got both from the dollar store)
DIY Ornaments - Magic Towel

We start with a simple magic towel.

  • Ribbon
  • Stuffing
  • Hot glue gun and glue sticks

Instructions:

Cut around the shape that you want to make into an ornament. And cut out that same shape in a plain colored wash cloth.


Cut out magic towel

Next, we cut out the parts we want to turn into ornaments.

Then you start gluing. Glue the pom-pom ribbon ) around the edge and then glue the black ribbon to the top.  I used hot glue for all my gluing, but if you are doing this with kids then you might wan to use fabric glue. You can also sew these together, but me and my sewing machine are not getting along right now, so my hot glue gun came to the rescue.

Then glue the plain wash cloth to the back, but make sure you leave a little gap so you can add stuffing. Add a little stuffing and glue the gap closed.

The ornament's backing

Then, add ribbon and glue together.


And that is it. These are great for kids and easy to do. Kids will like having their favorite characters on the tree.

Avengers ornaments

Here are the finished ornaments.

This post DIY Ornaments from Magic Towels appeared first on Take Time To Create


Subscribe via WordPress


The Take Time To Create Crafting Blog RSS Feed

Subscribe via Email

Enter your email address to subscribe to this blog and receive notifications of new posts by email.


Other Ways To Follow


The Take Time To Create Crafting Blog RSS Feed

Subscribe to my RSS feed

The Take Time to Create Crafting Blog Facebook Page

Follow me as Facebook

The Take Time to Create Crafting Blog Etsy Shop

Check out my my Etsy Shop

The Take Time To Create Crafting Blog Pinterest Board

Visit my Pinterest Board

Other Ways To Follow


The Take Time To Create Crafting Blog Instagram

Follow me on Instagram

The Take Time To Create Crafting Blog Twitter Feed

Follow me on Twitter

The Take Time To Create Crafting Blog Email

Send Me an Email


« Older posts Newer posts »

© 2024 Take Time To Create

Theme by Anders NorenUp ↑

Follow

Get the latest posts delivered to your mailbox:

%d bloggers like this: