Category: Uncategorized (page 1 of 2)

Wedgwood Inspired Heels

So I was wandering around on Pinterest and I found some wonderful vintage pumps with Wedgwood designs on them! so beautiful! I knew that I had to recreate them with items I had on hand.

These were reality simple to create. I used a silicon mold from Prima Marketing to create the rose motif. 

vintage wedgwood inspired pumps

vintage Wedgwood inspired pumps

After I created the roses I used Arteza metallic paints and then adhered them with E6000. Not too difficult, and the end result is awesome. 

vintage wedgwood inspired pumps

vintage Wedgwood inspired pumps

Now that I figured out how to create these shoes I have a feeling I will be adding things to all my shoes! Check out the video above for all the details on how to create these shoes!

Affiliate Links
Silicone mould (similar) https://amzn.to/324VuV5
hot glue https://amzn.to/324VQeh
arteza metallic https://amzn.to/2NsyOsC
White gesso https://amzn.to/2PzPiSj
E6000 https://amzn.to/36oMMEe
Painters tape https://amzn.to/2q73yqY
Nude Pumps https://amzn.to/2JE7pCH


Hibiscus Flower Fabric Mixed Media

Hello Everyone!

I have another fabric mixed media for you today. I am feeling like I need some spring, so I created this hibiscus flower fabric mixed media canvas. 

It was so good to get back into my fabric mixed medias and this one turned out great. 

I just used pink and green fabric as my base, this canvas didn’t need a lot of fabric colors to make it work. 

Hibiscus Flower Fabric Mixed Media

The bold flower in the center works great with the green background. And the gold beads in the center off set the flower perfectly.


Hibiscus Flower Fabric Mixed Media

I love all the texture and interest you get when using fabric. It makes the flower come alive.

Hibiscus Flower Fabric Mixed Media

If you want to recreate this canvas here is the photo I used as my reference, you are able to use it as a reference photo only. 

Hibiscus reference photo copy write Take Time To Create, LLC
Hibiscus reference photo copy write Take Time To Create, LLC.
Subject to terms and conditions of reference photos.

This has gotten me inspired to create new canvases, I can’t wait to show you what I decide to do next!

Affiliate links:

Liquitex black paint- https://amzn.to/2IpHGiz
Liquitex gloss gel https://amzn.to/2Z84W9M
Liquitex heavy gloss gel https://amzn.to/2ID2ti2
10 x 10 canvas- https://amzn.to/2GfGISq
palette knife https://amzn.to/2V2QVed
Folk Art Metallic https://amzn.to/2V7Cq8Y
Finnabair brushes https://amzn.to/2IzGFUo

The post Hibiscus Flower Fabric Mixed Media appeared first on Take Time To Create.

How to Start a Blank Art Journal Page

Hello Everyone!

Have you ever just looked at a blank piece of paper trying to figure out what to paint or draw.

Don’t worry this happens to all of us. When I start having trouble figuring out what to do I tend to do one of these 5 way to start a page.

Some of the pages I took pages from books and tissue paper and used a gel medium to adhere them down.

How to start a blank journal page

Other pages I just painted different texture and stenciled on. 

The whole idea is to just start, once you start then it is easier to be creative. Even if you don’t love the final page it is still a good exercise to get the creative juices flowing. 

How to start a blank journal page

How to start a blank journal page

I had a good time filming how I start a blank page. I think I will continue this series and show you how I start a page with with watercolors and markers and other art supplies. 

What art supplies would you like to see me use next time when I film how I start a blank art journal page?

The post How to Start a Blank Art Journal Page appeared first on Take Time to Create. 

Christmas Craft Project

Santa Mixed Media Canvas

Christmas is almost here, and this Santa mixed media canvas is perfect for your holiday decor.

Hello Everyone!

Lately I have been inspired to make mixed media canvases, and with Christmas fast approaching I have the perfect subject for my art.

I had this beautiful paper and glittery star that became the focal point, the rest was just details.

Now I will be honest, I didn’t take any pictures of me actually doing the mixed media, but I think I can explain well enough and as always please ask if you have questions.

I really enjoy making mixed media canvases, all inspired by Finnabair.

Materials:

  • 12x 12 canvas (I got mine at Michaels, but you can always get one on Amazon here: Canvas)
  • Paper (I don’t remember where I got this beautiful paper by KaiserCraft, St Nicholas Collection, Papa Noel,  but you can find great paper just about anywhere)
  • Large star (I found mine at the Dollar Store. It was just so beautiful that I couldn’t pass it up. )
  • Large letter, glitter, beads, and other do-dads, stickles, acrylic paint, stencil
  • Mod Podge, modeling paste, Mica Powder, clear gesso, clear spray sealer

Instructions:

Trim your paper to fit your canvas and spread Mod Podge on the canvas.  Place your paper on the canvas, smooth out. I turned my canvas over and let it dry overnight.

santa on canvas

Starting with santa paper on canvas

The next day I covered my paper with clear gesso to give it some tooth. Then I applied modeling paste with a swirl stencil to add some detail (you can’t really see it, but it is there.)

Then I sprinkled on mica powered and spread it around.  (I am in love with these Prima Marketing mica Powders. You can find the colors I used here: Gold, Copper, Pale Silver)

mica Powders

I am in love with these Prima Marketing mica Powders

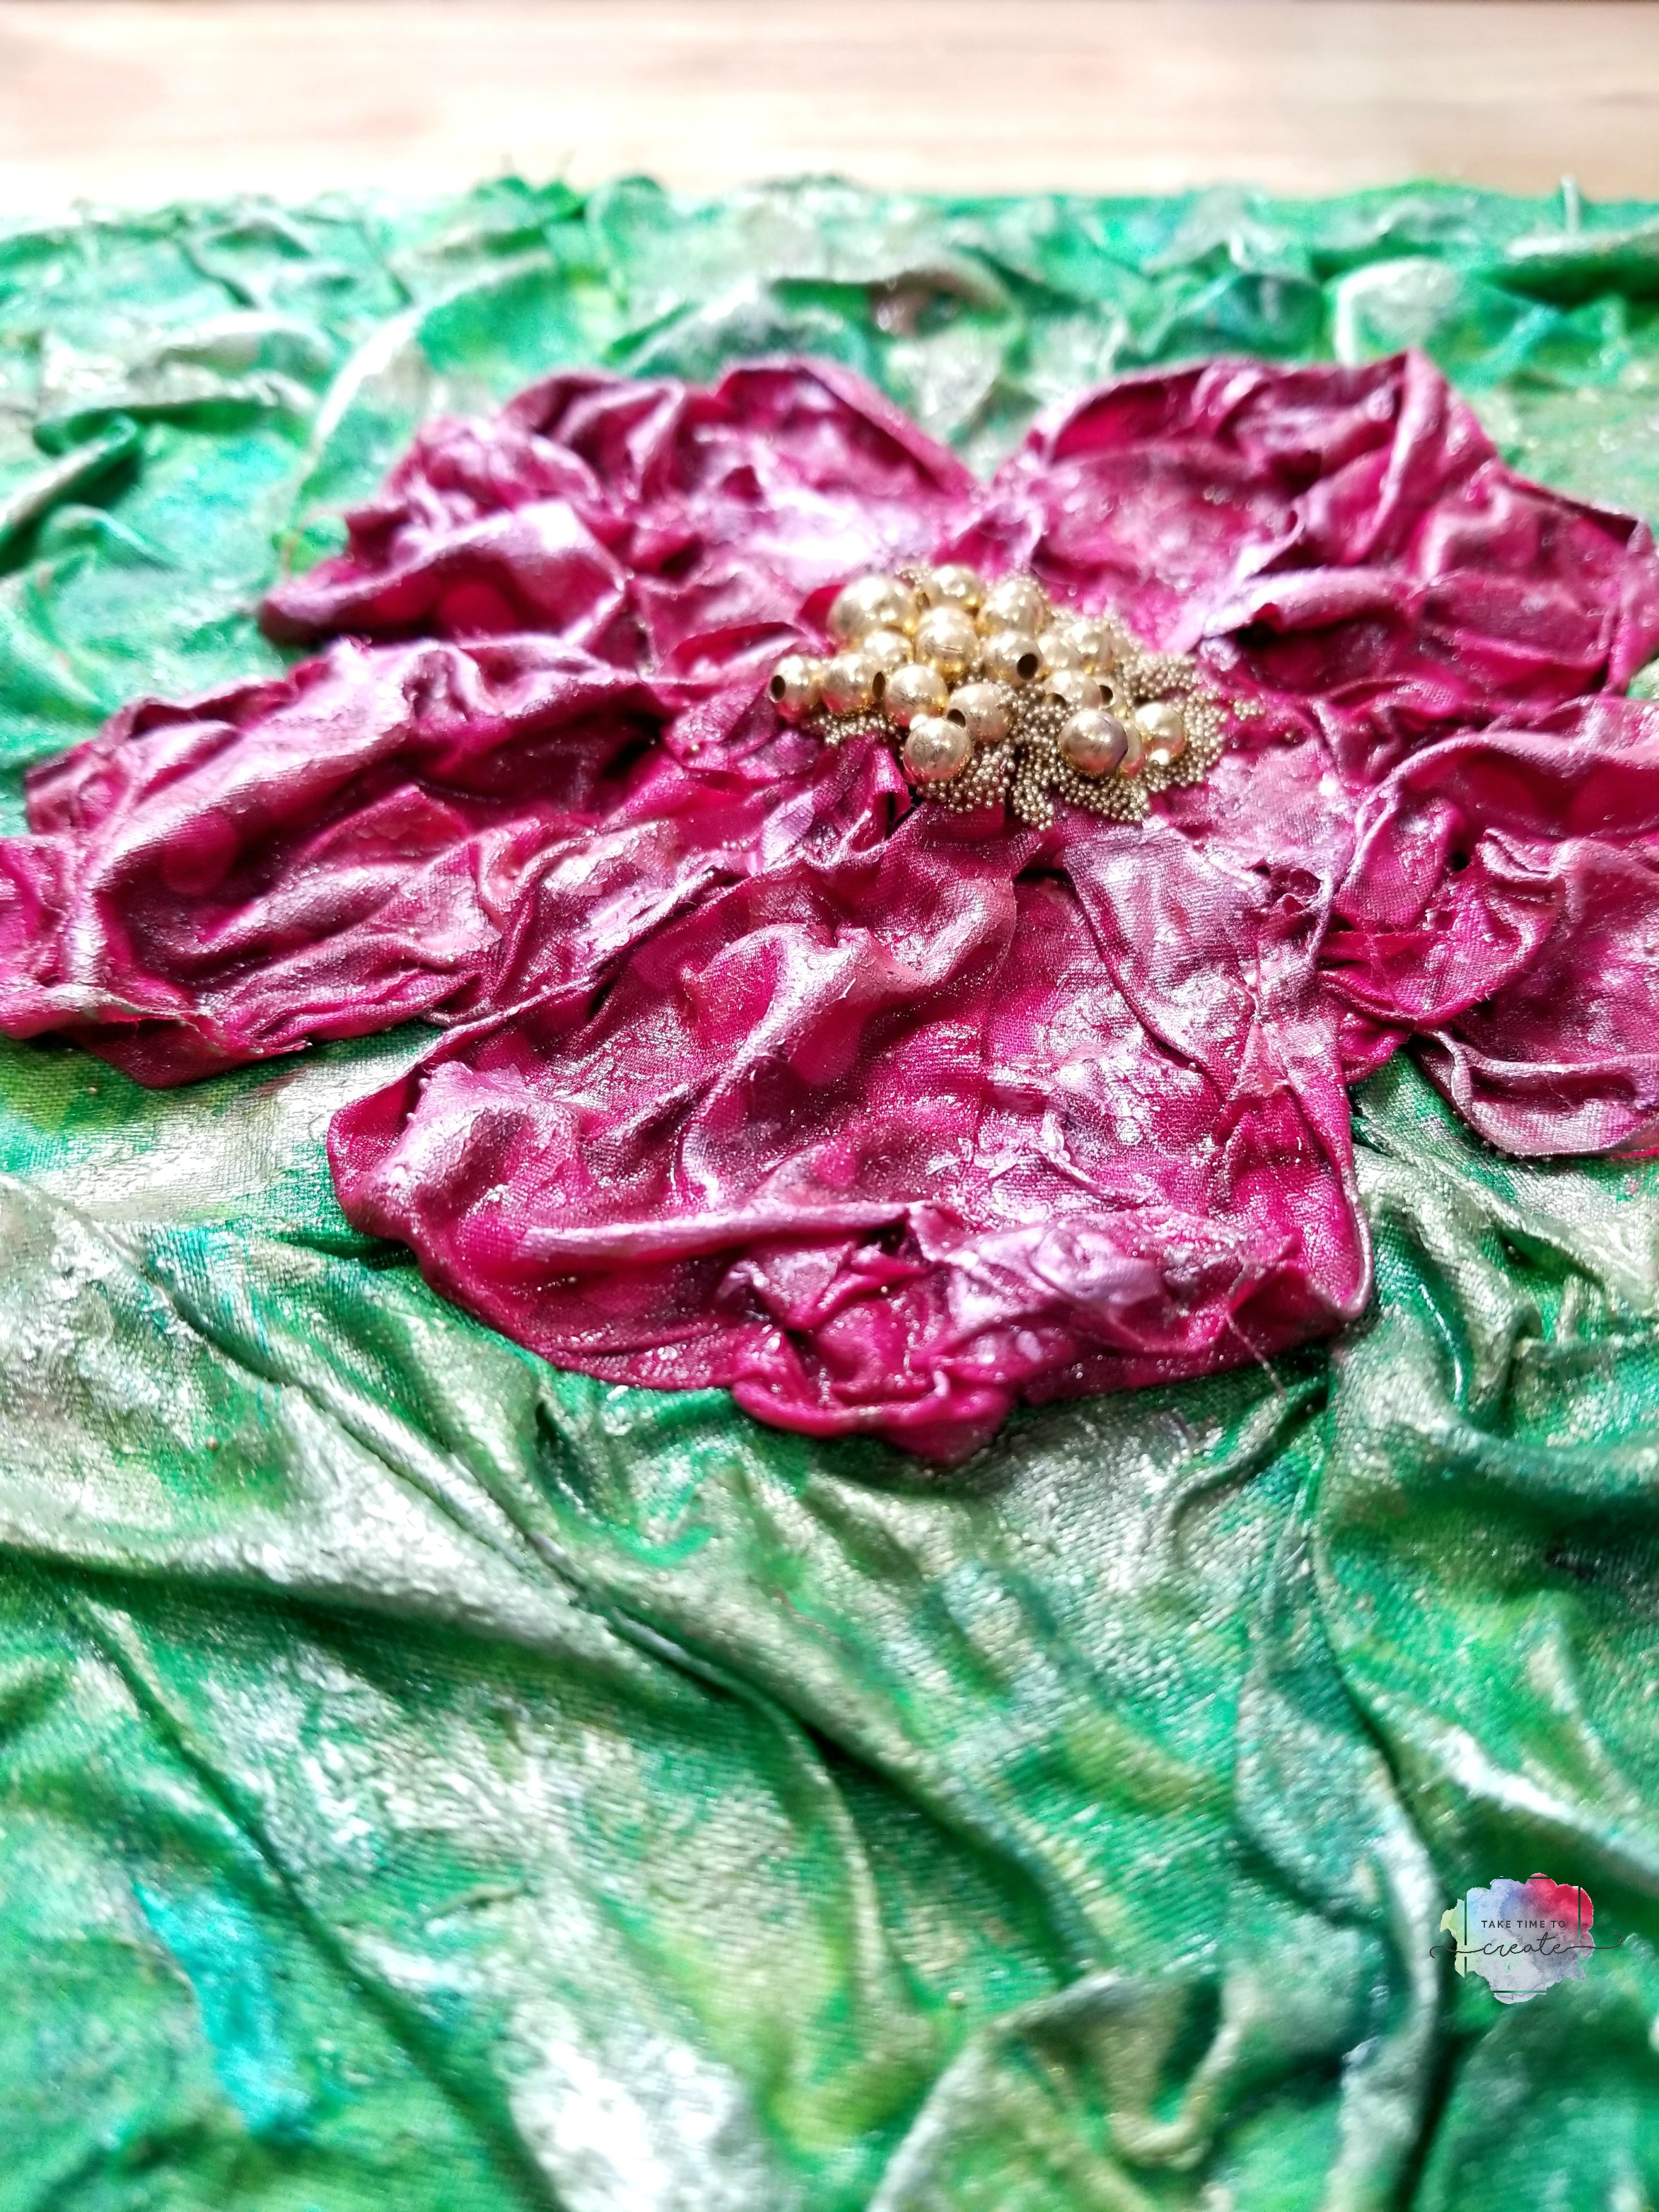
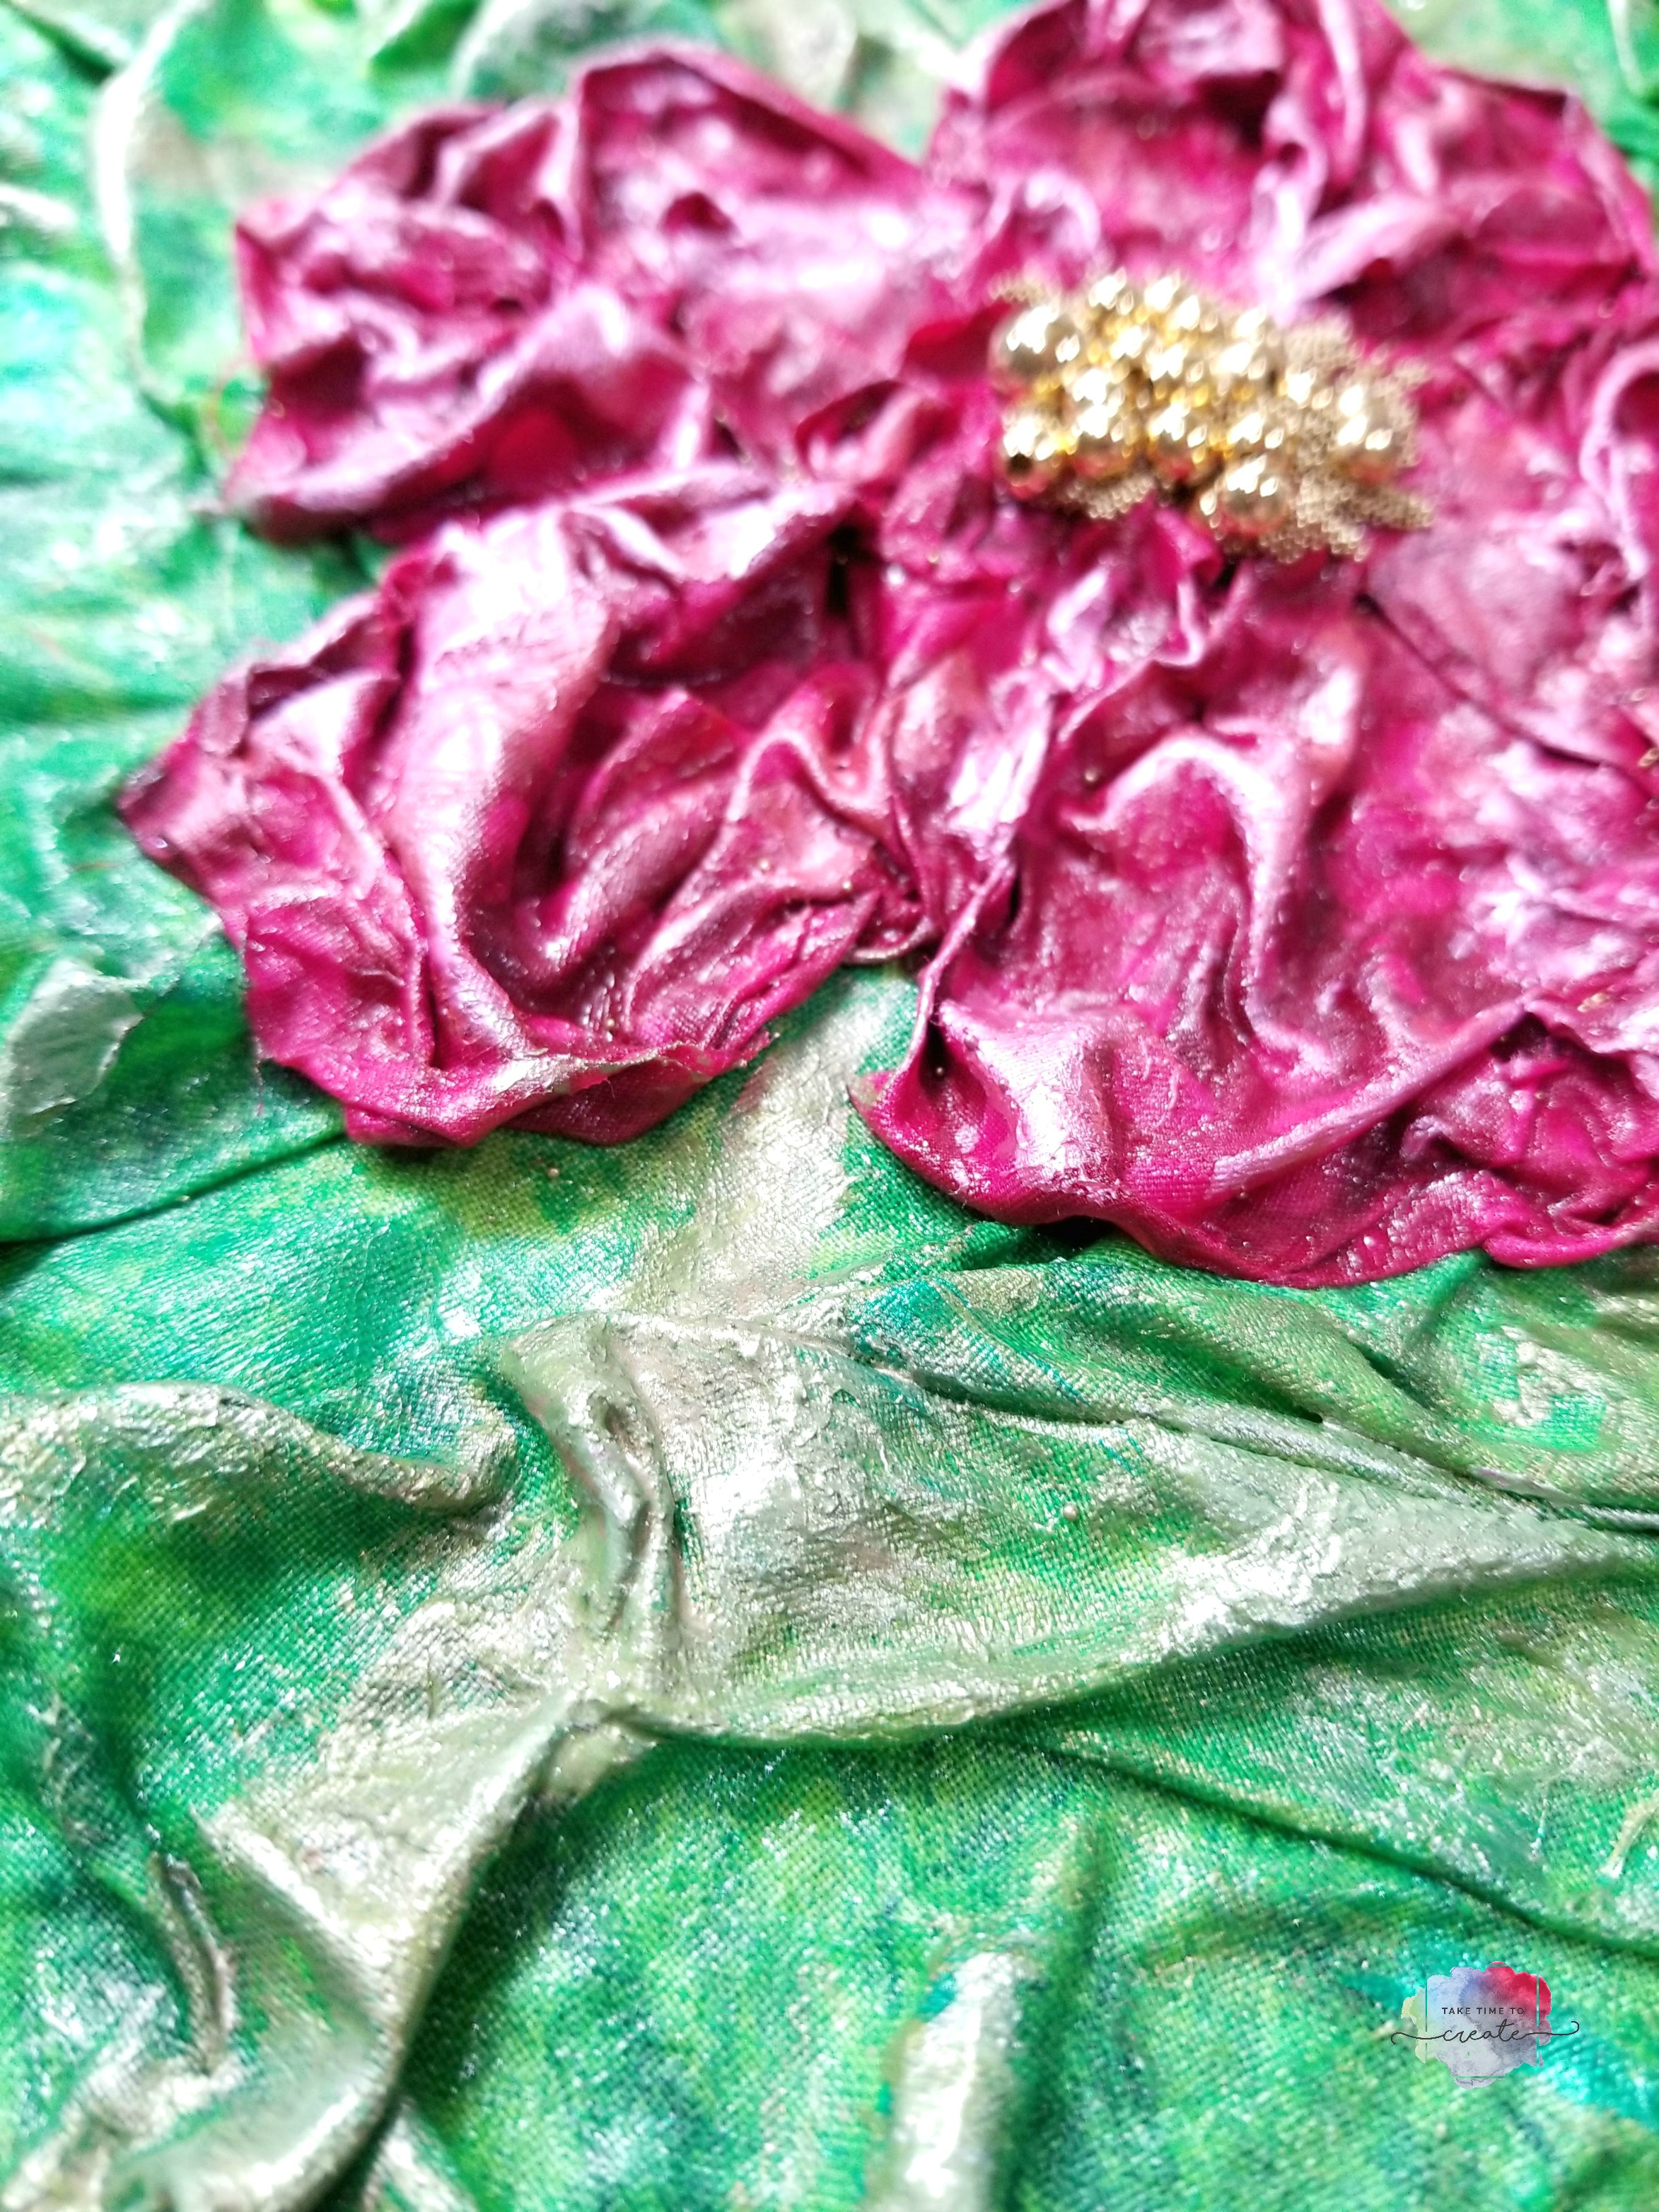
Once that was all dry I went to town. I added modeling paste to the star and glued it to the center.

I highlighted the stencil with painted and I painted around the edges with a shimmery white color.

Then I added the letters (they were pink, but I painted them and added glitter)

I added the large gems and small beads and micro beads with globs of modeling paste. Then I poured on lots of glitter to stick the the modeling paste (I figured that Christmas decor needs a lot of glitter)

santa mixed media canvis

Our santa mixed media canvis is coming together

I added rows of pearl beads, and key metal elements, and I added stick details to the star. Once everything is dry I sprayed it with a clear sealer, the mica powder is not adhered to anything and it will wipe away, so the sealer is necessary.

Christmas star close-up

a close-up of our Christmas star

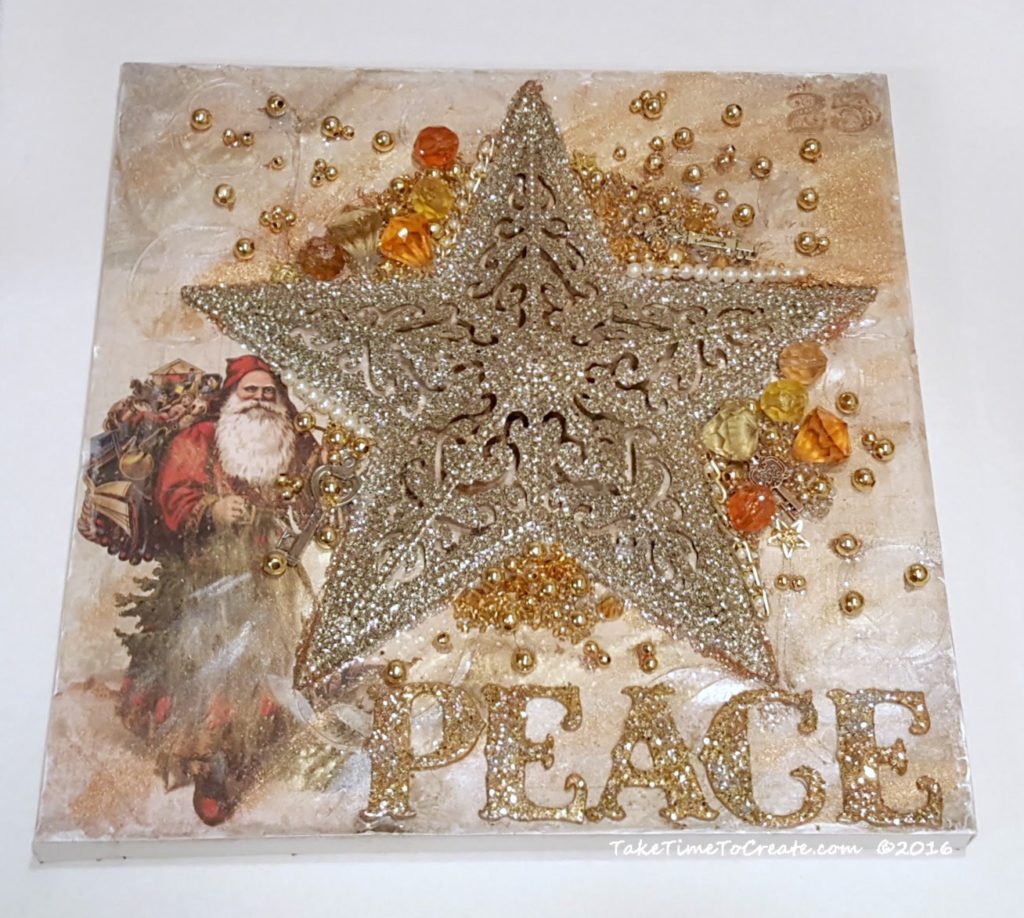
I really like how this turned out. I think it is an interesting piece.

Christmas star

Close-up of our Christmas star

santa mixed media canvas

finished santa mixed media canvas

What holiday should I make a mixed media for next? New Years? Easter? Valentine Day?

This post Santa Mixed Media Canvas appeared first on Take Time To Create


If you enjoyed this post, make sure you Follow Take Time To Create so you don’t miss out on other great posts.

Follow Take Time To Create on WordPress.com


This post contains affiliate links

DIY Star Wars No Sew Tablet Cover

Hello Everyone!

Have you ever wandered around a fabric store and see some fabric that just jumps out at you and demands that you buy it? No, is that just me?

Well that is what happened with this Star Wars fabric, it demanded to go home with me and to be made into something awesome. I think I did the fabric justice by making a no sew tablet cover.

DIY Star Wars No Sew Tablet Cover

Materials:

~ Fabric I used this awesome Darth Vader fabric for the outside and I used sweatshirt fabric for the inside to help protect my tablet and provide a little cushion

~ Ribbon

~ Hot Glue and Velcro

Instructions:

~ I laid out the 2 fabrics with wrong sides together and cut out how much I needed. There wasn’t any measuring just make sure you have a little room on the sides and enough on the length to create a flap. I left a little extra on the side (but not too much) so I had somewhere to put my stylus pen.DIY Star Wars No Sew Tablet Cover

~ Hot glue the fabric together around the edges. I did a little at a time and used a popsicle stick to help smooth out the edges with out burning my fingers.

DIY Star Wars No Sew Tablet Cover

~Once you have the edges glued then fold up the fabric, make sure you have your tablet to measure what you want the pocket to end. Then glue the edges together.

DIY Star Wars No Sew Tablet Cover

~ Then hot glue ribbon around the edges. My ribbon was not wide enough to wrap around the edge of the fabric so I glue some on the front and the back of the fabric. Glue ribbon every where that you see a raw edge.

DIY Star Wars No Sew Tablet Cover

DIY Star Wars No Sew Tablet Cover

~ Then glue on Velcro to the flap to close your cover and you are done.

DIY Star Wars No Sew Tablet Cover

I am in love with the fabric, I think I need to go back and get more to make a circle skirt.

In a upcoming post I will show you how to make a sew version of a tablet cover.


DIY Star Wars No Sew Tablet Cover

DIY Star Wars No Sew Tablet Cover

DIY Cell Phone Case From Old Tie

Hello Everyone!

I found this fantastic store in town, it is call Who Gives A Scrap. (BTW I love the name!) Anyway, this store is so awesome it has all kinds of craft supply donations that are up for sale. The stock is always changing so you never know what you will find. If you follow me on Instagram you already saw my haul, but this what I scored yesterday for about $25! The item I am most excited about is the bead loom. I have tons of pins on Pinterest for the bead loom and now that I have one I am excited to learn how to use it. Does anyone have any experience or tips on how to use a bead loom? Please share if you do.

So many new things to play with and to use for my crafts and DIY projects. Even our cat, Starlight, approves. haha.

DIY Cell Phone Case From Old Tie


The other day my sister and I were having a Craftersation on Pinterest. (A Craftersation  is a craft conversation between pinners on Pinterest.) She has the best Pinterest boards and I think she has pinned just about everything on the internet, haha. You can follow her here.

Anyway she pinned this really cute cell phone case made from an old tie so I pinned a different version of the same thing. And on it went for while. We have a lot of Craftersations, it is a fun way to stay connected and see what each other is interested in even though we live almost a thousand miles apart.

When I was at Who Gives a Scrap I saw that they had some old ties that would be perfect to make a cell phone case out of. After I got home yesterday I made my version of what I saw on Pinterest.

Here it is all done. I am in love with it!

DIY Cell Phone Case From Old Tie

Materials:

~Old Tie

~ Needle and thread, or sewing machine

~ Button or snap

Instructions:

This is one of the ties that I picked up yesterday. Isn’t it wonderful? I fell in love with it on the spot. For this project the wider the tie the better. Skinny ties from the 80s won’t work, but those ties can be use for different projects.

DIY Cell Phone Case From Old Tie

Next just measure how much space you need for your phone. The pointed part will be the flap, so factor that in. You will have to pick out the stitched that keep the flaps together so you can slide your phone in.

DIY Cell Phone Case From Old Tie

For this step I glued the ends together and the center flap closed using Fabric Fusion. I used clothes pins to hold it together while the glue dried. The glue worked just fine, but when I do this project again I think I will sew it all instead of using glue, I think it will be stronger and it will look better. You can hand stitch or use a machine.


DIY Cell Phone Case From Old Tie      DIY Cell Phone Case From Old Tie

Next I hand stitched on these buttons I had in my stash. They are so cute, I got them from Patterns of Time. They have so many great items on their website, when I ordered last it was hard to narrow down the items in my shopping cart to a reasonable amount, haha.

DIY Cell Phone Case From Old Tie

The case was all complete I thought it was very cute just the way it was but I decided that it should become a purse instead of just a case. This Tie Purse is perfect for me when I go out for an evening and my skirt doesn’t have pockets and I need to carry a phone and my ID and a credit card and some cash, it will all fit into this cute purse.

To add the straps all you do is hand sew the remaining part of the tie onto the sides of the case. And that is it.

DIY Cell Phone Case From Old Tie

Have you made one of these before? I would love to see it if you have. Stay tuned for more projects made from items I got from Who Gives A Scrap, that place rocks!!

DIY Cell Phone Case From Old TieDIY Cell Phone Case From Old Tie

There are no affiliate links in this post. All opinions are my own.

Re-purpose an old window into a shabby chic message board

If you follow my Instagram (taketimetocreate) then I am sure you have already seen the reveal of this repurposed window. For those of you who don’t follow me there here the shabby chic message board!

repurpose window to shabby chic message board

I have to say I do love the way it turned out! This all started when my friend asked me to paint a window for a silent auction for mental health awareness. At first I wasn’t too interested, not because I didn’t believe in the cause (because this is one cause I totally support) it was because I wasn’t sure I had a design that would work. Most everyone else did a more traditional painted window with flowers on the glass and things like that. Well of course I didn’t follow the crowd. So I did my own thing and hopefully it will bring in a lot of money for the charity!

Here is how I did the repurposing.

Materials:
~ old window (for this to work you for magnets you will need one with a metal screen)
~ sandpaper, tape, cleaning supplies
~ paint and brush
~ cork
~ flowers, magnets, tacks, and clothes pins
~ ribbon and burlap

Instructions:
~ The first thing you will need to do is sand down all the rough edges and smooth it out. Once you like the feel of the window then give it a good cleaning.

window

~ Now you are ready to paint. I taped around the edges to help cut down on how much paint went on the screen, and this seemed to help.
Paint a couple coats until you get it to how you like it. I used this white acrylic paint that I had on hand.

white acrylic paint

~ Cut your cork down to size and glue it on to the screen. I just glued the edges with a metal glue and that seems to hold it pretty well.

add cork to window

~Then I went to work decorating the edge. Shabby chic is all about layers so that is what I did. I put down a layer of burlap, the layered on a layer of crochet ribbon that I had in my stash.

add ribbon and burlap

That looked good, but I felt like it was missing something, so I added a ribbon on top and flowers in the corners.

add more ribbon

Then I added ribbon to the bottom of the screen and to the bottom of the window. Once that was done it was time to add the flower decorations.

~ For the flowers add a magnet the back of some and tack to the others. For the clothes pins I just added ribbon to a plain clothes pin I got from the dollar store.

glue magnets to flowers

And that is it. This is a very fun project that is easy to do and I loved using what I had on hand. I can’t wait for the auction and hopefully they will make a lot of money for their cause!

repurpose window to shabby chic message board

DIY Rhinestone Clutch

Hello Everyone!

DIY Rhinestone Clutch

I just had to make this clutch all because of this fantastic pair of shoes! (I think all great stories start with shoes)


Anyway, here is the story, my cousin is getting married on Sat (YAY) I am so happy for him. (His bride-to-be is wonderful and I think they will be very happy together. )

And since I have these great shoes that I never get to wear (they are a little impractical for work, haha) I decided to wear them to the wedding. Buuuut, I didn’t have a clutch to match. So I decided to make one.

DIY Rhinestone Clutch

Aren’t these shoes great?

Anyway here is how to make this DIY Rhinestone Clutch.

Material:

~ Fabric (I am using a faux leather that I had in my craft room, but any fabric that is slightly stiff will work. I did not line it, but you can if your fabric is not stiff enough)

~ zipper (I am using a plastic zipper that I had laying around, it is not the perfect red, but I think it works)

~ Sewing Machine, or needle and thread

~ Rhinestone and glue (I used Aleene’s jewel it glue)

~ Decoration for zipper if desired


Instructions:

~ First cut your clutch. I cut 2 pieces that were 10 inches x 6 inches. (this was big enough to put my lipstick, phone, gum, and blotting papers in)

DIY Rhinestone Clutch

~ Once your fabric is cut them measure your zipper. If it is too long then measure how long you want it, then place a few stitches there. Once it is secure then cut off the excess.

DIY Rhinestone Clutch

~ Next is place the fabric on the zipper and sew the fabric on the zipper. I held it together with tape since I didn’t want puncture holes in it from needles.

DIY Rhinestone Clutch

~ Do this step to both sides of the zipper

DIY Rhinestone Clutch


~ Turn your work so that right sides are together and stitch around the edges. Make sure you leave the zipper open so you can get your hand in to turn your work right side out.

DIY Rhinestone Clutch

~Once you have stitched all 3 sides turn your work right side out and there you have a really cute new clutch!

DIY Rhinestone Clutch

~ Ok by now you all know me well enough that you know I can leave anything that plain. I just knew it needed rhinestones. So I placed dots of glue in a swirl type pattern all over the clutch. Then I decided that wasn’t quite enough Smile so I added to wonderful broach that my mom gave me, with a little ribbon, I thought it was the perfect accent to the clutch.


DIY Rhinestone Clutch

There you have it. What do you think? Pretty easy right. Now on the the wedding celebration on Sat.

DIY Rhinestone Clutch

Happy New Year!

Happy New Year!

New Years Day is always a fun one for me. Not only is it a start to a new year, but it is my birthday. I find it is nice to reflect on the year that has passed, but it is fun to wonder and speculate about the upcoming year.

This blog has been so much fun and I can’t wait to see where it goes next year! You guys are the best, I thoroughly enjoy all the comments and suggestions you give me. You guys make me want to create more, you inspire me.

I have big plans for the blog this year. I want to do 2 projects a week (ambitious I know, but I think I can make it happen most of the time) and I will feature new and old products so you guys can see what I use and what is out there for your projects.

It is going to be a fun year and I am excited that you will make the journey with me.

Linda

Here is a sneak peak of next week’s projects. I wore this outfit for my birthday dinner with my hubby. I am wearing an altered necklace and I added lace to my shirt. I will show you how next week.

20160101_150243

DIY Shirt and altered necklace

20160101_150441

DIY Shirt and altered necklace

DIY Shirt and altered necklace


Continue reading

Super Sparkly Rhinestone DIY Beats Headphones

I am a firm believer that you can never have too much glitter and rhinestones! That being said, I thought I would fix my boring Beats headphones by adding rhinestones. Now they are acceptable to wear out in public 🙂 (You can see that even my sunglasses have rhinestones on them.)20150630_131118

A few weekends ago I went to Estes Park, CO with a few of my girlfriends. If you have never been there, you are missing out, it is one of the most beautiful towns in Colorado. During our girls weekend in between laughing, taking naps, visiting, watching movies, and catching up we spend our time doing crafts. Some scrapbook, some crochet and other just do general crafts. this year I decided to make my headphones sparkle. This is very easy to do, you just have to have patience.

All you need for materials are:

  1. Rhinestones. I used 5mm rhinestones purchased from Amazon
  2. E6000 (any glue that stick to plastic will work)
  3. headphones
  4. Sandpaper
  5. Syringe to help apply the glue. I purchased mine from Amazon
  6. Styrofoam head to help hold the headphone. This is not necessary, but I finds that is helps.
  7. Wax stick for picking up the rhinestones. I purchased mine from Amazon

Steps:

  1. Lightly sand the headphone. This is just to rough up the surface do that the glue will adhere better
  2. Clean the headphones. This is get all the dust off and get them ready for gluing.
  3. Lay out your pattern. I decided on a ombre look, but do what makes you happy. You can’t see it too well in the photos, but I promise is ombre and it looks pretty cool, if I do say so 😉

    20150619_212833

    My ombre pattern

    4. Put your headphones on the Styrofoam head and get ready for gluing!

20150619_161909

5. Start gluing! I found these terrific syringes that really help with the application of the glue. All you do is put some glue in the syringe and then you put a few dots of glue on the headphones.Take your wax applicator to pick up the rhinestone and place it in the glue. Easy as that.

20150619_161936

6. Keep going until you are done. Let it dry over night then you are ready to rock out to your new headphones!

20150620_153816

20150619_161915

20150630_131047

20150630_131125

« Older posts

© 2024 Take Time To Create

Theme by Anders NorenUp ↑

Follow

Get the latest posts delivered to your mailbox:

%d bloggers like this: