Tag: update (page 3 of 4)

Imagine Embroidered Garland

Hello Everyone!

Do you feel like your creative space is always neglected, like it is a just a cluttered room that has no real style? I do, all the time. I go and work in my craft room and then leave. There is constant disorganization and no real style in my room.

So, I decided to make this embroidered garland to hang over my window. (I am not showing you my window because I don’t even have a window treatment covering it, just a Transformers sheet that was my son’s. Pretty sad, right?) I am putting the skills I learned in my embroidery class to good use.

Imagine embroidery garland bunting


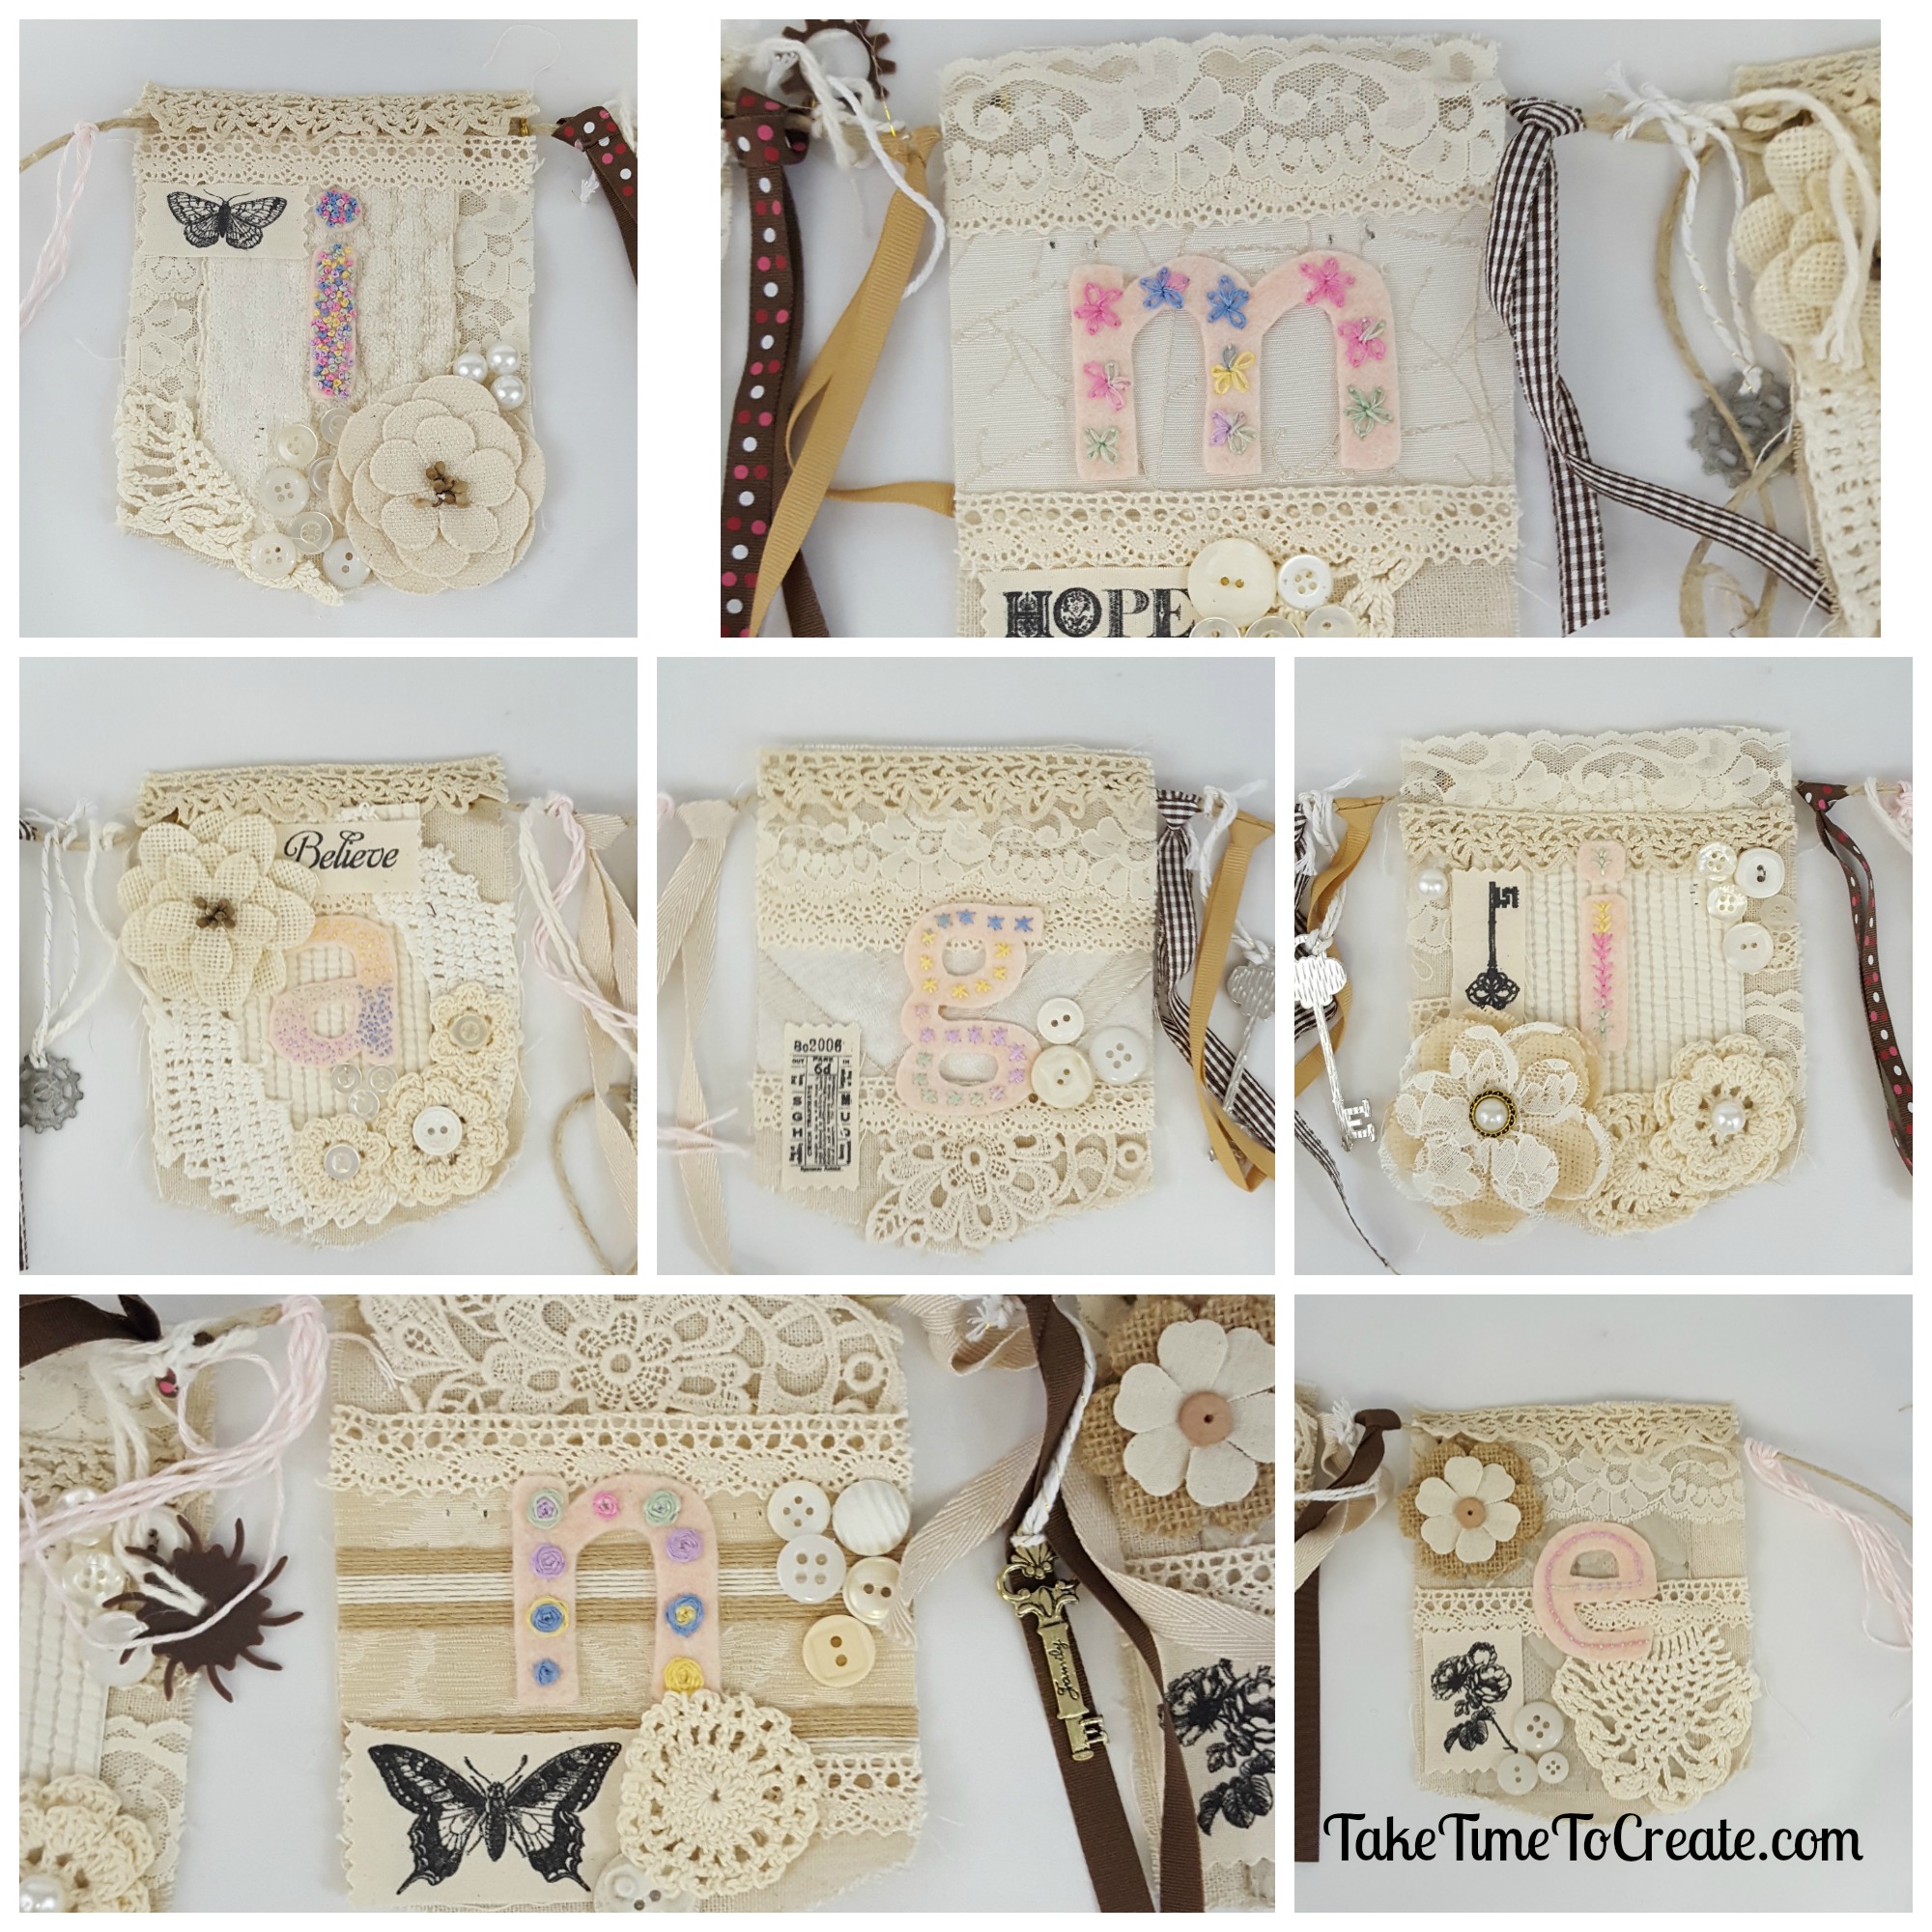
The first thing I did was cut out my word out of felted wool. (I found a font I liked and printed the word I wanted to embroider). Then I did a different embroidery stitch on each letter. I really liked how it was all a little different, yet unified.

Imagine embroidery garland bunting

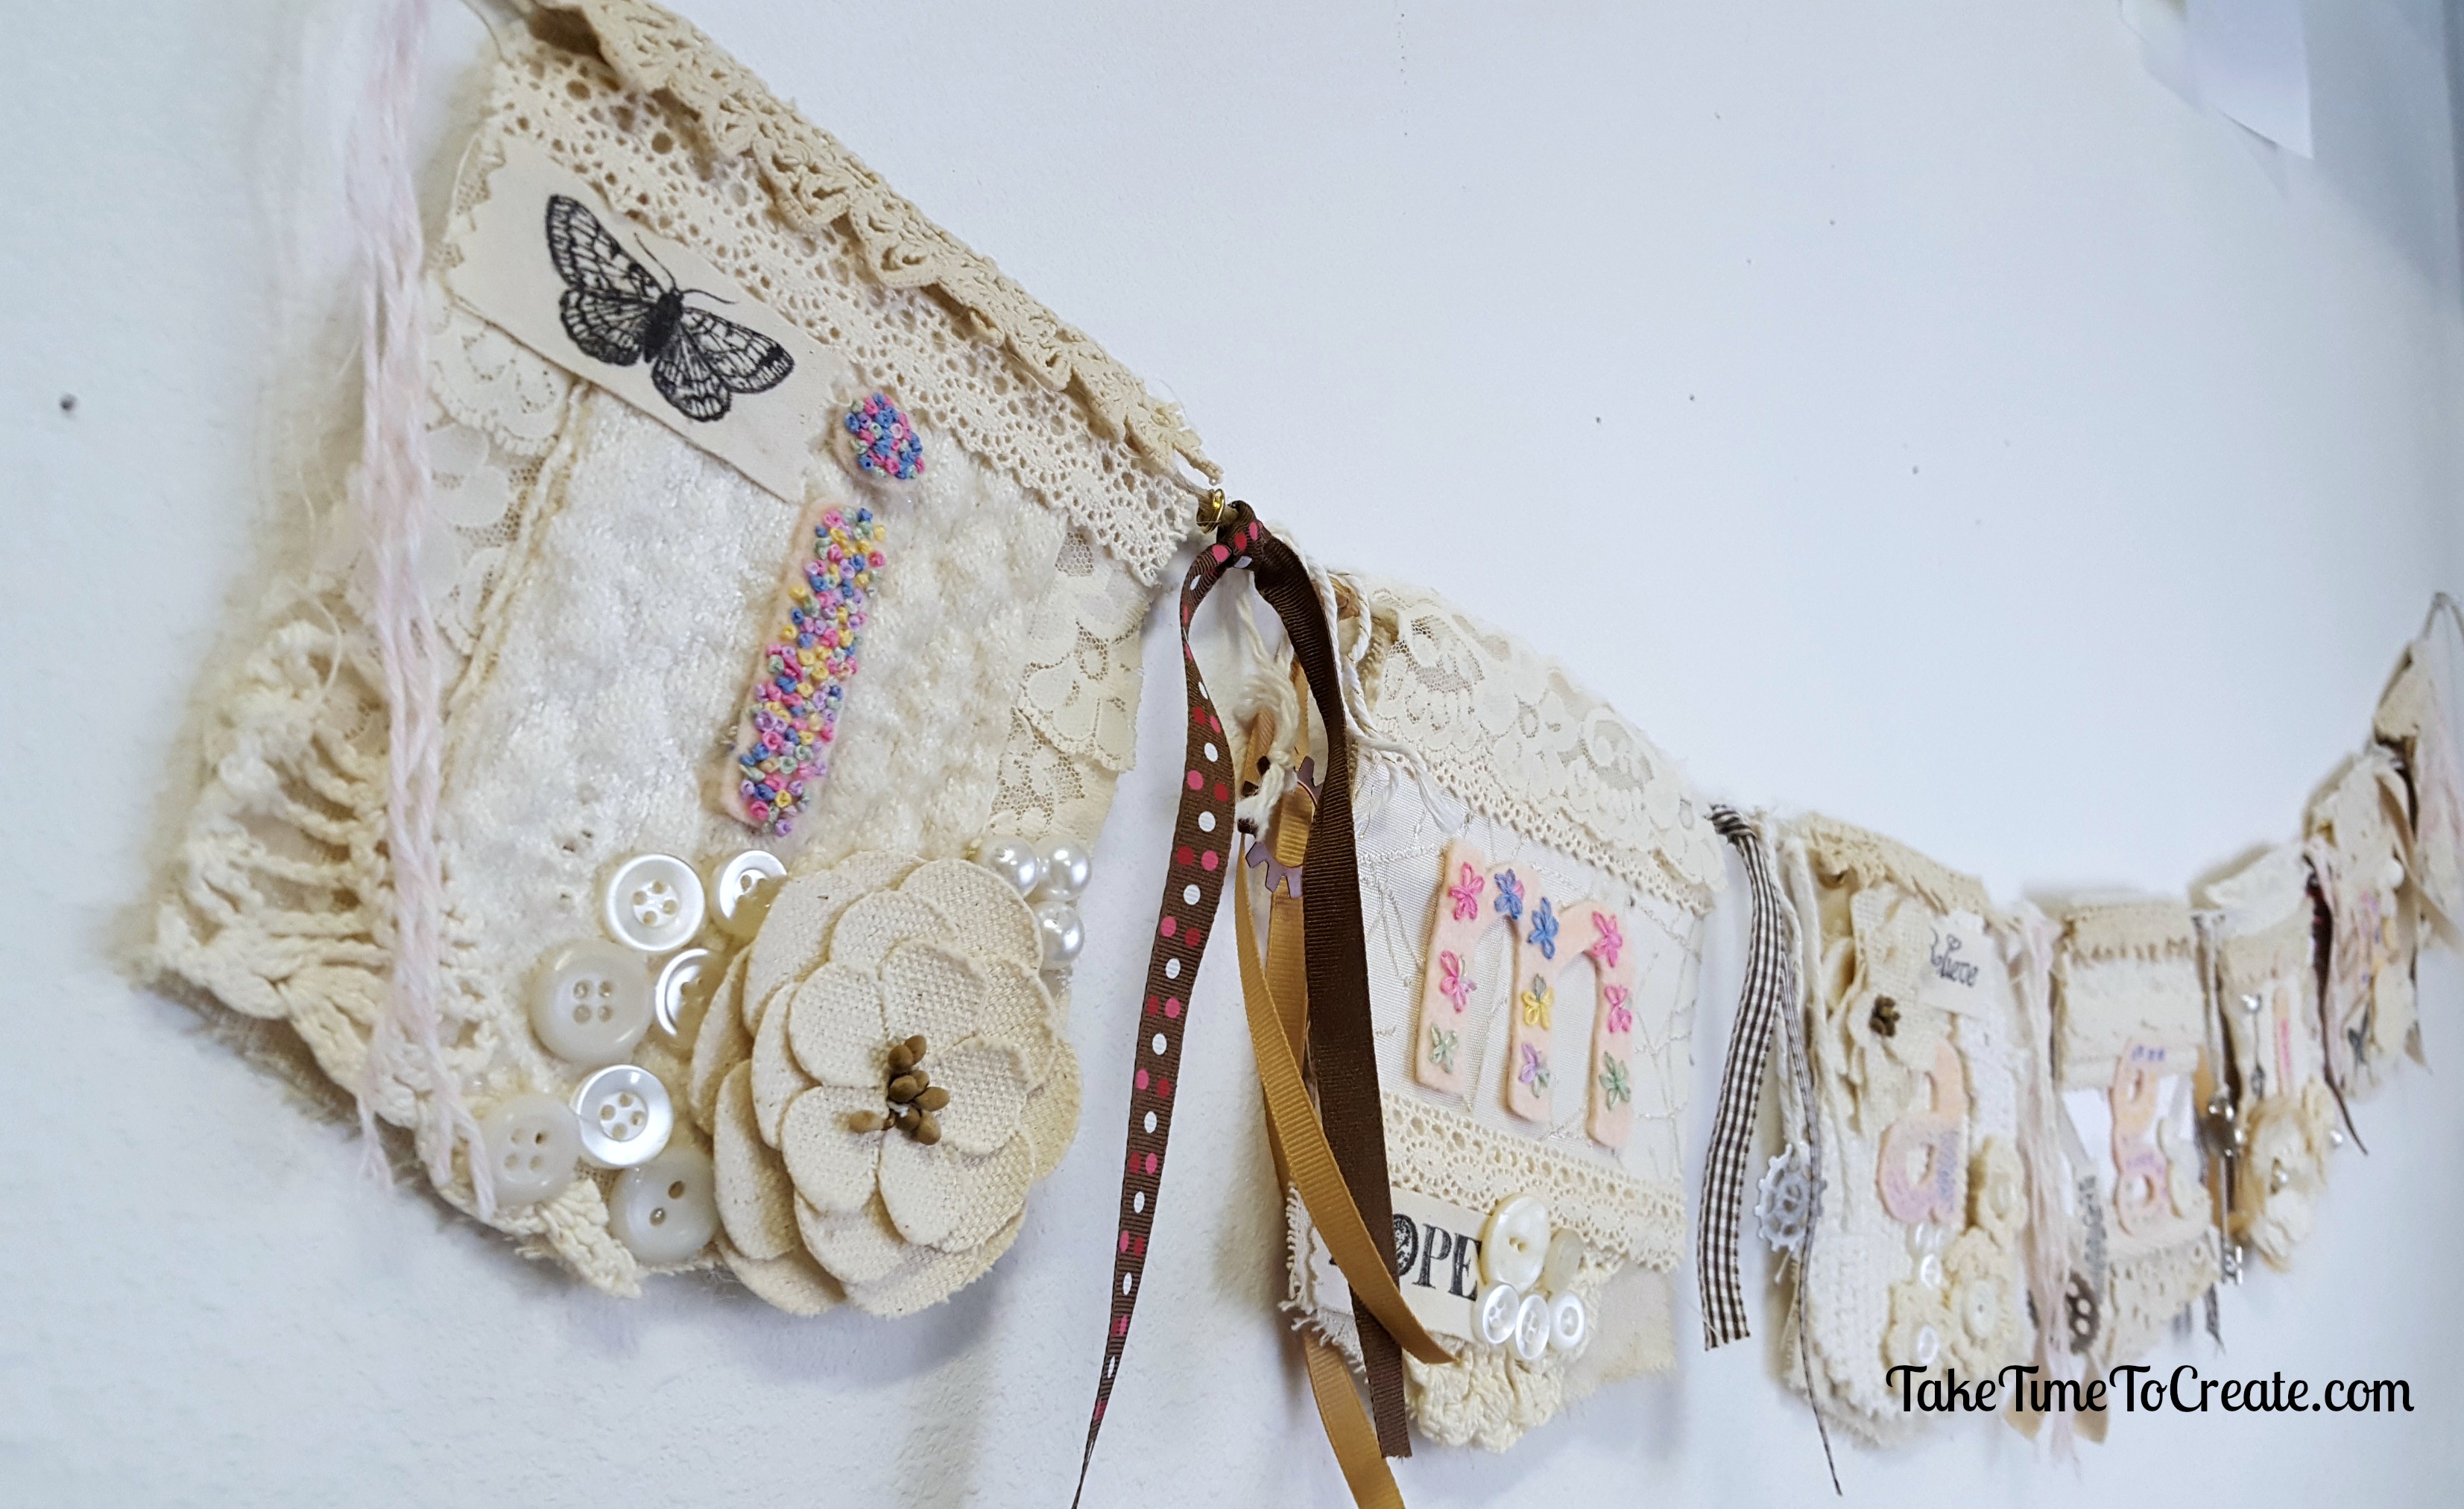
Then I started adding ribbon and lace and bits and bobs to a piece of burlap. I was going for a shabby chic look, that was monochromatic, and I think I came pretty close. Hot glue is your friend in this step, everything is hot glued down.

Imagine embroidery garland bunting

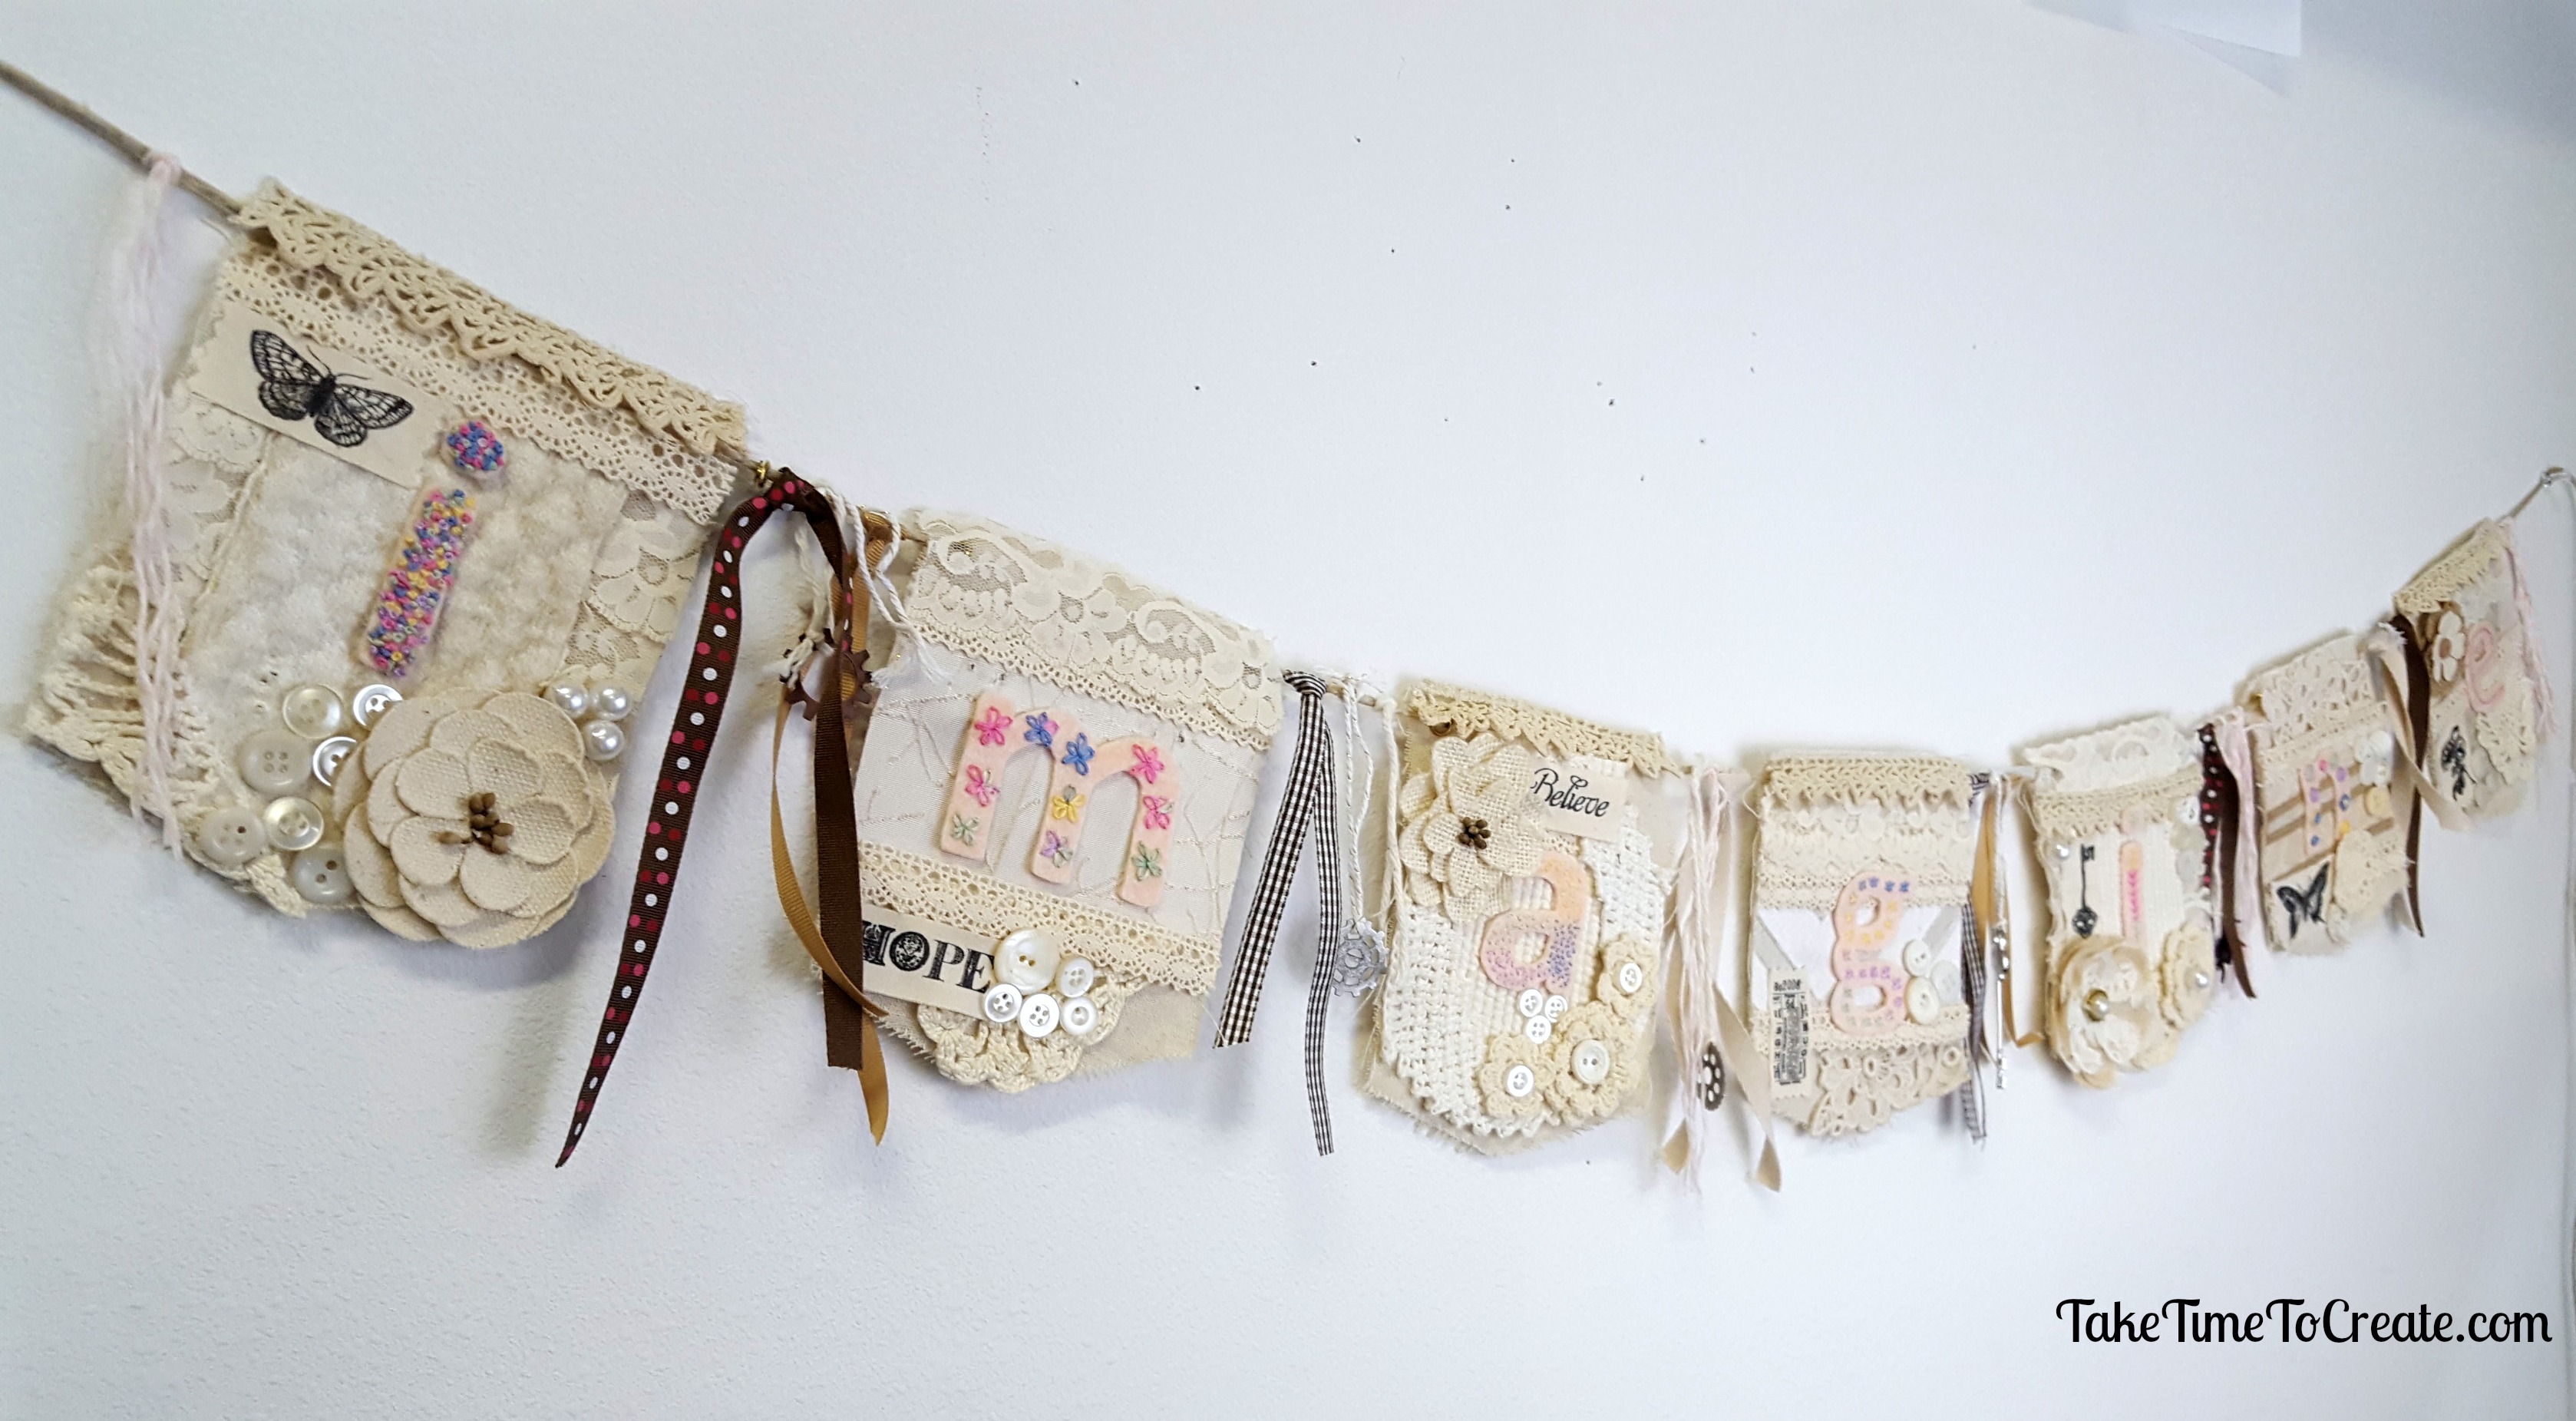
Next I added all the words to a string, leaving space between each letter. In the space I added ribbon, and charms and anything else I could find. I think it turned out really cute, perfect for the blank, boring spot above my window.


Imagine embroidery garland bunting

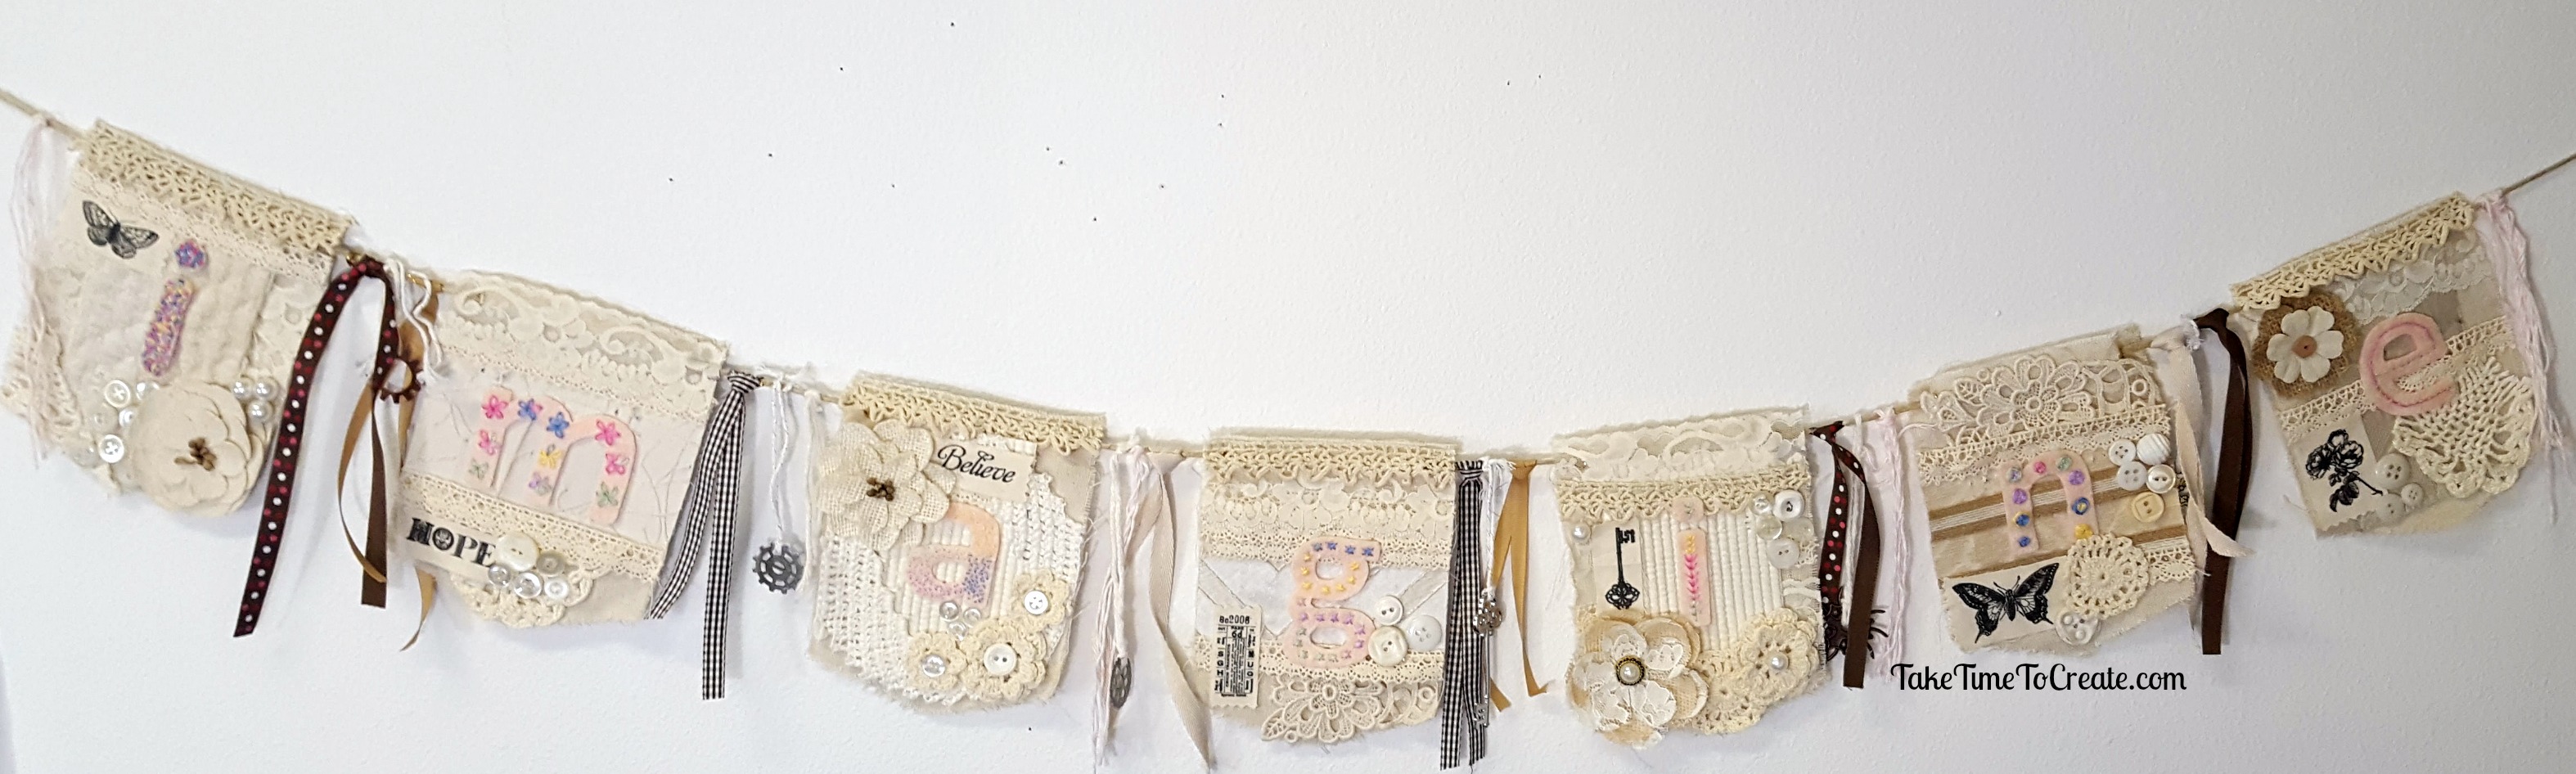
Here is a close up of all the letters. Each letter is a little different, but similar enough to belong together.

Imagine embroidery garland bunting

I am in love with this embroidered garland, and it is the perfect start to decorating my craft room. I am looking forward to creating not only a creative, crafty space, but a welcoming one as well.

Imagine embroidery garland bunting

The post Imagine Embroidered Garland appeared first on Take Time To Create.

Metallic Mixed Media Box

Metallic Mixed Media Box

A mixed media box is great for storage and display. Using basic mixed media techniques you can have a beautiful and useful box.

Hello Everyone!

In case you missed my class at my local creative reuse center, Who Gives a Scrap, I thought I would share with you one of the project I did. It was a beginning mixed media class that was tons of fun to teach and the participants were awesome! I loved seeing the creativity and individually of all the projects.

mixed media box

One of the challenges of teaching at a creative reuse center is trying to use items that you can find, which makes a mixed media project perfect. I prepped my box ahead of the class, but I used items that I found there. The sky is the limit with a box like this.

mixed media box

The first thing I did is find a small canvas for everyone to work with. I found these boxes that had old film canisters in it, these came from a university that was just going to throw them away. I am glad that that they didn’t pitch them. The box is about 6×6 and is a perfect size for beginners to work on, not to big to be intimidating, but not too small to be frustrating.

For the background I took tissue paper from old patters (I must really love old patterns I seem to use them all the time, lol. You can see the rose I made for my mom here: Tissue Paper Rose). I used Mod Podge and crinkled everything up and glued it down. Once it is all dry cover the background with black gesso.
mixed media box

Then I found buttons, and beads, and a knob that I really liked. So I hot glued it all the the box. You could use a gel to glue it down, but I wanted it to dry fast so I used hot glue.  Once I got it all down I painted clear gesso over everything so I could paint the smooth surfaces.
mixed media box

I love metallic paints! I used them all the time. For this project I just dry brushed the metallic paints on, highlighting the peaks and the valleys stayed black. If you don’t gesso then the paint won’t stick to the smooth buttons and beads. mixed media box

After dry brushing the paints i was done. The project was easy enough for beginners, but more advanced crafters could really go to town. I had a great time and I can’t wait to teach my next class!
mixed media box
The post Metallic Mixed Media Box appeared first on Take Time To Create.

Tissue Paper Rose

Tissue Paper Rose

Use the tissue paper in old patterns to create a beautiful tissue paper rose. 

Hello Everyone!

Last weekend was my beautiful mother’s birthday! She is such an important part of my life and I wanted to express that with a handmade gift.

I created this tissue paper rose for her and gave it to her last weekend when we went to lunch and shopping to celebrate!

diy tissue paper rose

I created a video to go along with the tutorial, you can see that here:  You Tube Tissue Paper Rose Tutorial

This was so much fun to create, and it was my first time doing something like this and I am happy with how it turned out.

Materials:

BTW this list contains affiliate links.

Instructions: 

First prep the canvas board with gesso. I chose black gesso to give me a clean slate.

Get the tissue paper ready by ripping the tissue paper and rolling it into a tight strip.

diy tissue paper rose

Roll the strips into a tight circle and glue it down in a spiral. Try and keep it all tight and keep going until you get the size you like.

Make the stems by using the strips in a swirl motion. The leaves were made from a short strip with one end slightly trimmed in a rounded shape.

diy tissue paper rose

Next I put a layer of black gesso on everything.

No photo here: Then I decided that the black was too dark for the center of my rose so I painted over the black with white gesso

Then I added glass bead texture to the outside of the rose.

diy tissue paper rose

Here is where I got really bad at taking photos, lol. But you can see the process in the video

I painted the rose with 2 colors of pink and the background is a light blue to a dark blue to a purple.

I tried to stamp the background with some images but I didn’t love that so I mostly covered that back up.

Then add mod podge and adhere the mica flakes. The mica flakes add so much dimension and sparkle!

diy tissue paper rose

Dry brush a light shimmery white over everything and spray a sealer on when you are done.

It makes a wonderfully sparkly gift that was tons of fun to make. 


diy tissue paper rose

The post Tissue Paper Rose appeared first on Take Time To Create.

This post contains affiliate links.

You Tube Channel and Yarn Bowl

YouTube Channel and Yarn Bowl

Creating a yarn bowl is a great way to use up all you scraps of yarn. 

Hello Everyone!

I am so excited to tell you that I have just started my You Tube Channel! As of today there is only one video, lol, but I will be adding more as the days go by. It is so fun to show you more with my videos and it will help my explain some of my processes better! I will also be videoing some of my art journals and hauls and all kinds of other things.

I would love for you to subscribe to my channel here: Take Time To Create You Tube Channel

Now on to the craft of the week.

Yarn Bowl

This is a pretty easy project that is similar to the leaf bowl that I made a few months ago. You can see that video here: Leaf bowl

Take any bowl with a shape that you like and wrap it with plastic wrap.

Yarn Bowl

Get your yarn ready by cutting it into smaller pieces if you want, I used pieces that were about a foot or more long. This is really up to you how you want your bowl to look. Then I used a lot of Mod Podge to glue it all down. In the future I won’t be using Mod Podge, I don’t think it holds the finished bowl stiff enough.

I think I am going to try Aleene’s Tacky Glue for my next bowl. I have seen on Pinterest where people heat up a glue mixture for their yarn bowl but since I don’t get along with my oven I am trying to stay away from that process, lol.  I will let you know hw my experiments go.

Yarn Bowl

Let it dry completely and carefully remove it from the bowl. Reshape as necessary. So very cute! 
Yarn Bowl

What other ways do you use up your yarn scraps?

This post You Tube Channel and Yarn Bowl appeared first on Take Time To Create.

Create a Purse from an old VHS Tape

Create a Purse from an old VHS Tape

What do you do with all those old VHS tapes? Why you create a purse! Perfect way to add some interest to your outfit!

Hello Everyone!

I am almost embarrassed to admit, but I still have a lot of VHS tapes laying around my house. I hate to toss them, but I have no way of playing them (I don’t even own a VHS player…) So what do I with this pile of tapes? I decided to create a purse!

I will admit that is project did not turn out exactly how I envisioned it. But it did turn out cute and the next one will be better! In the instructions I will tell you what I did and how I will make it better next time, that way you can create it at home with out all my struggles, lol

create a diy vhs purse

Materials:

  • VHS tape
  • screw driver
  • cutters
  • fabric, buttons, trim
  • super glue

Instructions:

create a diy vhs purse

First you find an old VHS tape. If you no longer have one in your stash you can find them at thrift stores, or ask around I am sure someone has one somewhere.

create a diy vhs purse

This is the fun part. Unscrew all the screws and open the tape. Take out the innards and safe them, they will work great for a mixed media project. Next you want to cut off the plastic bits that are sticking up. This is one area that I messed up, I cut too much off the bottom and it doesn’t seal (there is a tiny hole in the bottom. Just be careful and you should be good.

Then I glued some faux leather fabric on one side, in hindsight I probably should have glued it to both sides, but I wanted to see the clear windows still. I think I can make this a little better next time.

create a diy vhs purse

Glue hinges so that you can open and close your purse. Try not to glue your fingers to the tape, lol (I may or may not have done the, lol) Also try not to glue the hinge shut, it takes a lot of careful prying if you happen to glue the hinge (once again I may or may not have done the, lol)

create a diy vhs purse

Then I added a decorated bottle cap and some string to secure the purse closed. Next time I will use elastic, but this works. Also next time I will add fabric to the sides so the tape doesn’t lay flat when open, it will help keep everything contained. Add a strap, I wanted mine to look a little funky so I added pom-pom trim.

create a diy vhs purse

create a diy vhs purse

Overall I am happy with how this turned out, and I am excited to make improvements to version 2.  What are you doing to up cycle your VHS tapes?

The post Create a Purse from an old VHS Tape appeared first on Take Time To Create


DIY Straw Flower Hat

DIY Straw Flower Hat

With spring approaching a new straw hat is what everyone needs. And with a few markers you can personalize the hat and add just the right amount of flair.

Hello Everyone!

It has been a while since I did a Dollar Store project and an accessory project, so I thought I would combine the 2 into 1 project.

I have a terrible case of Spring Fever and when I saw these cute straw hats at the Dollar Store I knew I had to get one and decorate it.

diy straw flower hat


The project is simple enough and can be completed in under an hour.

Materials:

Instructions:

Find a super cute straw hat that you are willing to draw on.
diy straw flower hat


I didn’t want to spend a ton of money, so I thought a dollar was perfect. I also wanted to make this an easy project that could be completed quickly. And I accomplished that as well.

diy straw flower hat


Find a design that you want to draw and go to town. I thought pretty pink flowers were perfect for spring.

diy straw flower hat


Straw is a little harder to work on, but not impossible, just take your time and you will be fine. Pick a design that doesn’t have a lot of detail or it will get muddy on the hat.

This would be a great project with a group or for a girls weekend or with kids.

How are you handling your Spring Fever?

This post contains affiliate links

The post DIY Straw Flower Hat appeared first on Take Time To Create.

Galaxy Mixed Media Canvas

Galaxy Mixed Media Canvas

Mixed media is perfect to showcase a galaxy. With found objects, and paint you too can create your own galaxy.

Hello Everyone!

It has been a while since I last posted, and I am sorry for the long absence, I was traveling for work.

But now I am back and  want to show you a mixed media project that I have been working on for a while. It didn’t turn out how I anticipated, but I love the final results! I just went with the flow and this is what I ended up with.

galaxy mixed media canvas

Start with a black canvas and add all your goodies. I added an old educational film, some plastic bits I had laying around, large plastic gems, metal pieces, bottle caps, there is an old record on the very bottom, plastic coins. For interest and texture I stenciled some stars and swirls in the background and added some tea from a tea bag.


galaxy mixed media canvas

Cover everything in black gesso to get the canvas ready to become a galaxy

galaxy mixed media canvas

Before I even started painting I watched tons of videos on You Tube on how to paint a galaxy. I incorporated a variety of techniques, and I kept working on it until I was happy.

Then I went to town painting. I added layers and layers of  acrylic paint and used some DIY acrylic sprays. When I was finally happy I splattered white paint all over to make it look like stars. And I added some metal shavings and old necklace pieces to bring in some more metal elements.

I am not sure it looks like a galaxy, about half the people I have shown it to thinks it looks like the moon. I am good with both views, in the end I am happy with how it turned out.

galaxy mixed media canvas

galaxy mixed media

What do you think Galaxy or Moon? Now I have been thinking about doing an underwater mixed media, I think what will look awesome!

The post Galaxy Mixed Media Canvas appeared first on Take Time To Create.

Project has been entered into the following design challenges:


Merry Christmas and Happy New Year

Merry Christmas and Happy New Year

Merry Christmas and Happy new year to all  my wonderful followers. Because of you I have had a wonderful, fun year and I am excited for next year!

Hello Everyone!

As this year comes to a close I wanted to take a moment and say thank you for making this year pretty great. I had so much fun creating new thing and making tutorials for you enjoy.

I think every blogger says this, but in my case it is true, but I have the best followers! You guys are fun and supportive! Whether you follow me here on the blog or on my other social platforms you guys are just the best!

I will close this year with a pic of a collage that I have on my desk. I love this quote from Curly Girl (if you don’t know who that is  you have to follow her. Her designs are wonderful, I love them! You can find her here: Curly Girl Designs)

I took this quote from a planner, “We must take every opportunity to make the most of our very remarkable life,” and made a quick collage. I love having it near my work area as a perfect reminder that this is all pretty remarkable.

Have a safe holiday season and I will see you in the new year with new projects, ideas, and tutorials, and a You Tube Channel! Yikes, yes I am going to start a You Tube Channel to help demo even more things. (I will admit I am a little nervous about this, but it will be fun!)

So many new things for the new year! It is going to be amazing!

See you in 2017!

Linda


diy-pillows-burlap-coffee-sacks

Sewing Craft Project Burlap Pillows

Used burlap coffee sacks make for a great sewing craft project… they also make make great pillows. They are fun and unique and perfect for any decor.

Hello Everyone!

sewing craft project burlap pillow case

Finished burlap pillow case

Today is a cold, wintry day and I am inclined to stay inside all day (I do have to go to work, but when I get home I am going to snuggle down and say warm) anyway, as I think about staying home I am reminded of this sewing craft project I did where I made pillows from Burlap sacks. I did this a while ago, but I still love them so much. I think they are perfect for my decor. 

Materials:

  • You will need the used burlap sacks that is used for coffee. I originally purchased mine on eBay, but I did find some on Amazon. You can use this link: Burlap Coffee Sacks.  There are a lot of vendors for these sacks so you have your pick! But they usually come with random patterns, I don’t think you are able to pick your pattern. So keep that in mind when purchasing. 
  • Pillow form. I found mine at Ikea, they have the best prices for pillow forms
  • Needle and thread, or sewing machine. 
burlap sacks

This sewing craft project starts with burlap bags

Instructions:

Cut your sack to the dimensions of your pillow form. If you want the pillow to look more full then cut the sack a bit smaller. (I have to be honest here, I didn’t actually sew these pillows. My fabulous mom sewed them for me. haha, I don’t know what I would do without her.)

Once it is cut, pin the right sides together and sew the right sides together. Leave a little hole so you have room to put your pillow form in. 

Stuff your pillow and stitch the hole. 

finished sewing craft project

Here is another finished pillow

That is it, very easy to make a custom pillow for your home. You can use this technique for almost any fabric.  I love how easy it is to update your decor, and reusing items that might otherwise land in the landfill is a double awesome!

BTW if you are wondering how I painted my couch green you can check out this old post: Painted Couch

burlap-pillows-3

This post DIY Pillows from Burlap Coffee Sacks appeared first on Take Time To Create


If you enjoyed this post, make sure you Follow Take Time To Create so you don’t miss out on other great posts.

Follow Take Time To Create on WordPress.com


This post contains affiliate links.


Painted Christmas Houses

Painted Christmas Houses

You can find these really cute ceramic houses just about anywhere, with just a little paint and glitter they are ready to be put on display. 

My finished Christmas houses on display

Hello Everyone!

December is rolling along and it is time for me to think about decorating. The tree is up, and if you follow me on Instagram you probably have seen our tree by now. (@taketimetocreate).

With any holiday I always feel the need to create some new items. This year I made some painted Christmas houses.  I found the unfinished ceramic houses at our creative reuse center Who Gives A Scrap (I love that place!) With a little paint and glitter they were ready to go.

Materials:

  • Ceramic House (You can get these at a creative reuse center, craft stores, and sometimes the thrift stores will have some unfortunutally painted ones that need an update)
  • Paint and glitter found at the craft store. I really liked this paint, it was white with a little pearl look to it. Perfect for Christmas.

paint-and-glitter

Instructions:

Take your plain ceramic house and paint on a layer of white paint. You can always spray paint the houses, but I just decided to hand paint instead.  This is what it looks like before the paint.

(btw, The houses did come with detailed instructions to paint the house in all the colors, but I did not want to take the time to do any detailed painting. haha. So white paint here I come. )

Painted Christmas houses before glitter

My Painted Christmas houses before glitter

Add the paint. This is what it looks like with the paint. Go over everything, all the little details. Don’t forget the inside of the windows.  Touch up where ever you forgot.

Painted Christmas houses before glitter

My Painted Christmas houses before glitter

Then I decided to add some glitter detail to the snow and trees. Just pick a clear holographic glitter that goes with your paint. I put a layer of mod podge on then sprinkled it with glitter.

add glitter painted Christmas houses

Adding Glitter to the painted Christmas houses

Once they are dry they are ready to be put on display.

I think they turned out really cute. You can put lights in the bottom, but I didn’t have any. So this weekend I will pick up some and then they will look even better!

painted Christmas houses on the mantle

Close-up of the painted Christmas houses on the mantle

painted Christmas houses

Here are the finished painted Christmas houses


Subscribe via WordPress


The Take Time To Create Crafting Blog RSS Feed

Subscribe via Email

Enter your email address to subscribe to this blog and receive notifications of new posts by email.


Other Ways To Follow


The Take Time To Create Crafting Blog RSS Feed

Subscribe to my RSS feed

The Take Time to Create Crafting Blog Facebook Page

Follow me as Facebook

The Take Time to Create Crafting Blog Etsy Shop

Check out my my Etsy Shop

The Take Time To Create Crafting Blog Pinterest Board

Visit my Pinterest Board

Other Ways To Follow


The Take Time To Create Crafting Blog Instagram

Follow me on Instagram

The Take Time To Create Crafting Blog Twitter Feed

Follow me on Twitter

The Take Time To Create Crafting Blog Email

Send Me an Email


« Older posts Newer posts »

© 2024 Take Time To Create

Theme by Anders NorenUp ↑

Follow

Get the latest posts delivered to your mailbox:

%d bloggers like this: