Tag: update (page 2 of 4)

Sunflower Mixed Media Canvas

Hello Everyone!

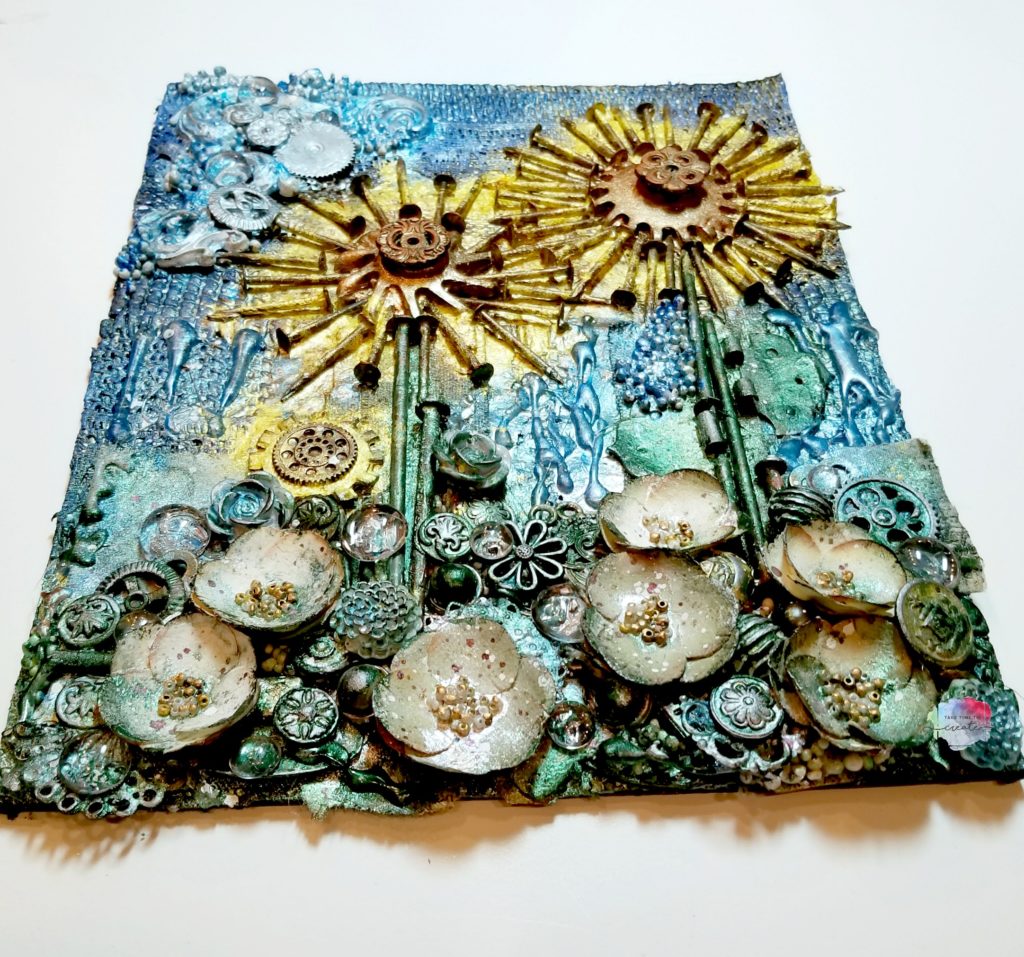
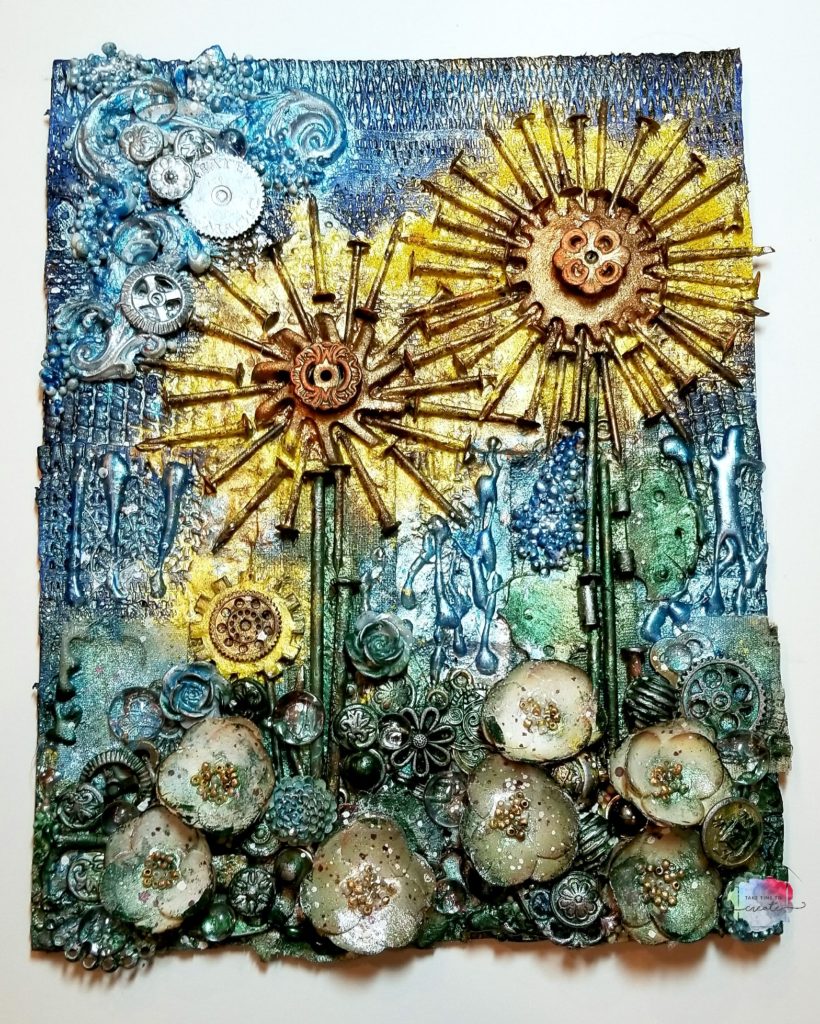
Fall is in the air and I am just loving it! I especially love seeing all the sunflowers, they are my favorite flowers! They are so pretty, and bright. Seeing all the sunflowers I was inspired to make a Sunflower Mixed Media Canvas.

Sunflower Mixed Media

Let me tell you how I made this canvas!

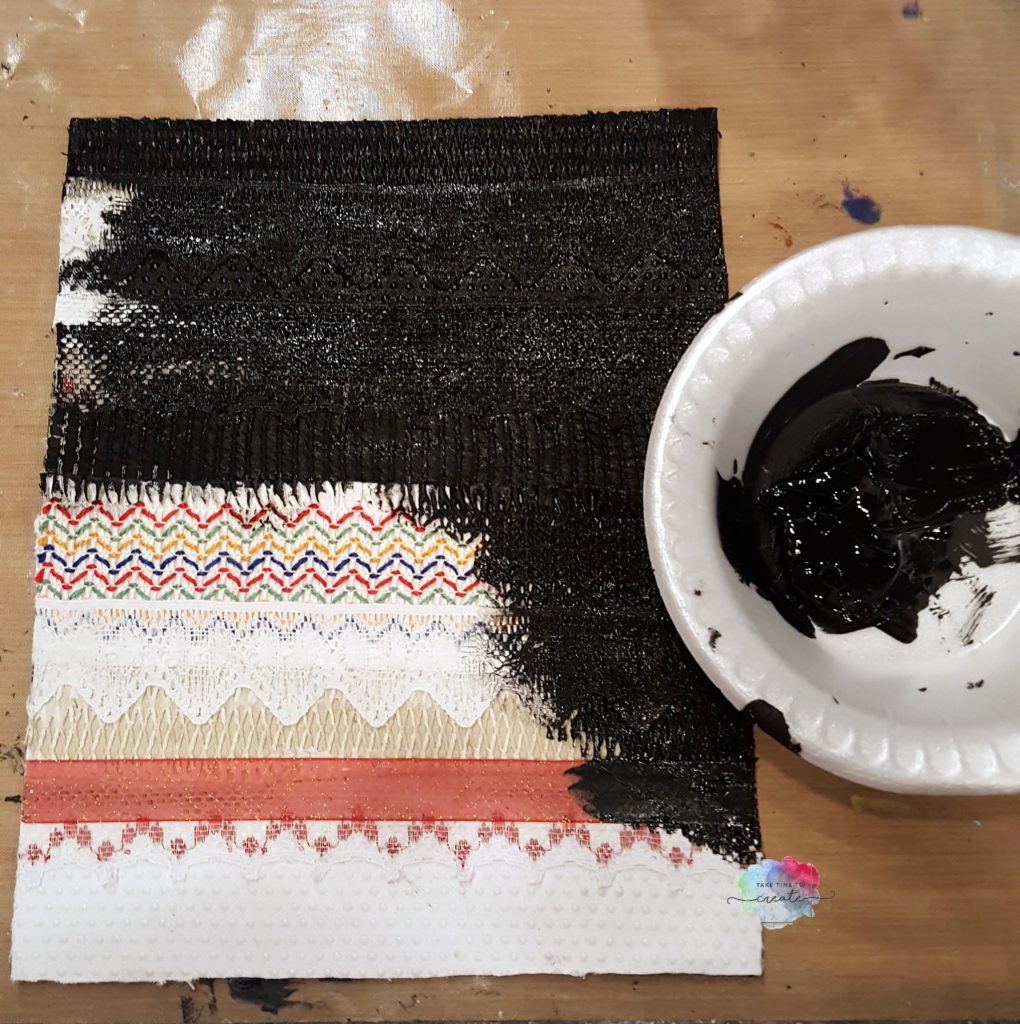
First I started with a canvas board and covered it with different ribbons (I adhered it with modeling paste), then I covered it all with black gesso.

Sunflower Mixed Media

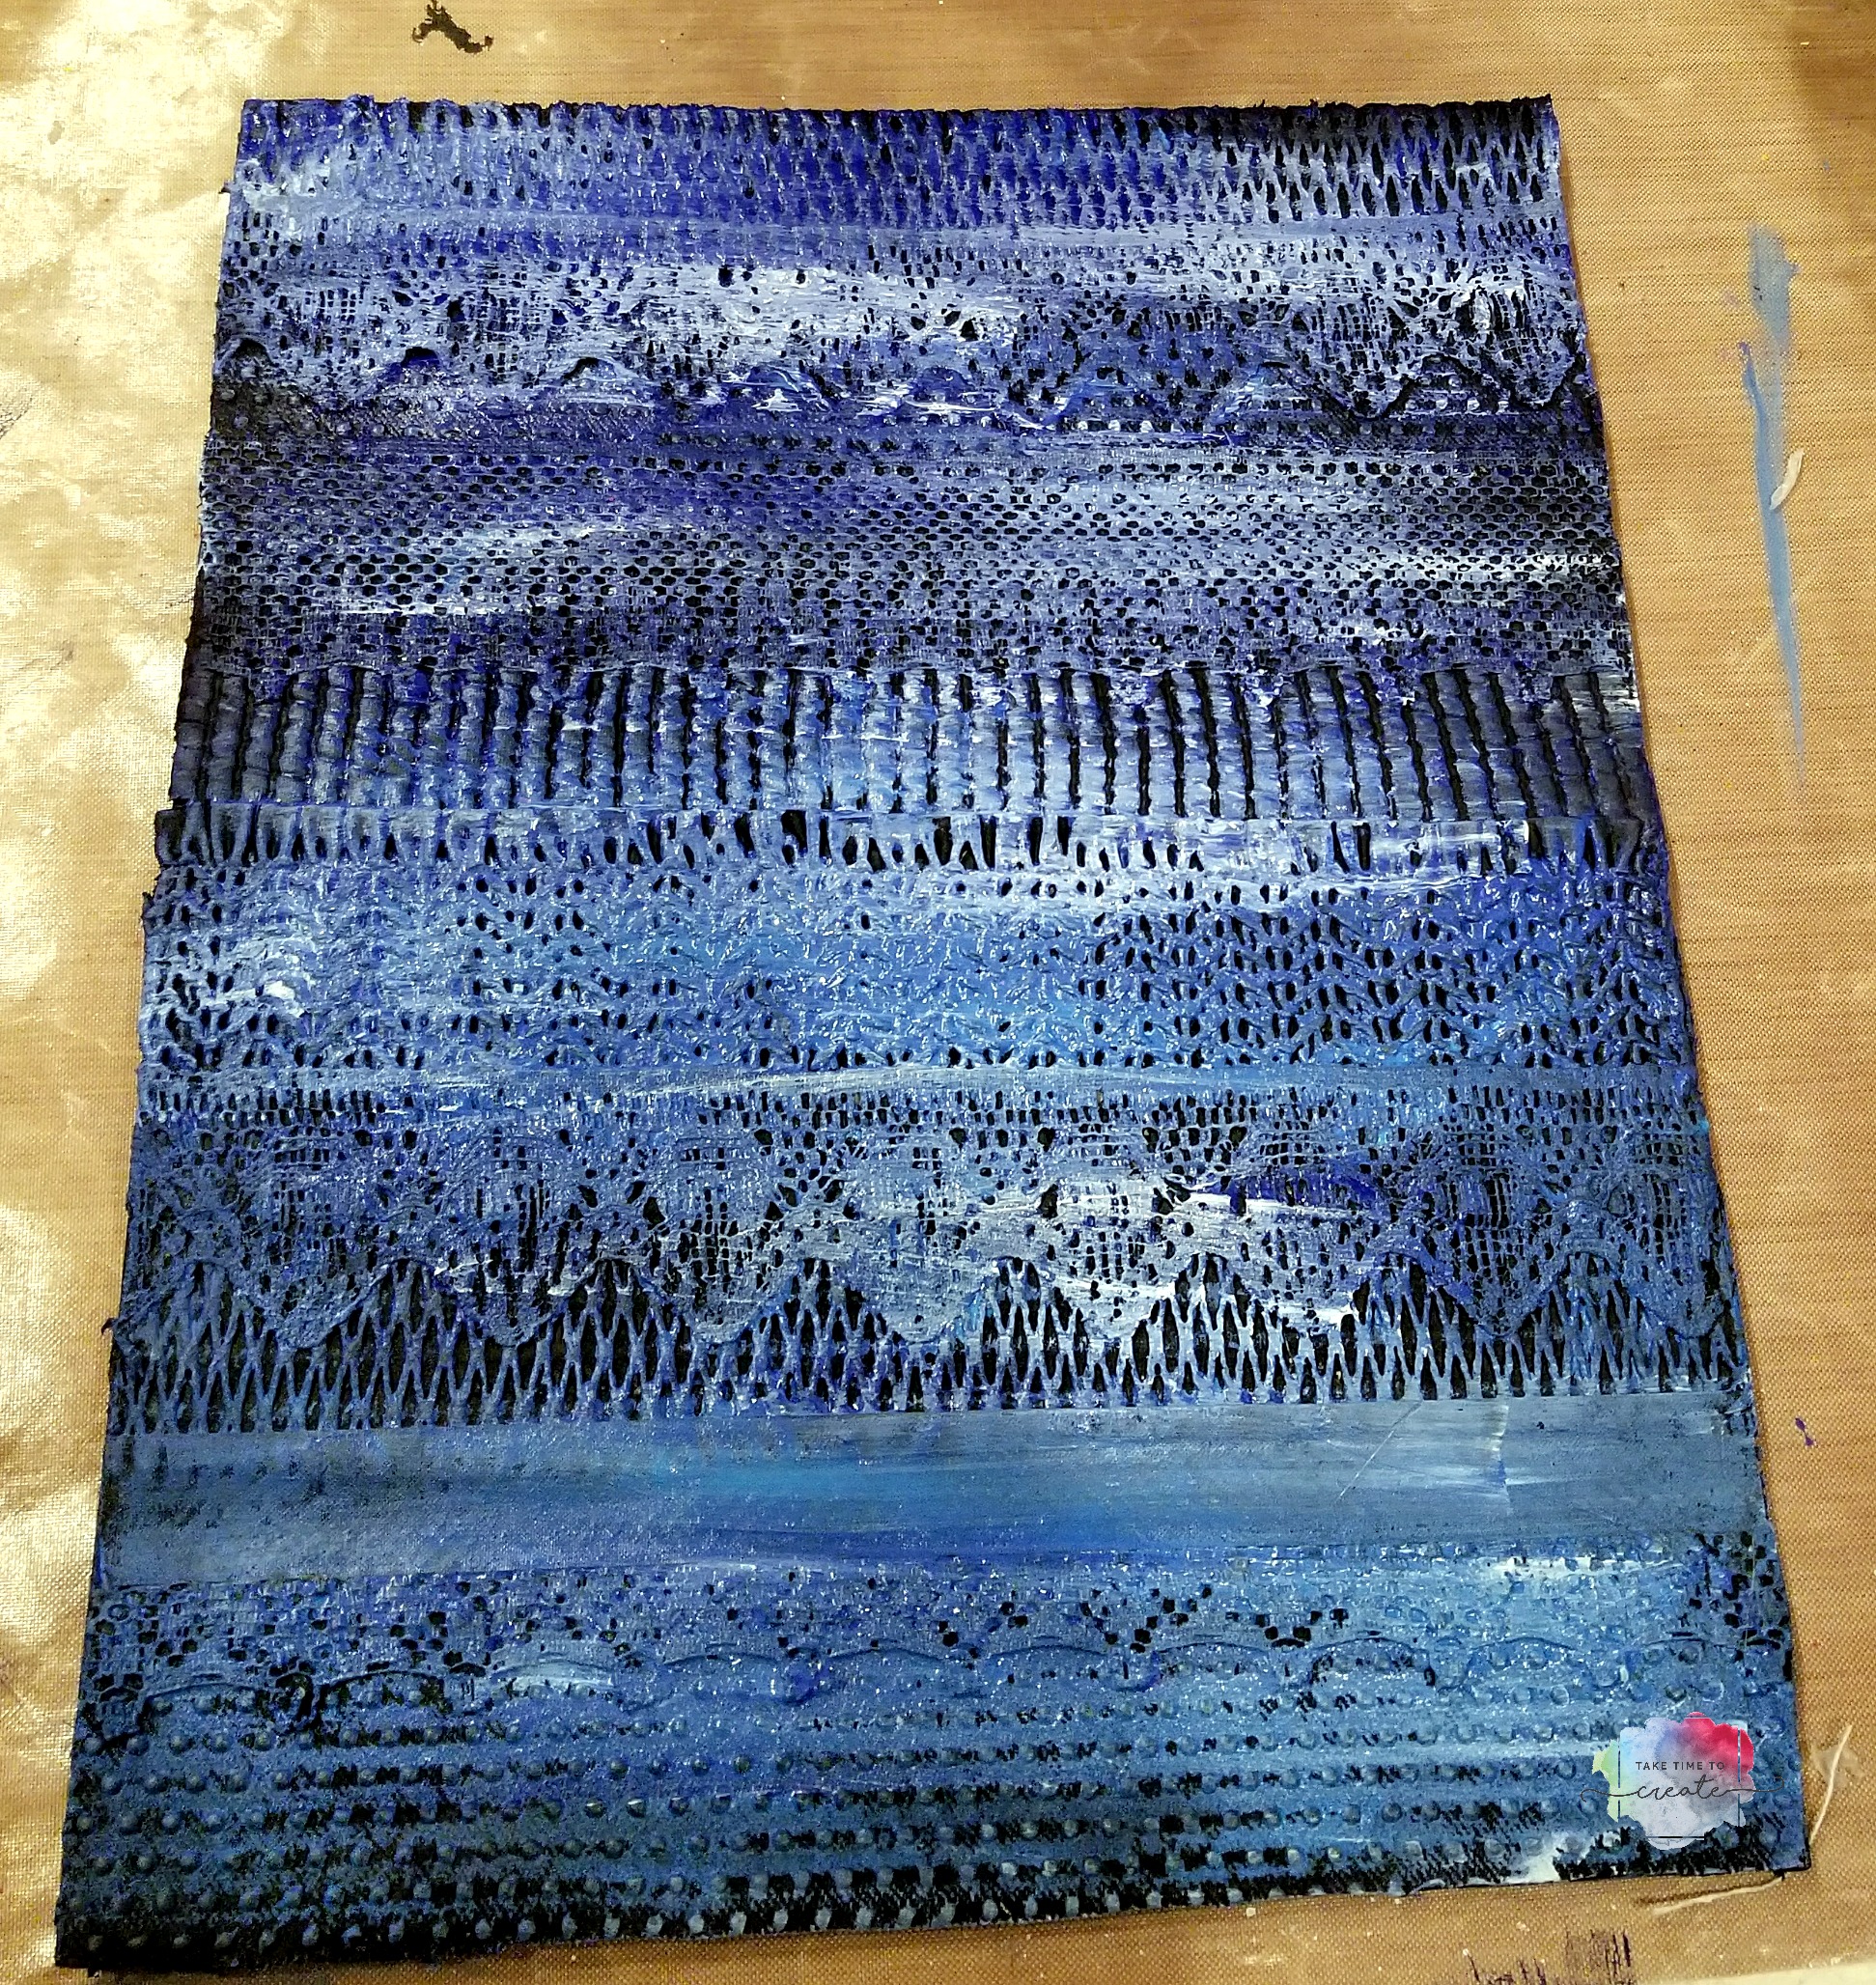
I painted the canvas with a few different shades of blue acrylic paint.  I loved how it looks like a sky, but it was a little bright,  I did end up toning it down by the time I was finished.

Sunflower Mixed Media

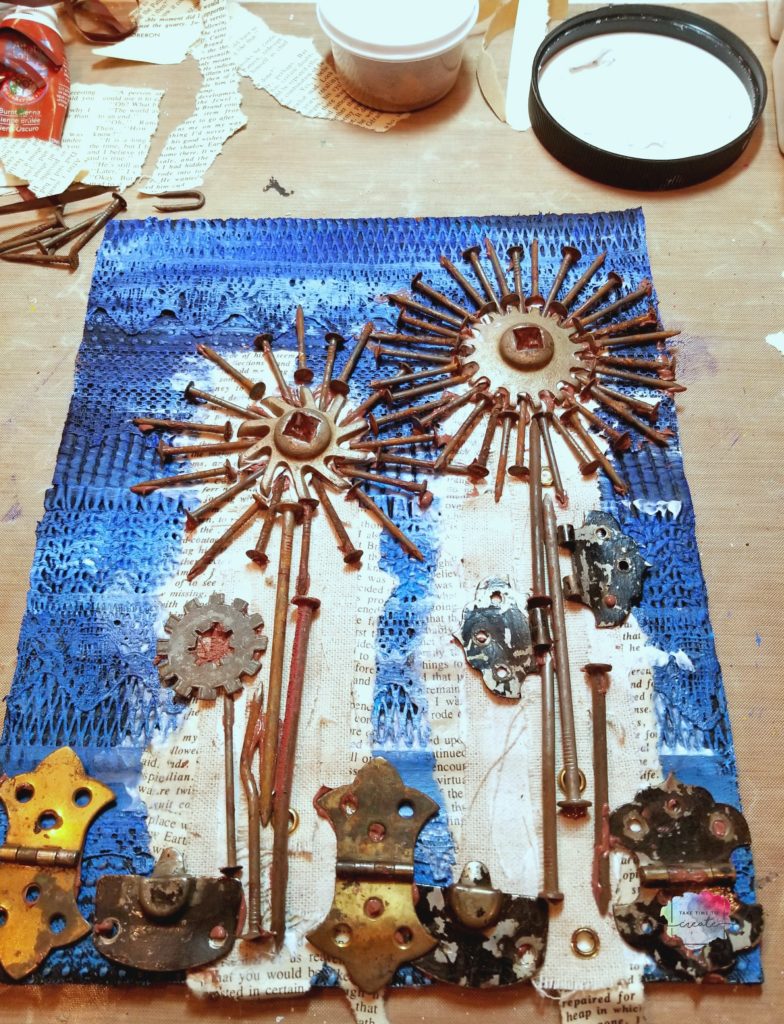
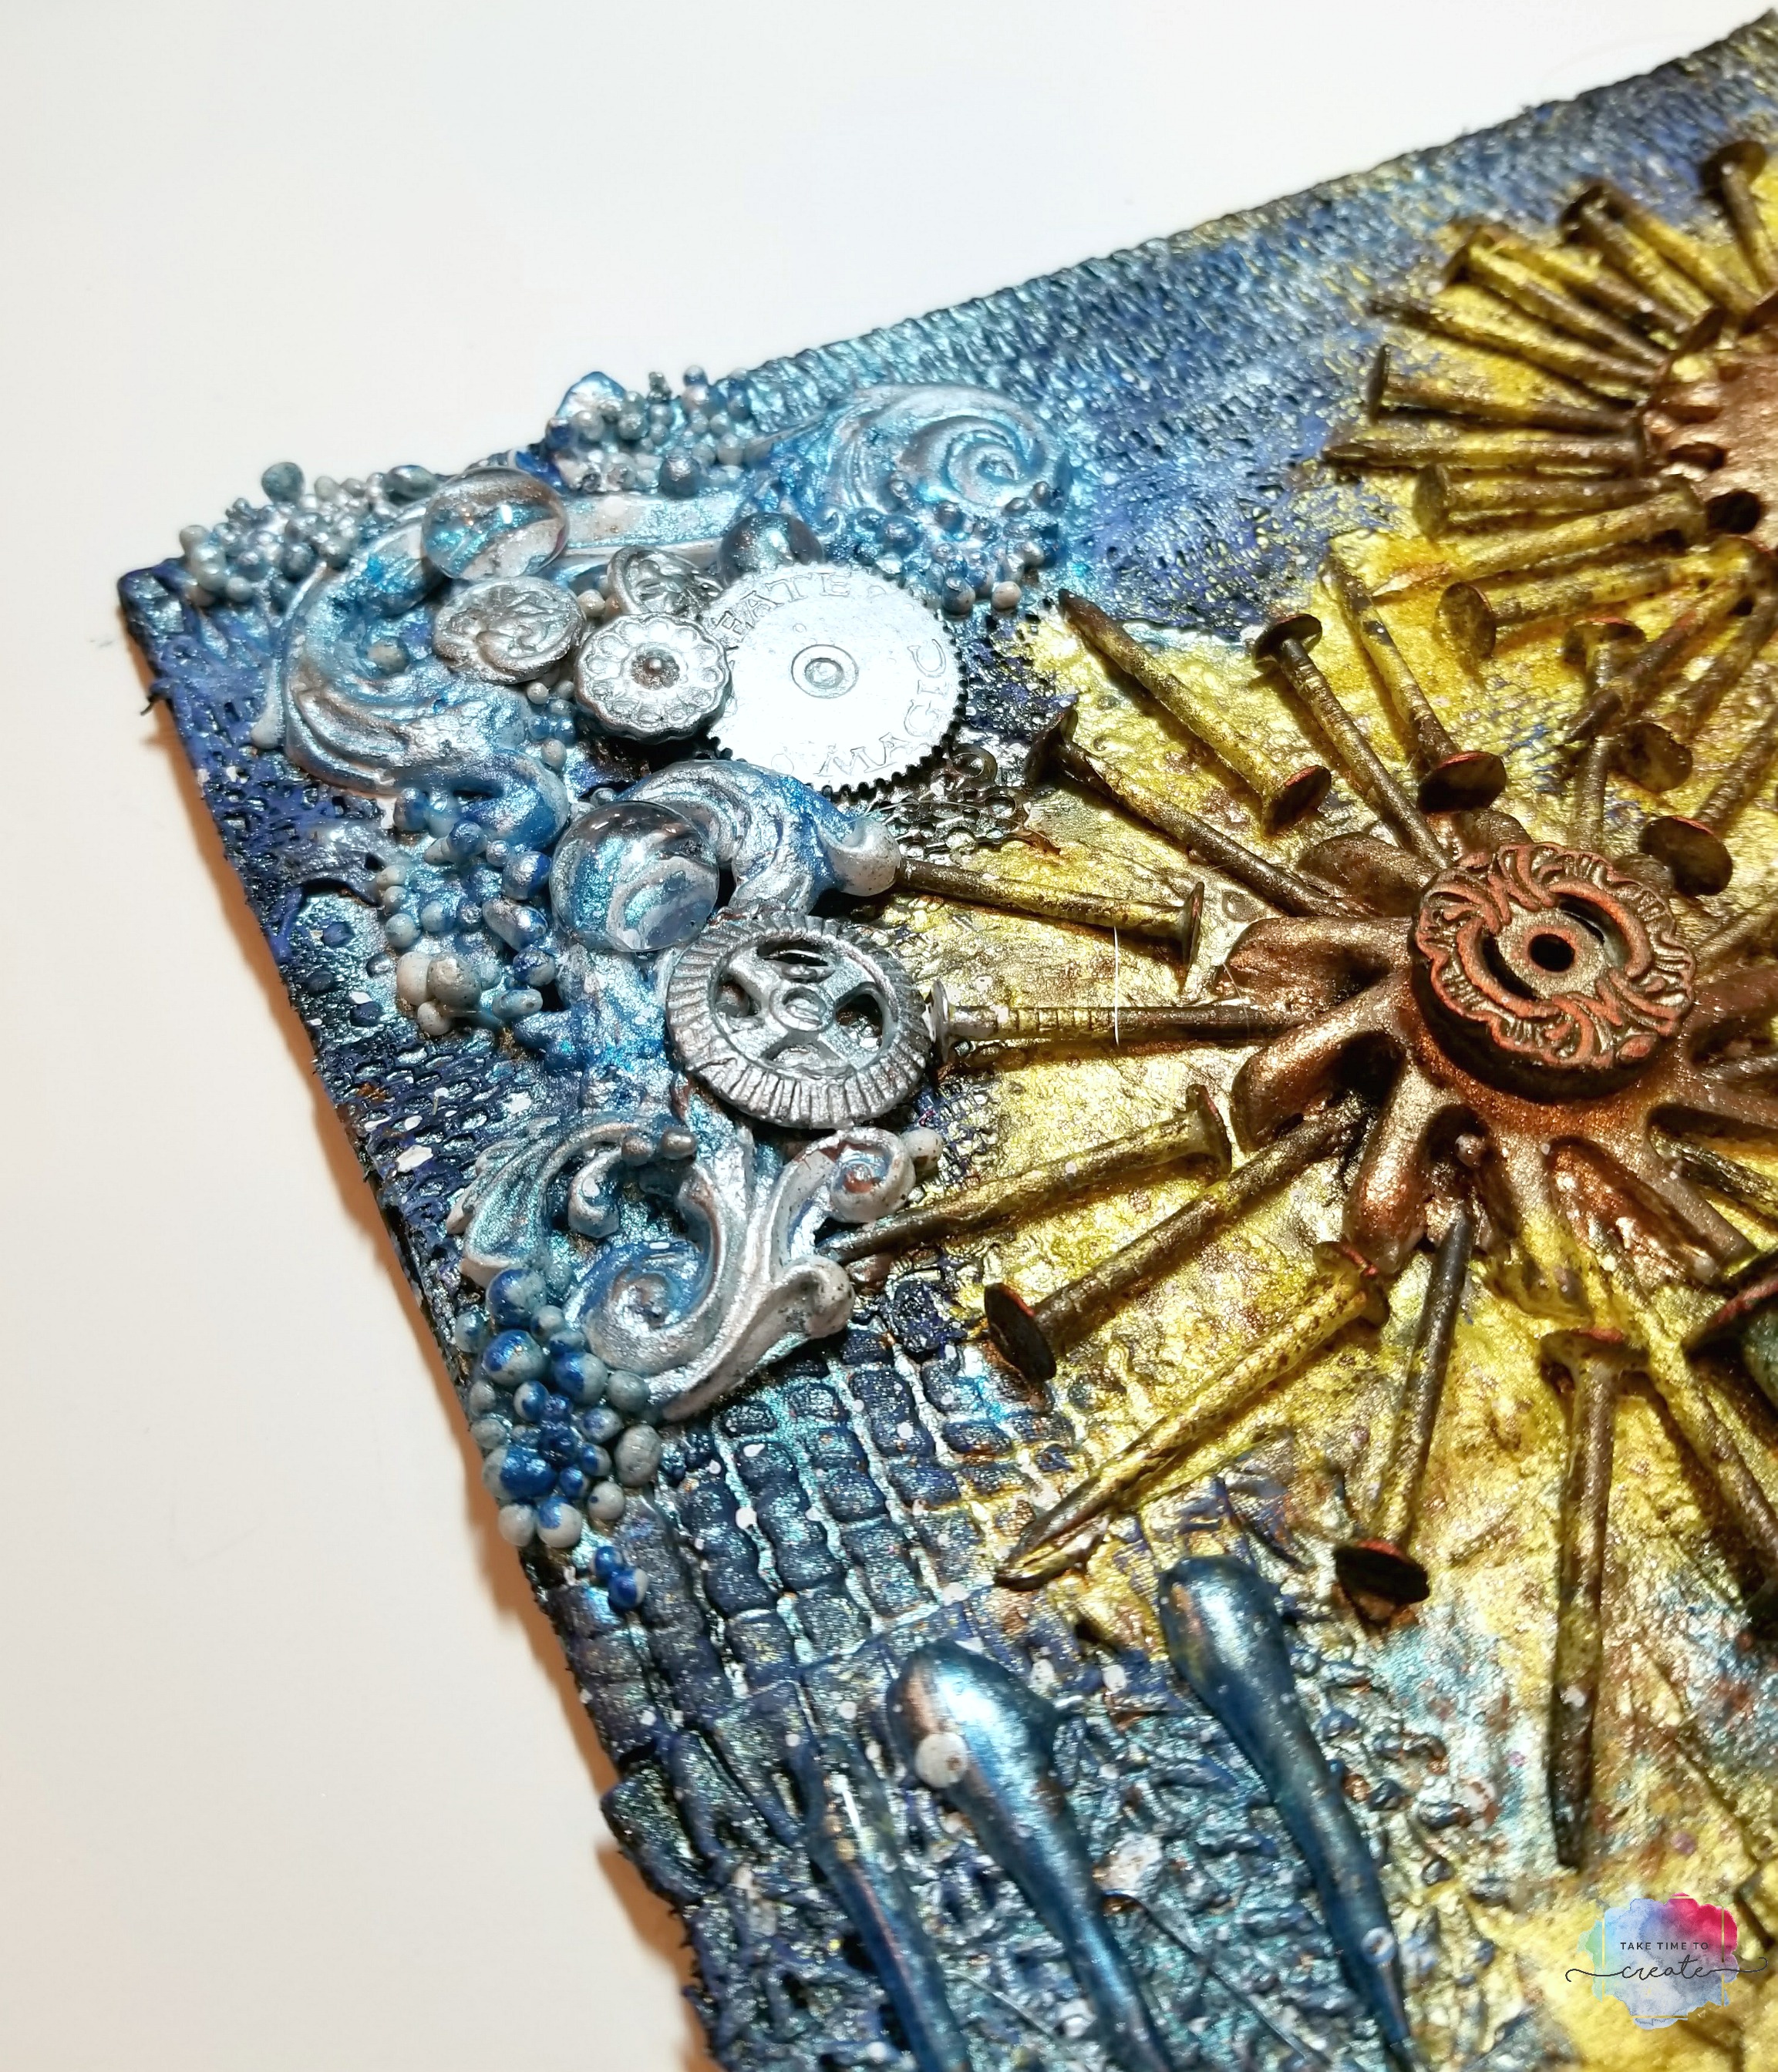
Now it is time to add all the goodies!! I had this pack of rusty nails that I found in my Grandpa’s shop, I couldn’t pass up this great texture. (be careful if you are using rusty nails, I wore gloves and washed my hands often)

I added book pages, burlap, other metal items, flowers, hinges, clear round dots, keys, brads, hot glue, and anything else I could find. Just use what you have in your stash and around the house. I  adhered it all with modeling paste (I tinted the paste with some brown acrylic paint).

Sunflower Mixed Media

Once everything was all dry I primed the elements with clear gesso then I sprinkled mica powder on (yellow in the flowers, green in the grass and stems, and blue in the sky) I added water to activate it and I loved the look. Once that was all dry I dry brushed acrylic paint all over to add more color and details.

I am in love with how it turned out! I used such a random assortment of products, I will list them all below for you. As always, let me know if you have and questions on this project.

Sunflower Mixed Media

Sunflower Mixed Media

Sunflower Mixed Media


Materials used: (affiliate links)

The post Sunflower Mixed Media Canvas Appeared first on Take Time To Create.

DIY Chalkboard Record

Hello Everyone!

What do you do with all those old records that are just laying around? Well, today I decided to turn some of them into a really cute chalkboard. BTW- I have a ton of records so be prepared for a lot more record tutorials, lol.

You can check out the video on how I did it.


This is such an easy tutorial, you can make a few at a time,  perfect for dorms, offices, or even gifts.

Materials:

Record

Primer (I used Kilz 2)

Chalkboard paint (I used the spray paint version)

Tape

Instructions:

Clean the record before you get started. I really liked the center of some of the records so I taped over them to protect them from the paint.

The others I just left and painted over the whole thing. I really like both versions.

DIY Chalkboard record

DIY Chalkboard record

Then I primed the records. Actually, I just primed 2 of them and just painted the other 2. I think it worked out just fine without the primer, so that is up to you what you want to do.

DIY Chalkboard record

Then I applied 3-4 coats of chalkboard paint on the record. Do this outside. Follow the instructions on the can they are all a little different.

DIY Chalkboard record

Once they were fully dry and after 24 hours I conditioned the record by rubbing chalk all over it  and cleaning it off. Then they were good to go! Old records repurposed into a really cool chalkboard!

Now, the question I always get asked, is how do you hang the record once you are done. You can use a plate hanger, or velcro command strips, or nail, or screw it in through the hole. Or you can get a picture display stand and out it on your desk. They are a ton of way to display your new record.


DIY Chalkboard record

I am in love with how this turned out.

What have you made with old records? I am needing some ideas for the stack I have acquired!

The post DIY Chalkboard Record appeared first on Take Time To Create.


DIY School Supplies

Hello Everyone!

Yikes! Can you believe it? School is just right around the corner! Or maybe it has already started for some people.

DIY School Supplies

To help ease the transition  I have a school supplies inspired DIY! These are perfect for dorms, or even the office. Do you want to know the best part? They are all a little geeky 🙂 Which is perfect!

The video can be found here:

Let’s start with the first project: Floppy Disc Pencil Holder

Grab your floppy discs from the basement and smile a little when you think of all the people that told you to throw them away, you knew they would come in handy someday, lol. Well today is the day!

I used duck tape to cover up the label and make it look a little cuter, but you could use washi tape or paint them.

Then just hot glue the sides together and then to bottom. Now you have  a cute place to put all your pencils and pens

DIY School Supplies

DIY School Supplies

The next 2 are magnets. First is the Action Figure Magnets

Find some really awesome action figures from the Dollar Store and glue a magnet to the back (Loctight or E6000 or any strong glue should work) .

That is it. Now you have a really cute magnet to hold all your important papers.

DIY School Supplies

The last project are these Canvas Magnets

Paint the mini canvas in any way you want, I did a galaxy, or stickers, or used a paint pen depending on what I wanted to do. In the video I show how I painted my galaxy if you are wanting to one like that.

Then you glue a magnet to the back and you now have a super cute magnet!


DIY School Supplies

Now you are ready for school! What supplies are you making this year?

The post DIY School Supplies appeared first on Take Time To Create.

DIY Watermelon Bag

Hello everyone!

This post contains affiliate links

One of my favorite summer treats is watermelon! I am convinced that it is the perfect food, sweet, juicy, messy, and pink, lol.

So I decided to make my very own watermelon bag to wear and show the world my love of watermelons.

diy watermelon bag

Materials:

  • Bag- I got mine from Sammy dress about a year ago, but here is a similar one on Amazon: Bag
  • Paint- I used Folk art acrylic paint, but any acrylic paint should do the trick: Paint
  • Paint pen- for drawing the seeds: paint pen


Instructions:

Here is the bag before any painting. It is a good bag and just fine the way it is, but I was determined to have a watermelon bag, lol.

diy watermelon bag

I found these 3 great colors from Folk Art in Pink Melon, Citrus Green and Classic Green. I thought they were the perfect watermelon color!diy watermelon bag

but before you start to paint measure your bag. You to make sure that you have about 2/3 of be bag in pink and the rest in green. But this is just a guess, use your eye to make a good judgement as to how much of each color.

diy watermelon bag

Then start painting. I started with the pink then went on to the greens. I painted in broad strokes and left the strokes in each of the colors as I painted. I didn’t want it too blended, I was going for a casual vibe. You can always blend more if that is  your style.

diy watermelon bag

You can leave it with out the seeds, but I thought the bag needed them. I just painted them on using a paint pen.

diy watermelon bag

I am loving how it turned out! What fruit bags are you going to make this summer?

diy watermelon bag


The post DIY Watermelon Bag appeared first on Take Time To Create.


DIY- Restoration Hardware Inspired Box

Hello Everyone!

This post contains affiliate links.

Today I have another Restoration Hardware Inspired project!

As many of you know, I love RH, they have amazing home decor items! I did a chandelier inspired project a few years ago, you can find that here: Chandelier


I found these beautiful metallic boxes on the RH website. I love the wood and the beautiful gem on top. But the price is a little out of my reach right now.

But it is easy to make one! My is not exactly the same… but that is all part of the fun in doing an inspired project.

Materials:

  • Box. I used a wooden cigar box, but any wooden box will do. The cardboard cigar box probably won’t work as well, but if that is all you have then just paint the printing with white paint first then it should work ok.
  • Metallic paint. I used the Folk Art paint I had in my stash, but use what you have
  • Gem. I had this giant plastic gem that worked great. Of course I got my box and gem from Who Gives A Scrap, lol.
  • Glue. Use a glue that will work on wood and plastic, I used Loctite glue.

Instructions: 

Pick your color and paint 2 coats on the box. I used a gold and a copper paint that looked really cool. If you want to make it look more like the RH box you can sand it first and use a wood filler it you want to cover up the writing.  I wanted the rustic finish with the metallic and gems, a little contrast that I like.

RH Inspired Box

Once the outside and inside are completely dry then glue your gem on with your glue. I liked the gem on the top, but you can place it anywhere that looks good.

RH Inspired Box

Once the glue has dried overnight you can add a spray sealer if you want. I wanted to protect the paint so I did add a gloss spray sealer.

RH Inspired Box

And there you have it, a RH inspired box. So very cute and it is great to give as a gift, or put the gift inside and use it as the wrapping.

RH Inspired Box


RH Inspired Box


RH Inspired Box

What companies inspire your DIY projects?

The post DIY- Restoration Hardware Inspired Box appeared first on Take Time To Create.

Craft Supply Thrift Haul and Tips and Tricks

Hello Everyone!

If you are like me you love to get a bargain, especially for craft supplies. Craft supplies can be very expensive, but you can find some great deals at creative reuse centers, or thrift stores.

Recently I went to my favorite creative reuse center, Who Gives a Scrap, and I have a craft supply thrift haul video for you.

Also, I wanted to give you a few tips, tricks and hints when shopping for craft supplies at a creative reuse center or thrift store.

Before I get into the tips, the biggest piece of advice I can give you is to buy what you need. If you buy everything that looks good, or interesting, you will be over run with stuff very quickly!

And always ask a person working at the store before trying out something when you trying to determine if the item still works or has ink left in it.

Things to look out for when shopping for Fabric:

  • Size- is it the size I need
  • Condition- are there any rips, tears, or stains that can’t be fixed or worked around

Things to look out for when shopping for Punches or Scissors:

  • Test to make sure they work! Try them out on a piece of paper

Things to look out for when shopping for Paint or Ink or Markers:

  • Open it to make sure the paint is not dried out, and there is still plenty left
  • Smell it, sometimes paint can start to smell a little funky and you don’t want that, lol
  • Scribble the markers to make sure they work, you don’t want to purchase dried out markers.

Thrift haul

Things to look out for when shopping for Books:

  • Check for pages torn out, if there are missing pages it might be a vital instruction that you are missing, lol
  • Check for overall condition, can you still use it?

Things to look out for when shopping for Embroidery/Cross Stitch/Needle Point Kits:

  • Check to see if it is unopened, if that is the case then you are good to good
  • But if it is open, check to make sure it has the floss, instructions, and anything else you need to complete the kit.

Thrift haul

Things to look out for when shopping for Charms or Jewelry Making supplies:

  • Check to make sure there is enough to complete  your project
  • Check the condition of the beads and tools, if it is not in usable condition then pass on the item.

There you have it, my tips, tricks, suggestions, and hints I use when I go thrift shopping for craft items. Any reputable thrift store, like Who Gives a Scrap, will have quality items that work and are ready for you to use. Keep your eye out, you never know what bargain you can find!

What tips do you use when you go craft supply thrift shopping?

The post Craft Supply Thrift Haul and Tips and Tricks appeared first on Take Time To Create.


Mixed Media Altered Bottle

Hello Everyone!

I love looking at wine bottles and any other bottle with a great shape.  They are just so beautiful and I have a hard time sending them to recycling, lol.

So with this bottle I decided to alter it using basic mixed media techniques. Now it is ready to be on display instead of heading to recycling.

You can watch the altered bottle process here:


Materials:

  • Bottle (cleaned and ready for painting)
  • Gesso, soft gloss gel, glue
  • brushes
  • buttons, raffia, and any other bits and bobs that you want to stick on
  • charm bracelet or necklace
  • tissue paper (or old patterns)

Instructions

Find a really great bottle. I love the shape of this one! Make sure it is clean before you start altering it.

altered bottle

For my base layer of texture I added crinkled up tissue paper from old pattered and adhered them with Soft Gloss gel. I will admit that I am still getting the hang of taking pictures and filming at the same time. I don’t have a pic of this but it is the same technique that I used in in these posts:

Mixed Media Box

Tissue Paper Rose

Once the paper is down and dry give everything a coat of black gesso. Once that first layer is dry, now it is the fun part, start adding buttons, ribbon, raffia to the neck, and anything else you want to add detail and interest.

altered bottle

Once all the glue is dry cover everything is black gesso. Make sure you get in all the nooks and crannies. altered bottle

Dry the gesso completely and then dry brush on the colors you want. I did a base layer of gun metal gray and highlighted the details with a pretty metallic purple.  I added an old bracelet to the neck for additional interest.

Spray seal it and you are done!

A beautiful new bottle to add to your decor! altered bottleThe post Mixed Media Altered Bottle appeared first on Take Time To Create.

DIY Rusty Lantern

Hello Everyone!

I seem to really love making everything all rusty and old, lol

I have another item that I made look rusty and worn, using the same techniques that I did earlier.

Here are the other posts about the rust technique:

For this project I used a lantern that I got at the dollar store (these are super cute just like this, but I just had to add my own touch to the lantern)

rust lantern

Then you just start dabbing on your paints with a make up sponge. I used the Finnabair Rust Pastes and I do like them! They add the right colors and texture to make it look like something rusted naturally.

rust lantern

Dab all around until you are happy with the the end look.

rust lantern

rust lantern

Here is the final product. I love this technique and I can’t wait to make something else rusty!
rust lantern

Also, I made a video of the process of making a rusty lantern if you want to check that out.

The post DIY Rusty Lantern appeared first on Take Time To Create.

Sea Shell Altered Mason Jar

Hello Everyone!

If you are like me then you probably have about 800 million mason jars in your home.  And all those wonderful crafts on Pinterest have inspired me to start using them!

So I decided to use one of those mason jars in this tutorial. It looks organic and beachy with the sea shells and sand texture. Perfect to store your souvenirs from the beach.

Altered sea shell mason jar

Materials

  • Mason Jar
  • Gesso
  • Acrylic paint and brushes
  • Hot Glue
  • Zipper
  • Sea Shells

Instructions

Find a mason jar, I am sure almost everyone has at least one mason jar in their homes, lol. You will need to prime it with white gesso. Paint a smooth layer all over the glass.

Please excuse my messy craft table, I have way too many projects going on and I am just a messy crafter, haha.

sea shell altered mason jar

The next layer is made to look like sand. I added some sand from the dollar store to some heavy gel and sponged it on with a foam brush. Let this layer completely dry before adding paint. If you have textured paste you can use that, but I didn’t have any so I decided to make some.

sea shell altered mason jar

sea shell altered mason jar

After the jar is dry you can add some acrylic paints. I sponged on 3 tan/sand colors to add detail and interest. Any browish colors should work.

sea shell altered mason jar

sea shell altered mason jar

Once it is all dry you can  add the sea shells, this is the fun part! Waiting until everything is dry will help with the glue adhering to the jar. I just used hot glue and that seemed to work for this project. Add a few shells and keep testing with the zipper to make sure your shells will fit.

Wrap the top with twine or raffia.

sea shell altered mason jar

After I added a bunch of shells I added the zipper. Glue it all down and then fill in the blank spaces with more shells.  I am a fan of adding more stuff until it isbursting. When you add shells to the lid lightly sand the metal to help the glue adhere.

Once it was complete I thought it needed some sparkle so I dry brushed on some beautiful gold acrylic paint.

sea shell altered mason jar

All done! I am loving this technique, and I think it would look great with rhinestones or buttons, or any other small item! So pretty!

sea shell altered mason jar

The post Sea Shell Altered Mason Jar appeared first on Take Time To Create.

DIY Dragon Egg Tutorial

Follow my blog with Bloglovin

Hello Everyone!

As you can see from the link above I am now on Bloglovin! In other exciting news, I will at some craft fairs and a comic con later in the year! As the time gets closer, and as I learn more information, I will share all the details with you! I can’t wait to show my crafts and to see you all in person!

I have a YouTube tutorial of this egg, you can watch it here:

This is a fairly easy tutorial that is fun and a great way to show your love for all things Dragon!

DIY dragon egg


Materials:

  • Old tin egg (my was left over from Easter)
  • Hot Glue
  • Black Gesso
  • Acrylic Paint

Instructions:

First cover your egg with hot glue then then take a silicone tool and smash the glue all around. I learned this technique from watching a video from The Frugal Crafter, I love learning new ideas from other crafters!

DIY dragon egg


diy dragon egg

Once the glue is dry then cover everything in a layer of black gesso. Make sure you get into all the nooks and crannies to completely cover the egg.

DIY dragon egg

Once the gesso is dried paint the egg using acrylic paints. I started with a sliver then I added a purple and ended with a white on top. Dry brush the colors on and try not to coat it too much, you want to see all the colors, including the black base layer.

DIY dragon egg

And there you have it, a custom dragon egg! I love how it looks in my Raku fired bowl that I did in my pottery class.

DIY dragon egg

The post DIY Dragon Egg tutorial appeared first on Take Time To Create.

« Older posts Newer posts »

© 2024 Take Time To Create

Theme by Anders NorenUp ↑

Follow

Get the latest posts delivered to your mailbox:

%d bloggers like this: