Category: Home (page 3 of 4)

Make a Basket Out of Wine Corks

Make a Basket Out of Wine Corks

Hello Everyone!

The question of the day is what to do with left over wine corks? Disclaimer: I did not drink all of this wine to make this craft, lol. I got a big box of wine corks from eBay for really cheap! I just love all the crafts people are doing on Pinterest with the corks so I thought I would try it out.

diy-basket-out-of-wine-corks

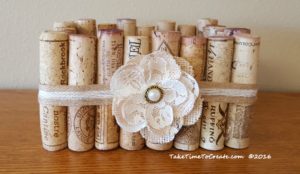
This is a really simple craft that probably won’t take more than 30 min to complete. This basket is perfect for just your desk or table. It is a really cute way to store just about anything.

finished-diy-wine-cork-basket

Instructions:

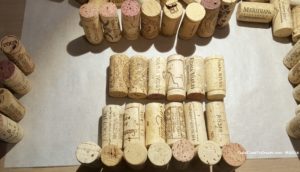
Gather your corks and start to assemble them. Try to get them all about the same size, it will make the basket look better.

start-gluing-the-corks-together

Then start hot gluing them together. Hold the pieces together for a few seconds to make sure they stick, but the hot glue should be strong enough to hold it together.

collect-your-wine-corks

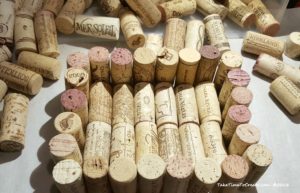
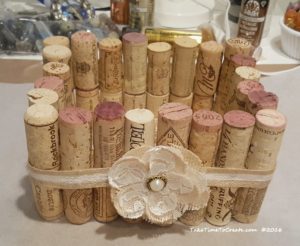
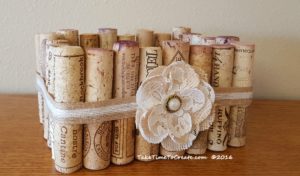
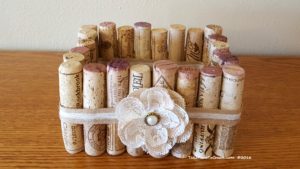
I did 2 rows of 5 for the bottom of the basket and 24 vertical corks for the sides. And I stacked the sides 2 corks tall.

Once I was gluing all the corks together I thought it looked a little plain so I added a ribbon and a flower to jazz it up.

add-ribbon-and-flower

So what have you made with wine corks?    Next I think I will make a trivet and a cork board for my office. Stay tuned to the tutorials.

finish-basket

wine-cork-basket-by-take-time-to-create

The post Make a Basket Out of Wine Corks appeared first on Take Time To Create.

Transforming Your Old Figurines

Hello Everyone!

Meet Issac. He is my new friend that sits on my desk at work. It was a simple task of transforming an old figurine from a golden owl into something amazing. Why is his name Issac? No particular reason except I asked my son what his name should be and Issac as suggest, and the name stuck. Perfect name for an owl.

issac-on-my-desk

Now, I will admit I particularly like birds, especially Owls. But, when I saw this disguised looking owl at Goodwill I knew that he had to come home with me.

owl-in-all-its-golden-glory

I just love how professional he looks with his suit and tie, He looks so serious. And the fact that he is a bust of an owl just cracked me up.  But he was gold. I didn’t think he really liked being a 70s fantastic golden owl, so I decided to help him out.  As I looked him over I noticed that he was white under his label so my thought is that he was originally white, which would be really cute as well.

But he needed to be Oil Rubbed Bronze.

spray-paint-your-owl

Protect your work space and spray in light, even coats, repeating as necessary. When he is completely covered let him dry. Once he is dried he is ready for display and he is ready to impart his wisdom.

finished-owl

I love covering my thrift finds with spray paint. I painted this Candle Holder,  and these Porch Lights, and these lanterns.  You never know what I will paint next. 

How to Reupholster an Office Chair

Hello everyone!

An office chair has got to be one of the most pieces of furniture that a person can own. You spend a ton of time in your chair so it should be comfortable and good looking. I had a chair that was wonderful, it worked great and I had it a long time. But it broke. So I had to search for a new one. After searching high and low I found one at a surplus store. It was in great condition and for only $15, I thought it was a steal. The only problem was the green fabric covering it. The color was ok, a dark green, but it was itchy and that was not ok. So I decided to recover so it didn’t drive me crazy sitting on it for 8 hours a day.

How to Reupholster an Office Chair

I think it turned out very cute. I found the fabric at Who Gives a Scrap. I talked about this awesome donation center last week. You can revisit that post here. They had this great upholstery fabric for only $2. Can’t beat that price. Here is how I went about recovering the chair.

Materials:

~Chair (this one wouldn’t be too bad if it wasn’t for the itchy fabric. Now I know why they had it for sale at the surplus store.)

How to Reupholster an Office Chair

~ Fabric (The stripped patter is cute and for only $2 I could pass that up.)

How to Reupholster an Office Chair

~ Staple gun, screw driver, glue gun, ribbon for edging

Instructions:

~ The first thing I did was take off the arm rests with the screw driver. I could have taken the whole chair apart and this might have made the process easier, but I decided to work around everything except the arm rests.

How to Reupholster an Office Chair

~ Then I measure the fabric and started stapling it on. The way this chair is constructed is a little weird. It has a plastic back and the original cover was Velcroed on, but I didn’t want to go that trouble so I decided to staple over everything.

How to Reupholster an Office Chair     How to Reupholster an Office Chair

~ I got the top part done then I went to town on the seat of the chair. The stripes made it easy to match the top to the bottom. I stapled everywhere then I went back and added more. I wanted to make sure everything held.

How to Reupholster an Office Chair     How to Reupholster an Office Chair

~ Once everything was secure and stapled on I hot glued on a tan ribbon that coordinated with the fabric. Then I put the arms back on that that was it. It took me a couple of hours to complete but it was worth it to not have an itchy chair.

How to Reupholster an Office Chair     How to Reupholster an Office Chair

Once I finished my son loved it so much he has asked me to do a chair for him. But if my chair is ever missing I know who to took it. Smile

How to Reupholster an Office Chair

Repurpose an old window into a Chalkboard

Hello Everyone!

As many of you already know I was working a project for a Mental Health Awareness charity auction. We were all repurposing and painting old windows. Here you can see my post about creating a shabby chic message board. Today I am going to walk you through how I made this chalkboard with an old window.

Repurpose an old window into a Chalkboard


Materials:

~Old window. This window had pealing paint and a crack in the Plexiglas, so it was perfect for this project.

~ Cleaning supplies and sandpaper

~ Paint, brushes, and tape for the frame

~ Primer, chalkboard paint, and brushes for the chalkboard part.


Instructions;

~ The first step is to prep the window. Not the most fun, but it is necessary for a successful project. I sanded all the edges until they were smooth and ready to paint. This took a while because the window was so rough.

Repurpose an old window into a Chalkboard

~ Then you paint the frame. I did tape off the Plexiglas because I am not the neatest painter. I used Artist’s Loft in Metallic Cobalt Blue, I love the iridescent quality of the blue paint.

Repurpose an old window into a Chalkboard

~ Paint away. Kitty help is essential to the success of any craft project Smile Starlight is my favorite kind of help, lol.

Repurpose an old window into a Chalkboard

Repurpose an old window into a Chalkboard

I did 2 coats of the blue

Repurpose an old window into a Chalkboard.

~ After the frame had dried for a day I taped off the frame part and prepped the Plexiglas. First I lightly sanded the glass so that the paint would adhere. Then I put a coat of primer on according to the directions. I used Kilz primer.

Repurpose an old window into a Chalkboard

~ Once the primer was dry I painted 4 coats of chalkboard paint on according to the directions. I used Rustoleum Chalkboard paint. Once it was dry and cured for 3 days I conditioned the chalkboard according to the directions.

Repurpose an old window into a Chalkboard

Repurpose an old window into a Chalkboard

~ Once it was completely dry and conditioned I took a stencil and painted a design in the corners and added some flowers and that is it. A new chalkboard for an old window

Repurpose an old window into a Chalkboard

Have you painted and or repurposed an old window? How did it turn out? I would love to see pictures!

Re-purpose an old window into a shabby chic message board

If you follow my Instagram (taketimetocreate) then I am sure you have already seen the reveal of this repurposed window. For those of you who don’t follow me there here the shabby chic message board!

repurpose window to shabby chic message board

I have to say I do love the way it turned out! This all started when my friend asked me to paint a window for a silent auction for mental health awareness. At first I wasn’t too interested, not because I didn’t believe in the cause (because this is one cause I totally support) it was because I wasn’t sure I had a design that would work. Most everyone else did a more traditional painted window with flowers on the glass and things like that. Well of course I didn’t follow the crowd. So I did my own thing and hopefully it will bring in a lot of money for the charity!

Here is how I did the repurposing.

Materials:
~ old window (for this to work you for magnets you will need one with a metal screen)
~ sandpaper, tape, cleaning supplies
~ paint and brush
~ cork
~ flowers, magnets, tacks, and clothes pins
~ ribbon and burlap

Instructions:
~ The first thing you will need to do is sand down all the rough edges and smooth it out. Once you like the feel of the window then give it a good cleaning.

window

~ Now you are ready to paint. I taped around the edges to help cut down on how much paint went on the screen, and this seemed to help.
Paint a couple coats until you get it to how you like it. I used this white acrylic paint that I had on hand.

white acrylic paint

~ Cut your cork down to size and glue it on to the screen. I just glued the edges with a metal glue and that seems to hold it pretty well.

add cork to window

~Then I went to work decorating the edge. Shabby chic is all about layers so that is what I did. I put down a layer of burlap, the layered on a layer of crochet ribbon that I had in my stash.

add ribbon and burlap

That looked good, but I felt like it was missing something, so I added a ribbon on top and flowers in the corners.

add more ribbon

Then I added ribbon to the bottom of the screen and to the bottom of the window. Once that was done it was time to add the flower decorations.

~ For the flowers add a magnet the back of some and tack to the others. For the clothes pins I just added ribbon to a plain clothes pin I got from the dollar store.

glue magnets to flowers

And that is it. This is a very fun project that is easy to do and I loved using what I had on hand. I can’t wait for the auction and hopefully they will make a lot of money for their cause!

repurpose window to shabby chic message board

Monogram Wood Burn Coasters

Hello Everyone!

Before I get into my DIY I just wanted to let you know that there will be some updates coming to the blog. The design will be getting an overhaul. All the same content will be here, hopefully it will be easier to find and navigate to.

I am excited for the updates, and I will keep you posted on the progress.


Last week I told you guys about my cousin getting married (I made a clutch to go with my shoes. You can see that post here) The wedding was beautiful! I am so happy for them.

I wanted to give them something special for their wedding so I decided to try out my wood burning tool. (I have had it for a while, just never used it)

I thought coasters would be good for the newly weds,  and a monogram of their last name would be perfect.

monogram wood burn coaster

Materials:

~ wood ( You can use scraps you have around, or pick some up at a store. I found mine at Michaels)

~ Wood burn tool

~ graphite paper

~ print out of what you want to wood burn (I just created my monogram in word and printed it on my computer)

~ Stain (I used a pre stain because of the nature of the soft wood I was using, then I used a natural stain, and finished with a clear coat)

~sandpaper and foam paint brushed

~ Felt or cork for the back

Instructions:

First you lightly sand the wood to make sure it is nice and smooth.

Then you transfer the design onto the wood. I traced the design with a pencil using graphite paper. This worked really well.

monogram wood burn coaster

Then I stared to outline the monogram with the wood burn tool.

 monogram wood burn coaster

This was my first attempt at making something with the wood burn tool and I learned to go at a steady pace with even pressure. 

 monogram wood burn coaster

Also be very careful, the tool is HOT. I even have the band aid to prove how hot the tool can get Smile

monogram wood burn coaster

Once it was completed and I was happy with the design I pretreated the wood with a Pre-Stain. Then I followed up with a natural stain and finished with a clear coat. Follow the directions on the stain to get the best results.

monogram wood burn coaster

Then I put self adhesive felt on the back, and then I was done!

monogram wood burn coaster

This was such a fun project!  It did take a little while to get the hand of wood burning, but now that I get it I have a ton of other projects that I have in mind! These are perfect gifts for everyone!

monogram wood burn coaster

monogram wood burn coaster

Turn an Ikea bookcase into a bench

Hello Everyone!

Isn’t Ikea one of the most wonderful places on Earth? I mean they have everything, all in one place!

Well a little while ago I was looking for the perfect bench to put in my kitchen, near the door. I couldn’t find anything that I liked, but I did see people on Pinterest turning an Ikea bookcase into a bench.

Turn an Ikea bookcase into a bench

It is very simple to do.

Materials:

~ bookcase the is strong enough to handle the weight when tipped on its side. I used the Ikea Expedit, but I don’t think they have that anymore. But check around they might have a suitable alternative.

~ Plywood for the top

~ Foam cushion

~ Fabric

~ Staple gun

Instructions:

~ First assemble the bookcase. They might take awhile and you might need help. If you want to raise the height now is the time to add legs to the bench. I didn’t want them, but you may want something different

~ For the cushion, cut the plywood the size of the bench top

~ Then  you make a sandwich of fabric on the bottom, ( I used a strip to help me keep it all in line. The fabric possibilities are endless) then the foam and lastly the plywood. Then stretch and staple all around.

Turn an Ikea bookcase into a benchTurn an Ikea bookcase into a bench

Turn an Ikea bookcase into a bench

I used this same technique when we redid the entry closet. You can see that transformation: here

Turn an Ikea bookcase into a bench

And that is it. A very easy way to transform a room and increase your storage.

Is there any Ikea transformations that you have done in your house?

Vintage Button Magnets

So as you all probably know by now I love buttons. I made this letter S a few years ago and I still love it. Buttons are so much fun to go through and sort and reminisce about. I think they are one of my favorite crafting item.

So I made another craft with buttons. This time I made button magnets.

In addition to the crafting I decided to reopen my Etsy store and sell some of the things I make here on this blog. Stop by and check it out: TakeTimeToCreate.

Here is how you can make your own button magnets

Materials:

~ Buttons (so many buttons!!! And this is only a small portion of what my mom gave me! She is the best!)

Box of buttons     Buttons

~ Magnets

~ Glue (I am using my trusty E-6000)

~ Clippers or something to cut the shank off


Instructions

~ prep the buttons. You might need to clean them a bit or snip off the shank. Be careful because pieces of plastic might go flying.

Cut off the shank

~ Stack the buttons to create a different looks. Glue the stacks as necessary.

layer the buttons     layer the buttons

~ Glue the back of the button and add the magnet

Glue on the back of buttonAdd magnet to backAdd magnet to Button

~ Wait for them to dry and then put them up on your fridge. You can see I use them to hold pictures of Cole. I love his monster and dino magnets he made when he was little. So cute! Sigh he is not so little anymore.

Stay tuned for DIYs on how I made the little canvas magnets and the bottle glass magnets.

Display button magnet     Display button magnet

Here are some of the completed magnet sets that I have on Etsy just to give you an idea of what you can do with magnets and buttons. These make great house warming gifts!

Button magnets     Button magnets

Button magnets     Button magnets

Easy DIY Scarf Holder

I know I am way late to the scarf train, but now that I am aboard I am all about scarfs! I love how you can take a basic outfit and dress it up with a simple scarf, and they make your wardrobe so much more versatile!

Well now that I have accumulated a fair number of scarfs I ran in to the problem of where to store them. I wanted the in a location that I could see them so I didn’t forget about them in the morning. Also I wanted the scarfs to hang so they didn’t get too wrinkly (less ironing, which is always a good thing)

So we can up with the solution of finding a way to hang them on the back of the closet door. Please excuse any mess you see in my closet, organization is an ongoing problem in there.

Easy DIY Scarf Holder

This is a fast and easy way to hang your scarfs

Materials:

~ Dowel Rod

Easy DIY Scarf Holder

~ Adhesive hooks (I used 3M Command hooks)

~ Level (for hanging)

~ Duck Tape (Used this great purple Prism color)

Easy DIY Scarf HolderEasy DIY Scarf Holder

Instructions:

~ cut your dowel to length. I wanted 2 rows, so I just cut them the length I needed. We had a saw at home, but the home improvement store can cut it for you if needed.

~ I was worried about the wood snagging my scarfs so I decided to wrap it in Duck tape. It also has the added benefit of being purple and sparkly.

Easy DIY Scarf Holder

~ Attach your hooks to your door, or where ever you want your scarf holder. (My fabulous husband was nice enough to help me hang it up and make sure it was level)

Easy DIY Scarf Holder

Easy DIY Scarf Holder

~ Add the dowel rods

Easy DIY Scarf Holder

~ Add your scarfs and you are done!

Easy DIY Scarf Holder


It was that easy!

Gallery Wall

Today I thought I would take a moment and show you my gallery walls that are in my house. I love to have photos of my family and our favorite vacation spots on our walls in our house. Since we don’t have a ton of wall space we needed to be creative in how we display our pictures. So we set up two gallery walls. One in a 3 x 3 grid and looks a little modern with our black and white pictures. The other is a little more free flow. I will show you both and how we put them together.

gallery walls

gallery walls

Black and White Grid

This was a fun  way to show our favorite vacation spots. We love to travel and we have tons of pictures from our travels, so what better way to show where we have been than with a gallery wall. The frames are 12 x 12 black frames I got at Aaron Brothers, but I think you can get them pretty much anywhere, including online.  I had our photos printed at Walmart in black and white in and  8×10 size. I added a blurred boarder around the edges. When I got the photos I glued them on to a 12 x12 piece of card stock and framed the photo. We then hung them in a 3 x 3 grid pattern. Very easy to do and it is a nice way to show case you travel photos.

Here is a close up of the photos

gallery wall

If you want to see how we painted our couch you can see this blog post.


gallery walls

Gallery Wall

The other wall was a little bit less defined. Going up our stairs we thought it would be fun to show our family pictures and other things that mean a lot us. First we laid it out on the floor (and yes that is Starlight “helping”). I am so sorry for the blurry pictures, these are just terrible…

gallery walls

Anyway we laid out that pattern and when we found a pleasing layout we took papers in the sizes of the frames and laid it out on the actual wall so we could get a good idea of placement. Once we were happy we pounded in nails and hung up everything.

gallery walls

On this wall we have our family pictures, a favorite saying (Live well, laugh often, love much) a letter S that I put buttons on (the how to blog post is here) and a beautiful hand pained tile we got in the Bahamas. And we have prints with what our names mean. It is a wonderful grouping of things we love.

gallery walls

gallery walls


What do you think of our gallery? How do you hang pictures in your home?

« Older posts Newer posts »

© 2024 Take Time To Create

Theme by Anders NorenUp ↑

Follow

Get the latest posts delivered to your mailbox:

%d bloggers like this: