Tag: home improvement

No Sew Cat Bed

Hello Everyone!

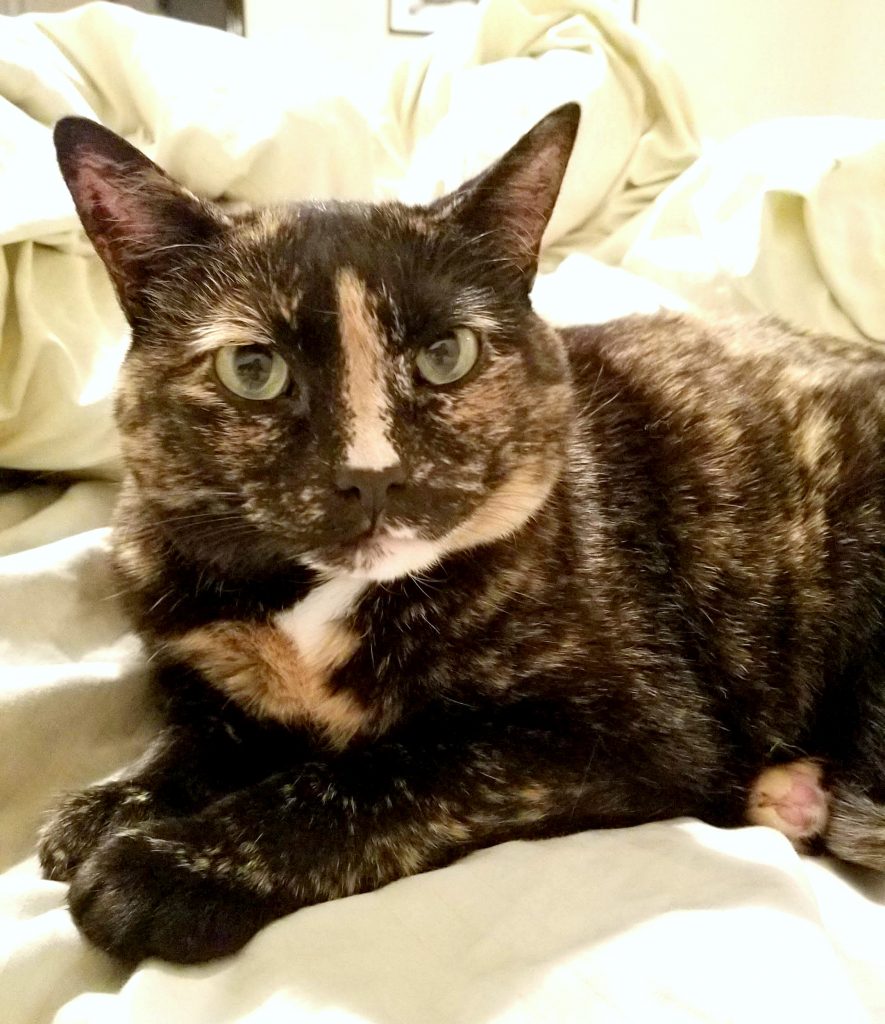
I have a cat that thinks she is a princess, and since she is a princess she needed a pink velour bed with gold trim. And since I don’t sew, I had to create a no sew version.

Our cat rules the house, lol. And since she does this pretty pink pillow is perfect for her. 

Starlight
Starlight

This pillow is easy to create. Take 2 pieces of fabric and glue them together with fabric glue. If you want trim add it now. Make sure you leave a hole so you can stuff the pillow with ploy fill. 

Stuff your pillow and then glue the hole shut. That is it. Such a fun, easy way to create a new space for your pet.

No sew cat bed

I placed the bed on the trunk that Starlight sleeps on. The trunk is super hard and I thought she would appreciate the soft pillow. In true cat form she refused to pose for a picture, lol

But at least she has a new bed when she is ready to sleep on it. What other no sew projects do you work on?

Affiliate links:
Fabric Fusion https://amzn.to/2tvf0eF
Poly Fill https://amzn.to/2TJUNgt
Pink Velour (I found mine at a creative reuse center, but this is similar) https://amzn.to/2N6CFe5
Gold Cord trim (I found mine at a creative reuse center, but this is similar) https://amzn.to/2TPcdbE

The post No Sew Cat Bed appeared first on Take Time To Create.


Re-purpose an old window into a shabby chic message board

If you follow my Instagram (taketimetocreate) then I am sure you have already seen the reveal of this repurposed window. For those of you who don’t follow me there here the shabby chic message board!

repurpose window to shabby chic message board

I have to say I do love the way it turned out! This all started when my friend asked me to paint a window for a silent auction for mental health awareness. At first I wasn’t too interested, not because I didn’t believe in the cause (because this is one cause I totally support) it was because I wasn’t sure I had a design that would work. Most everyone else did a more traditional painted window with flowers on the glass and things like that. Well of course I didn’t follow the crowd. So I did my own thing and hopefully it will bring in a lot of money for the charity!

Here is how I did the repurposing.

Materials:
~ old window (for this to work you for magnets you will need one with a metal screen)
~ sandpaper, tape, cleaning supplies
~ paint and brush
~ cork
~ flowers, magnets, tacks, and clothes pins
~ ribbon and burlap

Instructions:
~ The first thing you will need to do is sand down all the rough edges and smooth it out. Once you like the feel of the window then give it a good cleaning.

window

~ Now you are ready to paint. I taped around the edges to help cut down on how much paint went on the screen, and this seemed to help.
Paint a couple coats until you get it to how you like it. I used this white acrylic paint that I had on hand.

white acrylic paint

~ Cut your cork down to size and glue it on to the screen. I just glued the edges with a metal glue and that seems to hold it pretty well.

add cork to window

~Then I went to work decorating the edge. Shabby chic is all about layers so that is what I did. I put down a layer of burlap, the layered on a layer of crochet ribbon that I had in my stash.

add ribbon and burlap

That looked good, but I felt like it was missing something, so I added a ribbon on top and flowers in the corners.

add more ribbon

Then I added ribbon to the bottom of the screen and to the bottom of the window. Once that was done it was time to add the flower decorations.

~ For the flowers add a magnet the back of some and tack to the others. For the clothes pins I just added ribbon to a plain clothes pin I got from the dollar store.

glue magnets to flowers

And that is it. This is a very fun project that is easy to do and I loved using what I had on hand. I can’t wait for the auction and hopefully they will make a lot of money for their cause!

repurpose window to shabby chic message board

Easy DIY Scarf Holder

I know I am way late to the scarf train, but now that I am aboard I am all about scarfs! I love how you can take a basic outfit and dress it up with a simple scarf, and they make your wardrobe so much more versatile!

Well now that I have accumulated a fair number of scarfs I ran in to the problem of where to store them. I wanted the in a location that I could see them so I didn’t forget about them in the morning. Also I wanted the scarfs to hang so they didn’t get too wrinkly (less ironing, which is always a good thing)

So we can up with the solution of finding a way to hang them on the back of the closet door. Please excuse any mess you see in my closet, organization is an ongoing problem in there.

Easy DIY Scarf Holder

This is a fast and easy way to hang your scarfs

Materials:

~ Dowel Rod

Easy DIY Scarf Holder

~ Adhesive hooks (I used 3M Command hooks)

~ Level (for hanging)

~ Duck Tape (Used this great purple Prism color)

Easy DIY Scarf HolderEasy DIY Scarf Holder

Instructions:

~ cut your dowel to length. I wanted 2 rows, so I just cut them the length I needed. We had a saw at home, but the home improvement store can cut it for you if needed.

~ I was worried about the wood snagging my scarfs so I decided to wrap it in Duck tape. It also has the added benefit of being purple and sparkly.

Easy DIY Scarf Holder

~ Attach your hooks to your door, or where ever you want your scarf holder. (My fabulous husband was nice enough to help me hang it up and make sure it was level)

Easy DIY Scarf Holder

Easy DIY Scarf Holder

~ Add the dowel rods

Easy DIY Scarf Holder

~ Add your scarfs and you are done!

Easy DIY Scarf Holder


It was that easy!

Gallery Wall

Today I thought I would take a moment and show you my gallery walls that are in my house. I love to have photos of my family and our favorite vacation spots on our walls in our house. Since we don’t have a ton of wall space we needed to be creative in how we display our pictures. So we set up two gallery walls. One in a 3 x 3 grid and looks a little modern with our black and white pictures. The other is a little more free flow. I will show you both and how we put them together.

gallery walls

gallery walls

Black and White Grid

This was a fun  way to show our favorite vacation spots. We love to travel and we have tons of pictures from our travels, so what better way to show where we have been than with a gallery wall. The frames are 12 x 12 black frames I got at Aaron Brothers, but I think you can get them pretty much anywhere, including online.  I had our photos printed at Walmart in black and white in and  8×10 size. I added a blurred boarder around the edges. When I got the photos I glued them on to a 12 x12 piece of card stock and framed the photo. We then hung them in a 3 x 3 grid pattern. Very easy to do and it is a nice way to show case you travel photos.

Here is a close up of the photos

gallery wall

If you want to see how we painted our couch you can see this blog post.


gallery walls

Gallery Wall

The other wall was a little bit less defined. Going up our stairs we thought it would be fun to show our family pictures and other things that mean a lot us. First we laid it out on the floor (and yes that is Starlight “helping”). I am so sorry for the blurry pictures, these are just terrible…

gallery walls

Anyway we laid out that pattern and when we found a pleasing layout we took papers in the sizes of the frames and laid it out on the actual wall so we could get a good idea of placement. Once we were happy we pounded in nails and hung up everything.

gallery walls

On this wall we have our family pictures, a favorite saying (Live well, laugh often, love much) a letter S that I put buttons on (the how to blog post is here) and a beautiful hand pained tile we got in the Bahamas. And we have prints with what our names mean. It is a wonderful grouping of things we love.

gallery walls

gallery walls


What do you think of our gallery? How do you hang pictures in your home?

© 2024 Take Time To Create

Theme by Anders NorenUp ↑

Follow

Get the latest posts delivered to your mailbox:

%d bloggers like this: