Tag: craft diy (page 3 of 9)

Easy DIY Thank You Cards

Hello Everyone!

Thank you cards are something we all need to have and these easy DIY cards are perfect for almost any occasion. And since I am obsessed with watercolors, these are right up my alley 🙂

These would be great gifts for new homeowners, newly weds, or graduates.


Materials (Affiliate Links):

  • Water Color Postcards: http://amzn.to/2EmGb2S
  • Van Gogh Water Colors: http://amzn.to/2GaSfRs
  • Dylusions Ink: http://amzn.to/2suEniH
  • Washi Tape
  • Thank you stamp

Instructions:

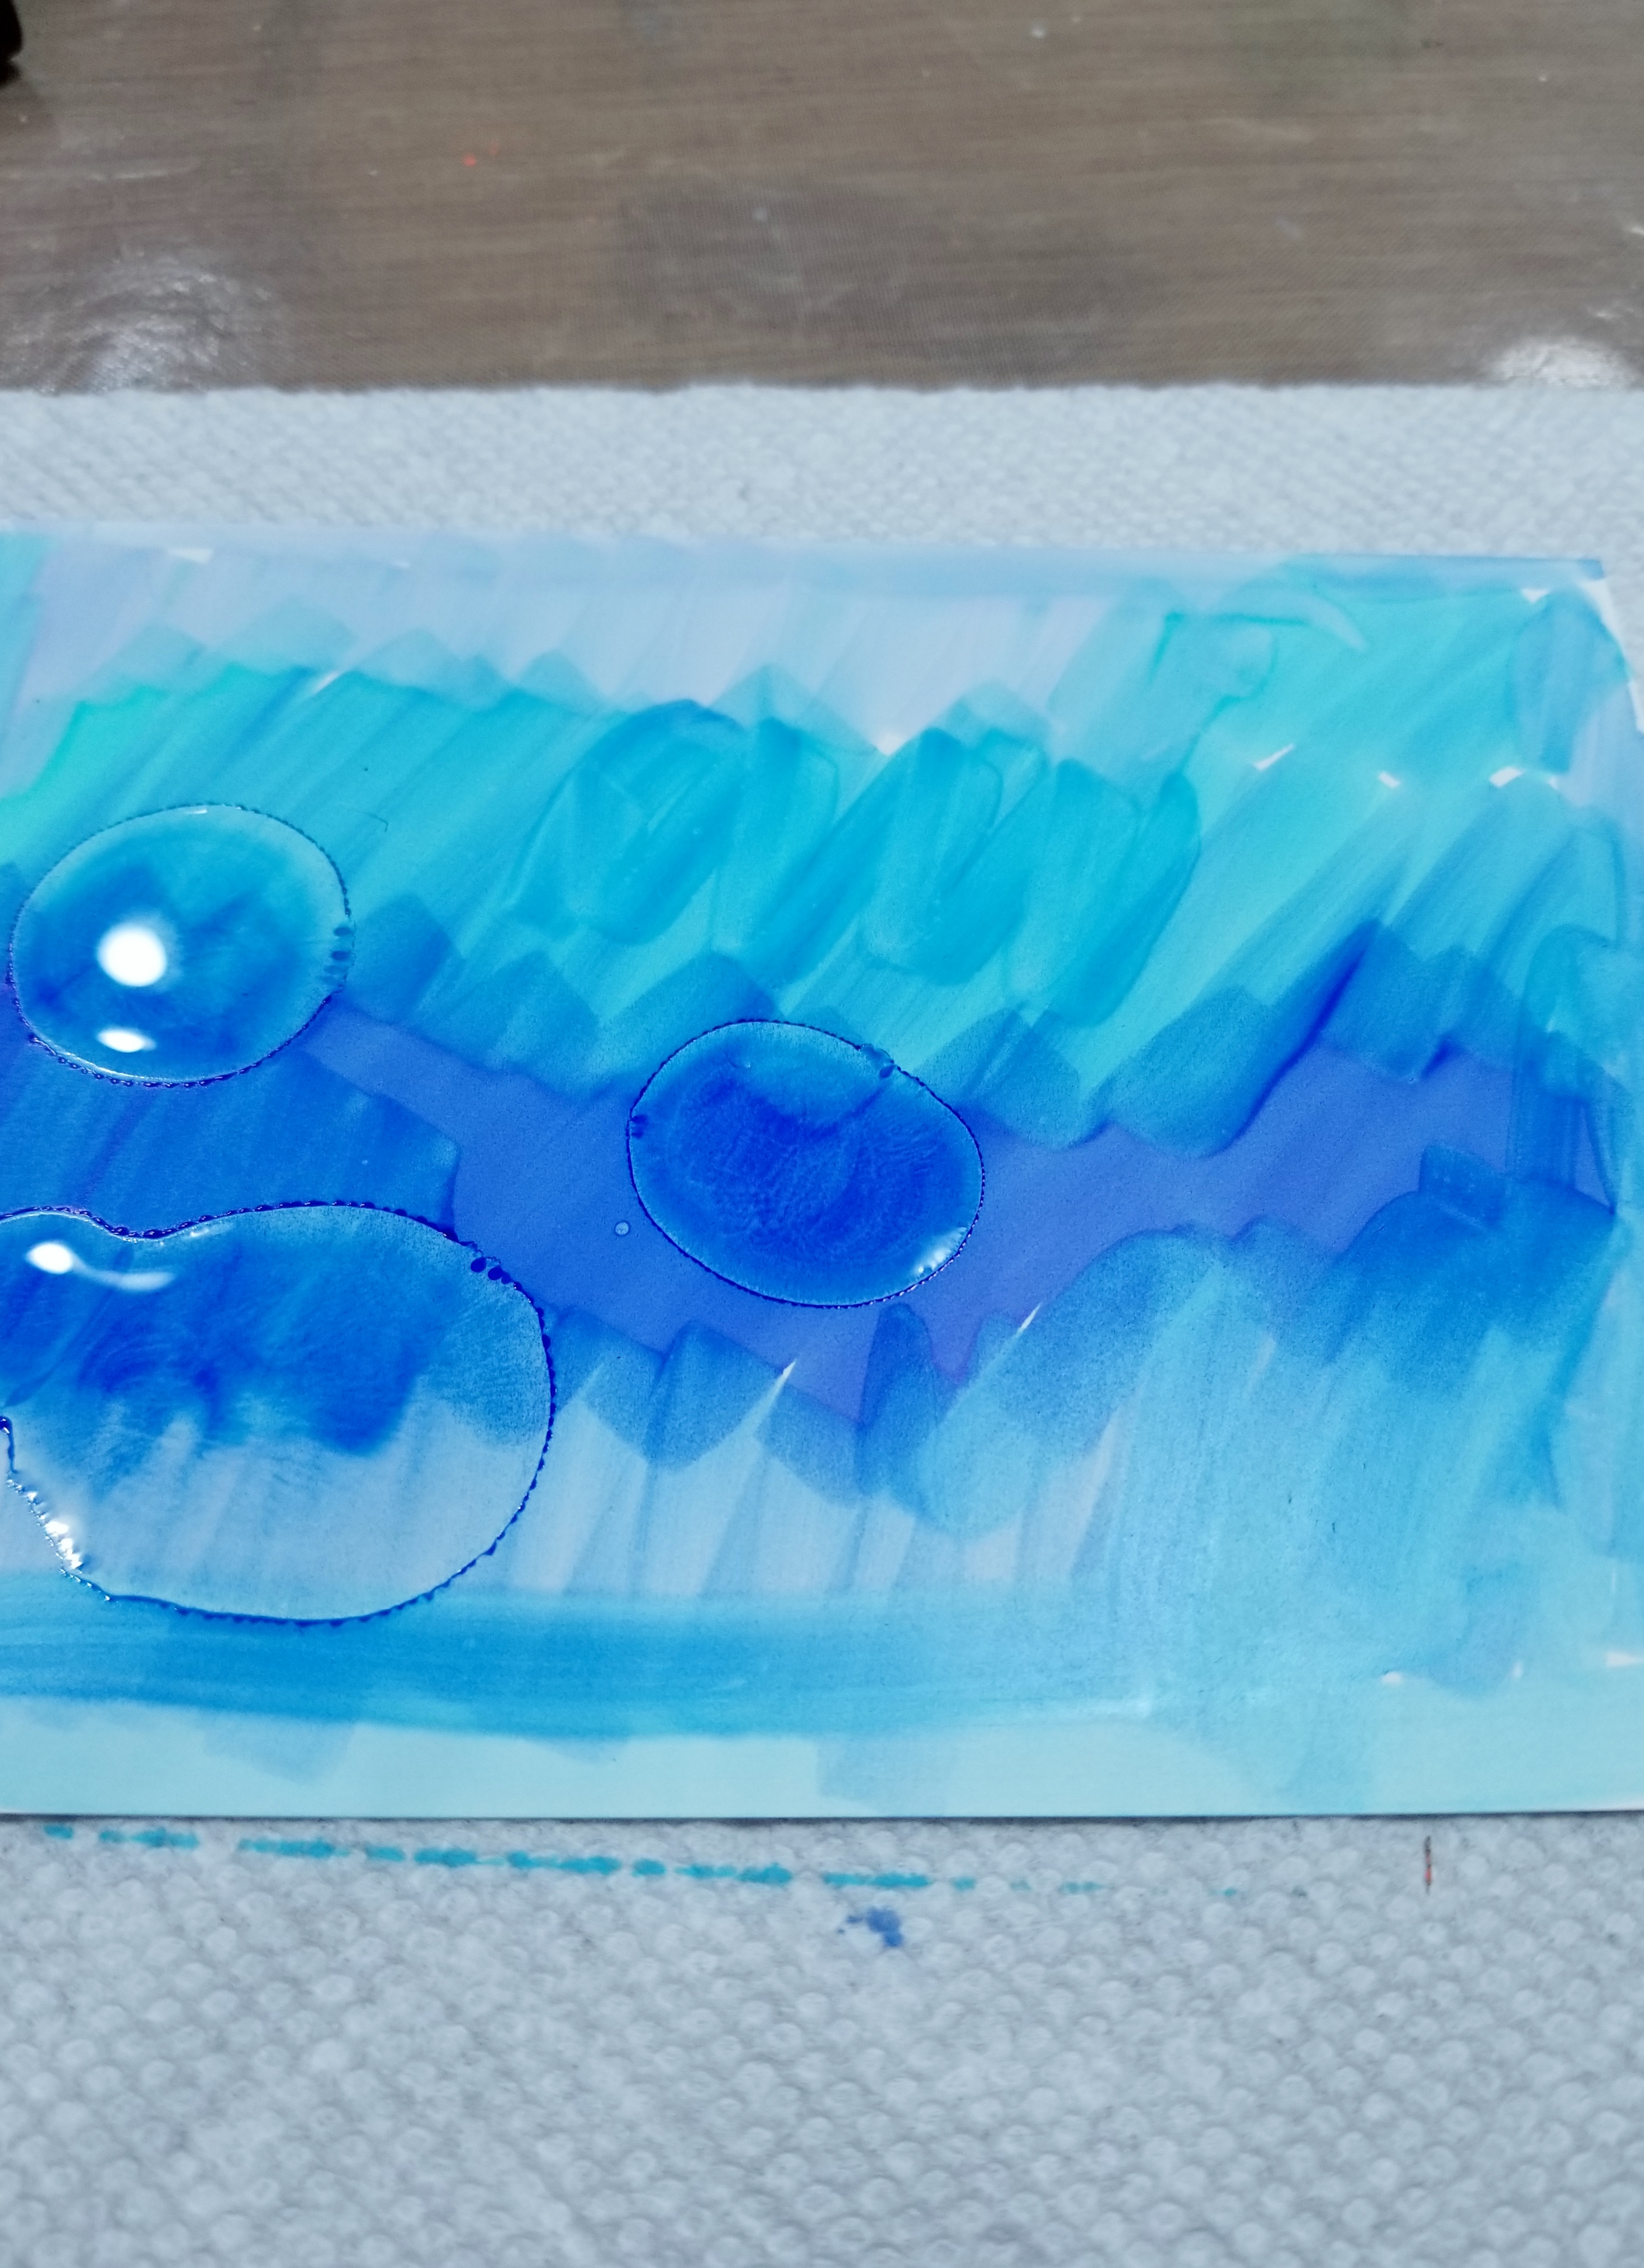
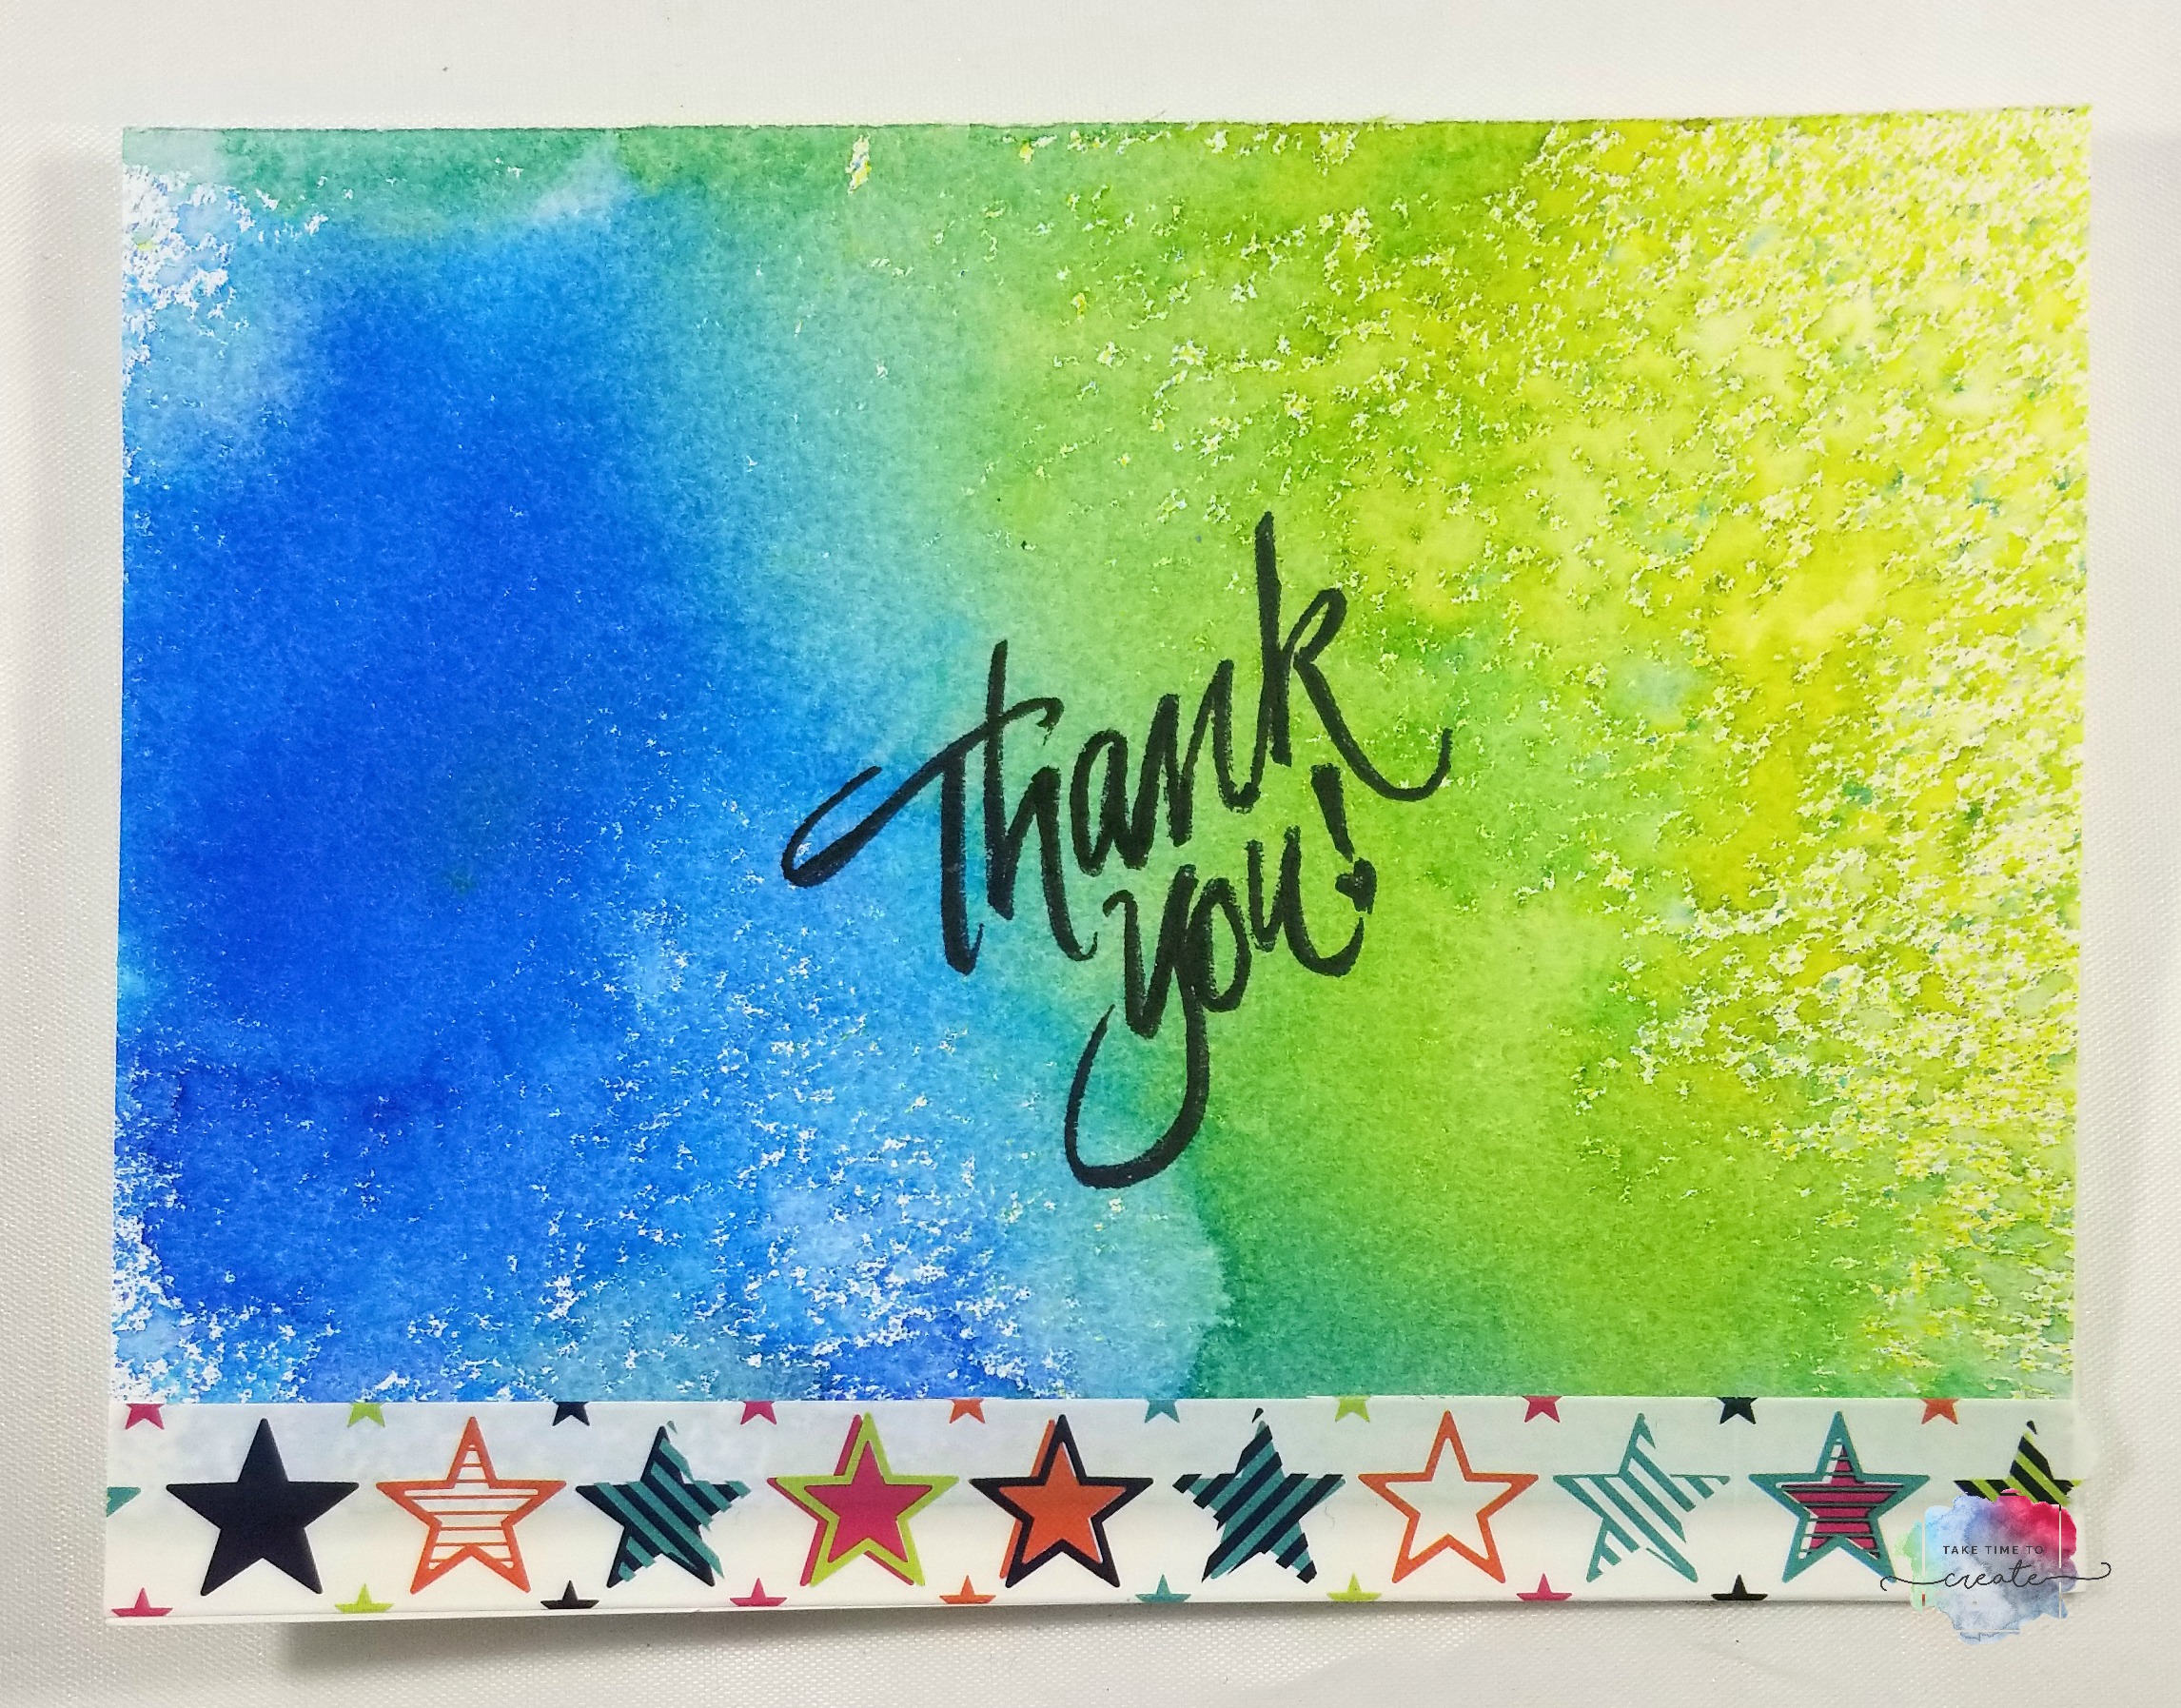
This first card is super easy and looks really cute. All you do is spritz the watercolor card with water and then lightly spray 2 different Dylusions ink sprays.  Move the card to blend the colors in the middle, then add some washi tape at the bottom and stamp Thank You in the middle and you are done! Quick and easy and they look great!

Watercolor thank you cards

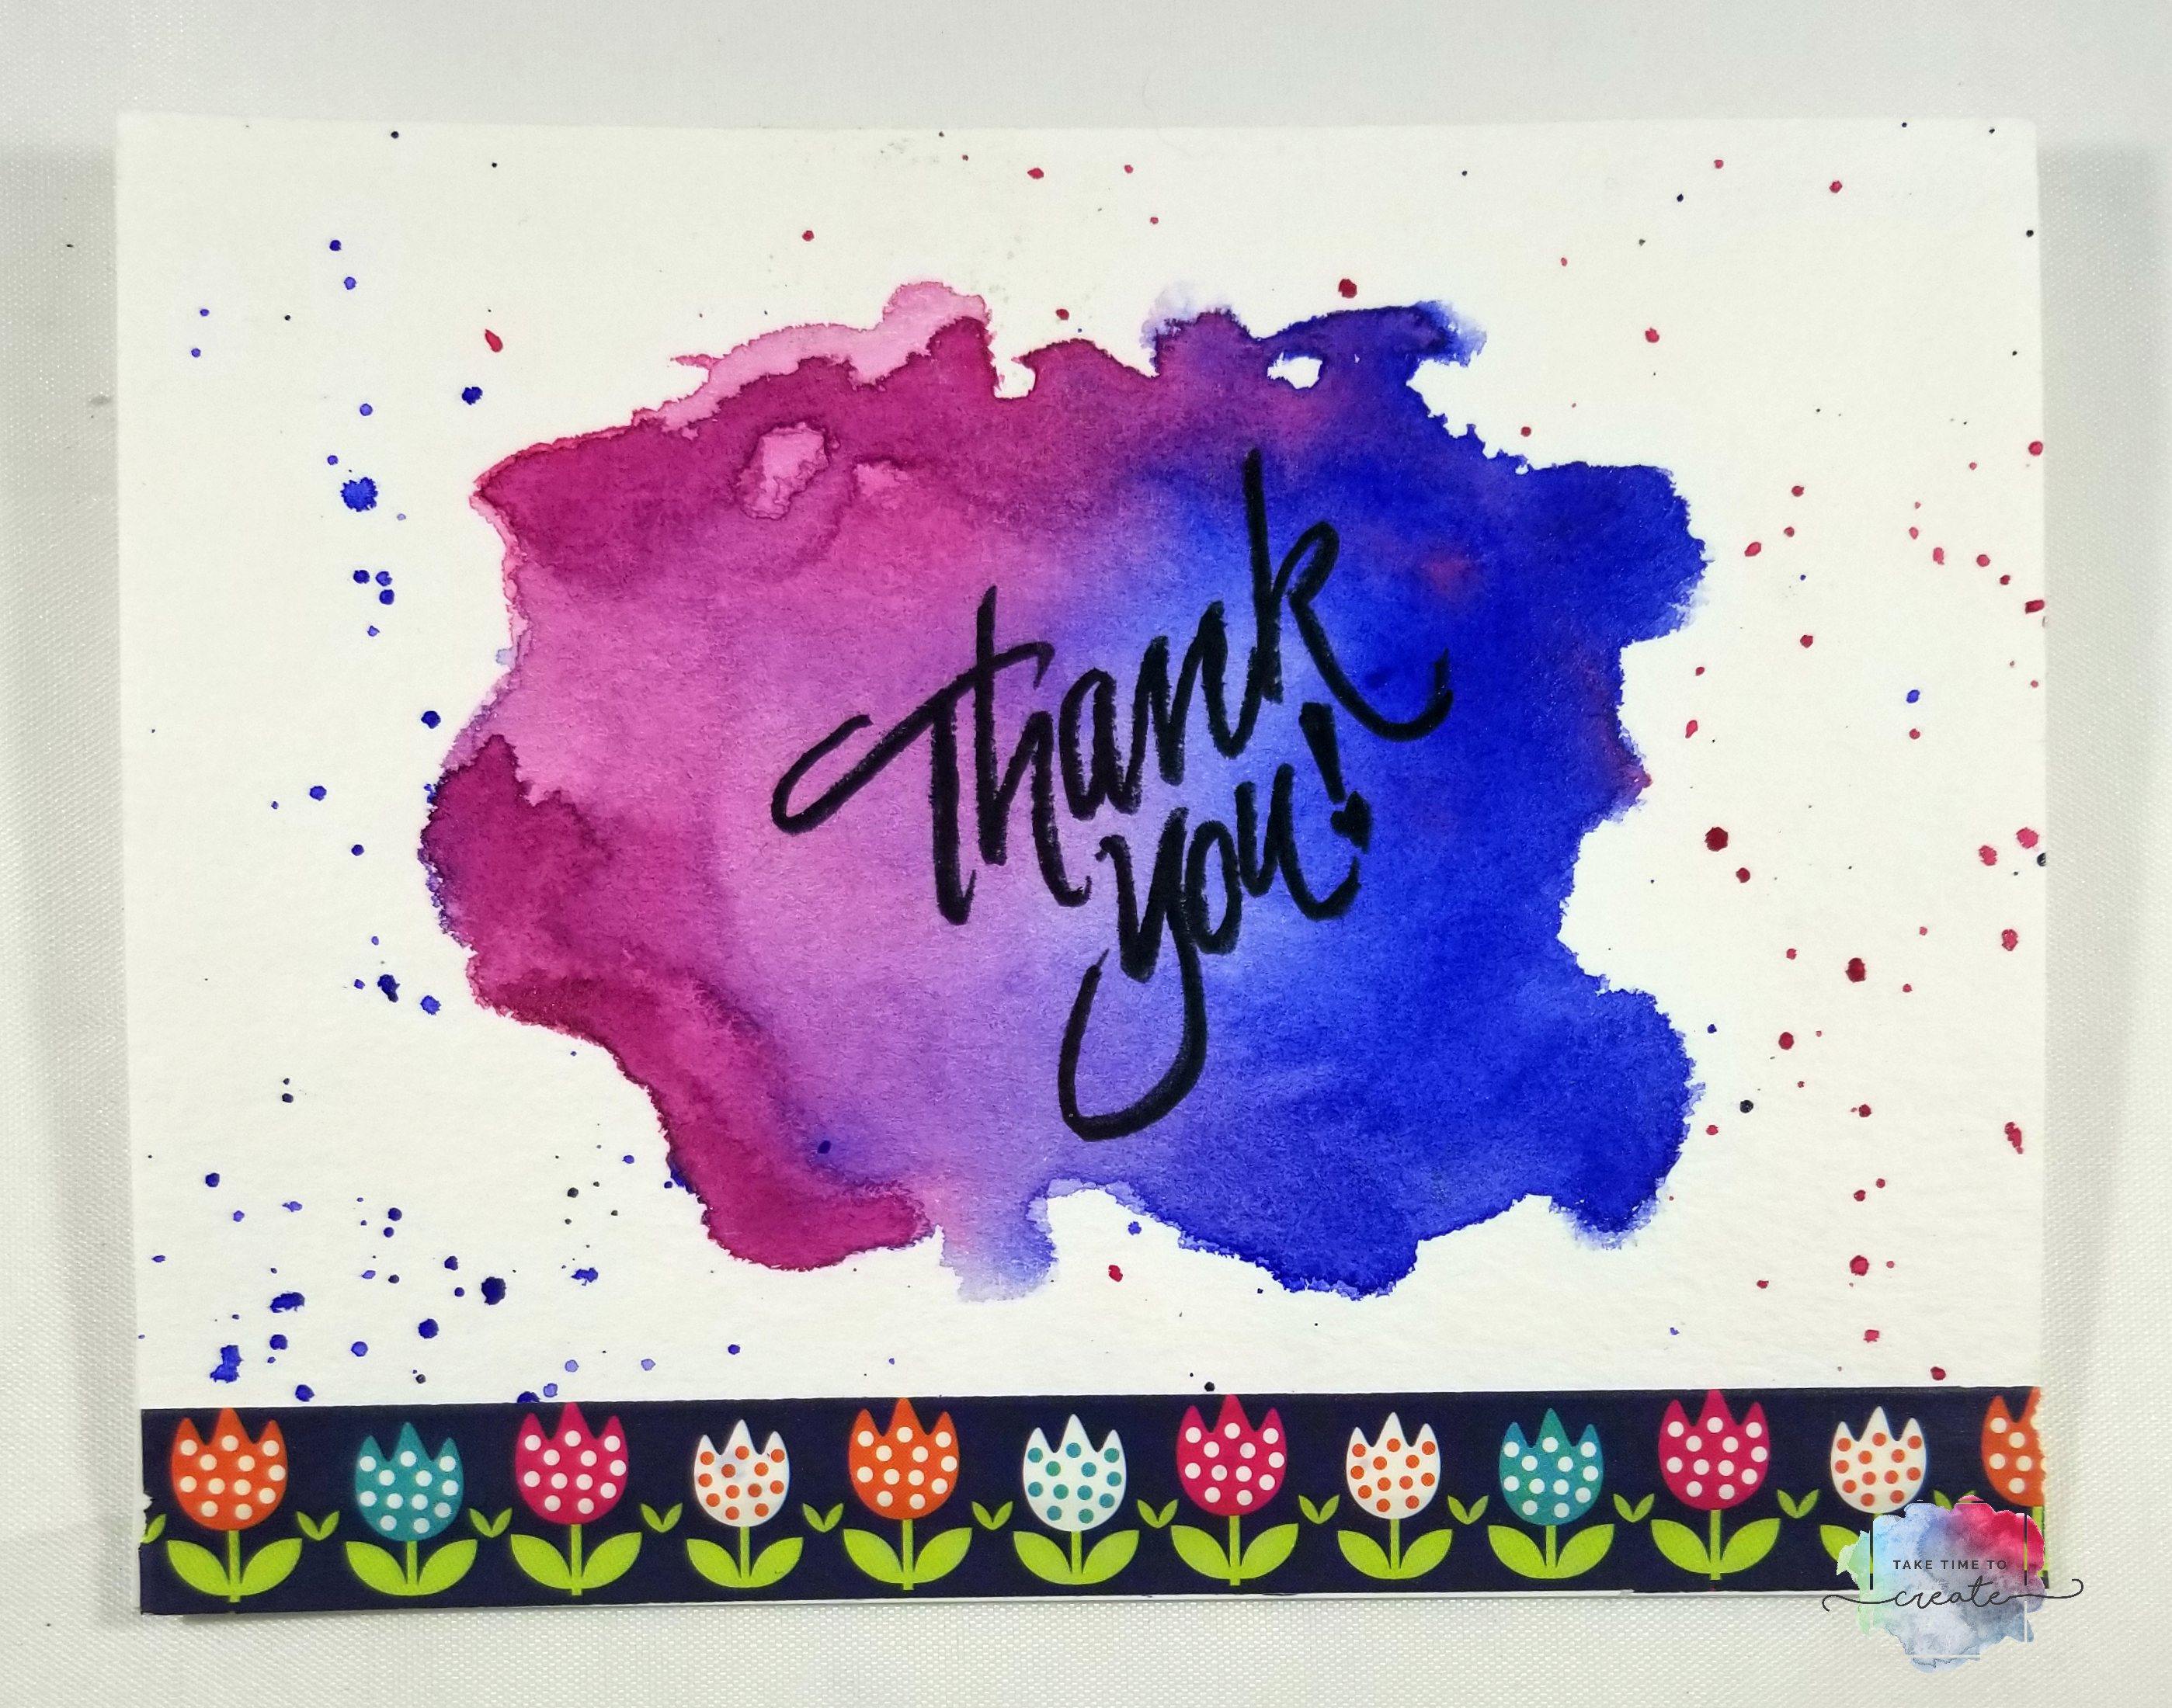
This next card is also super fun and easy to make. Which is great because you can make a lot of them ahead of time and have them ready! For this one take a wet paint brush and paint with water in a blob type shape. Then add some watercolors into the blob, you can mix the 2 in the middle and blend them together. Add splashes and a stamped Thank You to the middle and some washi tape on the bottom. Now you have another Thank you card for your stash.

Watercolor thank you cards

This last card takes a little longer, but it is worth it. All you do is watercolor the sky, starting with the lightest color and work your way darker.  Blend carefully, you don’t want to create mud.  Once the sky is dry it is time to paint the mountains. I just used black acrylic paint to make the mountains and then I lightly drew in the trees with the same paint. Now you have a cute sunset card that is perfect for all occasions.

Watercolor thank you cards


Watercolor thank you cards

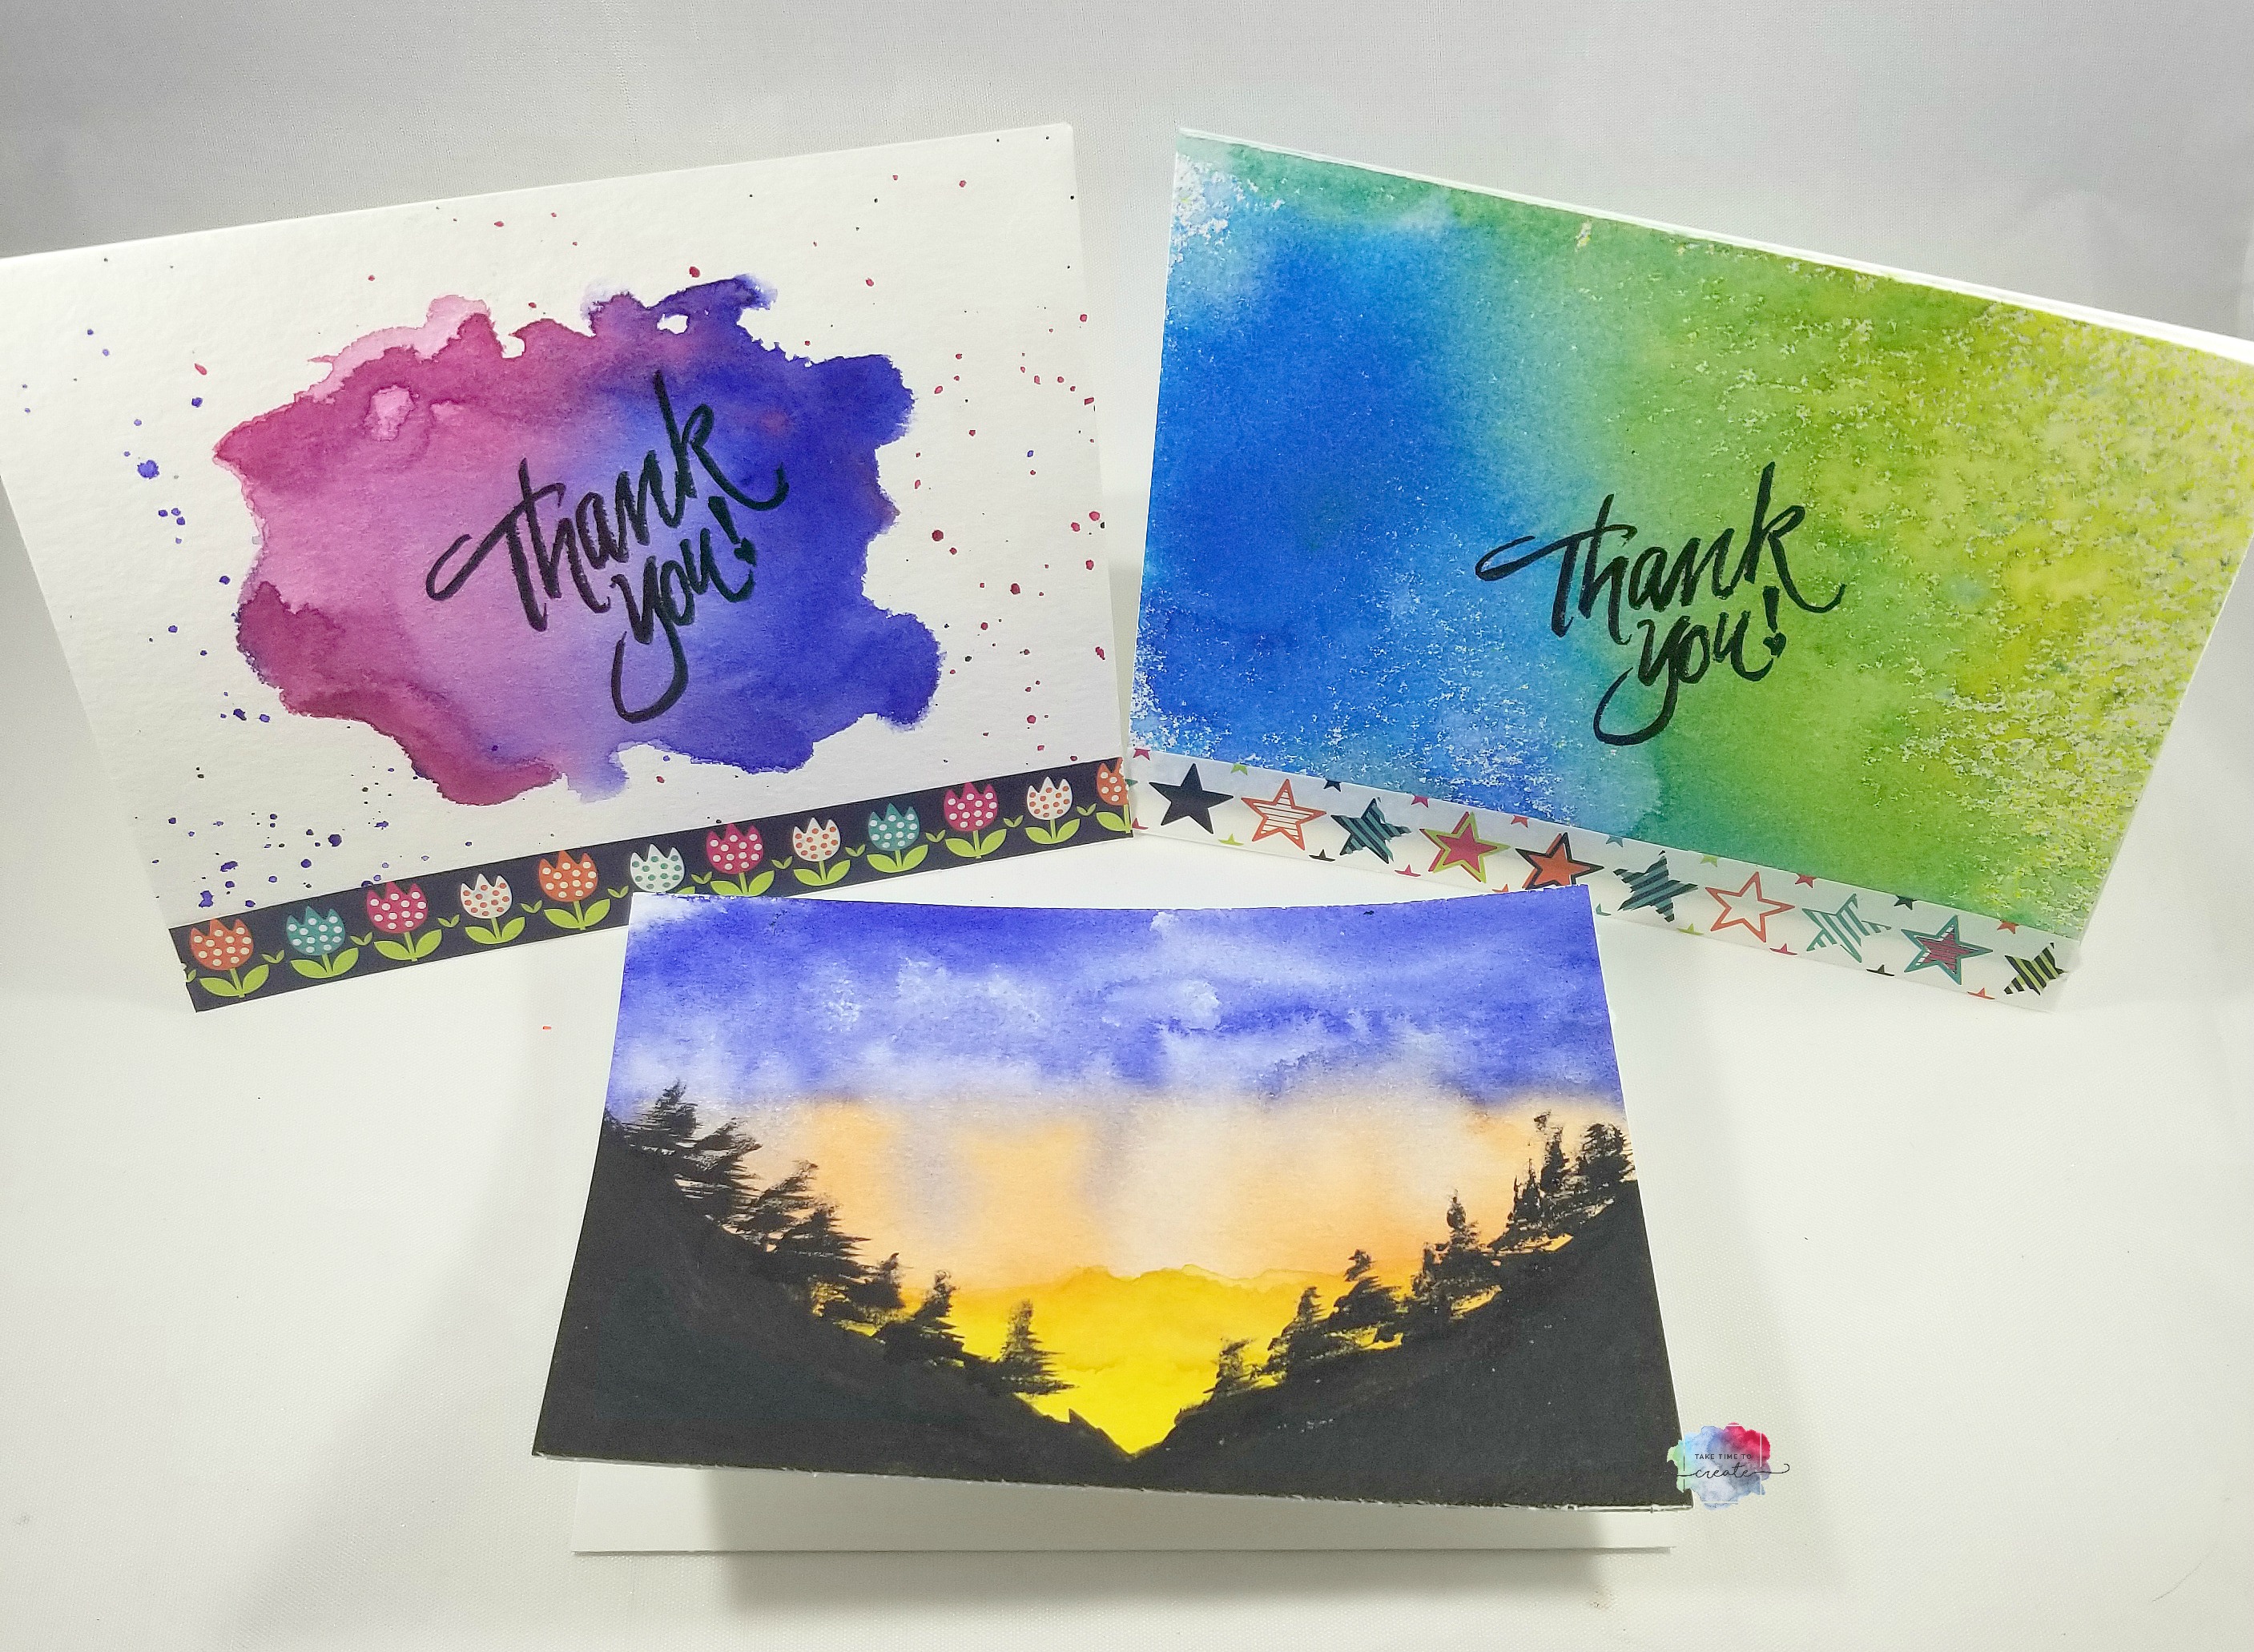
There you have it, 3 easy watercolor Thank You cards.

The post Easy DIY Thank You Cards appeared first on Take Time To Create.

Beach Landscape with Fabric- Mixed Media Canvas

Hello Everyone!

Fabric Beach Landscape Mixed Media Canvas

Don’t you just love it when a plan comes together? Recently I went to Hawaii with my family and I went to Quilt and Fabric land and I picked up a pile of fat quarters (with complete honesty, I don’t sew but I do glue things onto canvases, lol) I knew I wanted to make a beach landscape mixed media canvas. I am so thrilled with how it turned out, just how I imagined it!

You can see the video here in case you need more in depth instructions:


Materials:

Affiliate links to products I used (or similar)


Instructions:

Use any sized canvas you want, I used a 20×20 and painted the edges with black acrylic paint.


Fabric Beach Landscape Mixed Media Canvas

First cut your fabric into strips then plan out what you want you canvas to look like. I wanted a beach landscape with a sun set, so I used a lot of blues for the sky, turquoise for the water, tans for the beach, and yellow, reds, and oranges for the sun. This will give you a rough idea of what it will look like, but things will move and shift and you will change your mind throughout the process, which is perfectly fine.

Fabric Beach Landscape Mixed Media Canvas

Now, we need to adhere everything down. So I took a heavy gloss gel (modeling paste would work as well) and spread a thin layer on to the canvas. Then I dipped a strip of fabric into the soft gloss gel and soaked the fabric (make sure you ring it out out) then I crinkled it up and put it on the canvas.  I wanted to to stay in place and this seemed to work great.

Fabric Beach Landscape Mixed Media Canvas

I started with the sun, which was my focal point and then I built the scenery up from there. This does take a while, but be patient and take breaks if needed. Then let it dry completely before moving on to the next step.

Fabric Beach Landscape Mixed Media Canvas

Once it was all dry I adhered sea shells on to the fabric with the heavy gel. I wanted to add more texture and interest to the canvas.

Then I dry brushed on different paints in metallic and sparks colors to add even more detail.

Fabric Beach Landscape Mixed Media Canvas

Fabric Beach Landscape Mixed Media Canvas

Fabric Beach Landscape Mixed Media Canvas


Fabric Beach Landscape Mixed Media Canvas

I love how this turned out and I can’t wait to create more landscapes with fabric!

What scene should I create next?

The post Beach Landscape with Fabric- Mixed Media Canvas appeared first on Take Time to Create.

Investigative Art Journal You Tube Series

Hello everyone!

I you all had a wonderful holiday. I relaxed and had a great time off, but now it is time to get back to work, lol.

As many of  you know I have a You Tube Channel where I feature a lot of the projects that I do right here on the blog, but I do have a series that I haven’t mentioned here. This new series I started is called Investigative Art Journal this is where I take art and craft supplies and I weight them, test them, and destroy them to learn things and to see how much product is there.

Craft supplies can be really expensive and was curious as to how much product is actually in a tube.  I am hoping that these video will help you with your purchasing decisions.

In my first video I checked out Faber-Castell Gelatos:

This was so much fun and eye opening! There was a surprising amount of product in that little Gelato.  It makes me feel a little better about buying all the colors, lol. But now I need to use them all, but that might take a million years, lol.

I have created a few videos, but the one that surprised me the most is the Stickles:

When I thought I was done, when I couldn’t squeeze out another drop I cut it open and I was surprised to see how much was left! You won’t believe it when you see the video. So make sure you cut open the bottle when you think  you are done.

Here is a link to my playlist so you can check out all my videos:

I would love for you to check out my channel and subscribe.

This has been a super fun project and I have a ton of other products I am going to test this year.

Is there anything you would like me to test and check out? Leave me your suggestions below and I will see what I can do.

The post Investigative Art Journal You Tube Series appeared first on Take Time To Create.

Christmas Tree Mixed Media Canvas

Hello Everyone!

Christmas is almost here! In anticipation I created this Christmas Tree Mixed Media Canvas. I just love everything about the Christmas season and this canvas put me in the holiday spirit!

I did a video tutorial that goes over all the steps and I will try and describe what I did in the instructions below (but the video might be easier to follow along with all the steps, lol).


Materials: (Affiliate links)

  • Canvas: http://amzn.to/2BaGRH
  • Dina Wakley Stencil: http://amzn.to/2ySBrKY
  • Liquitex Glass beads: http://amzn.to/2ySpaWR
  • Artists Loft Paint: http://amzn.to/2zjU3qA
  • Blue Mica Powder: http://amzn.to/2B9JVDc
  • Deep Water Mica Powder: http://amzn.to/2yThMdN
  • Finnabair silver wax: http://amzn.to/2jcRaz7
  • Finnabair bronze wax: http://amzn.to/2yTtqFD
  • Laser cut snowflakes (Similar): http://amzn.to/2jcRVYU
  • Gel Sticks: http://amzn.to/2BtzMyk
  • Gel Pen: http://amzn.to/2oC3Rsy

Instructions:

Start with an 11×14 canvas and cover it with old music. This is a great way to break up the background and start a canvas.

Now it is time to add color and texture. I used the Dina Wakley stencil and added glass beads to the bottom. Then I painted the sky with a few different blues and the snow with white. Don’t forget to paint the edges. for sparkle I added Mica powders and spread them out with water and let it drip to the bottom. Let this all dry before going on to the next step.

Christmas Tree Mixed media Canvas


Now it is time to prep the tress. Find 3 different Christmas papers that will work for trees and cut them into triangles.


Christmas Tree Mixed media Canvas

Then I used a gel stick to add color to the edges and smeared it in then I added a white line on top with a gel pen. This added dimension to the trees.

For the snowflakes I painted the wood cut out with liquid watercolors and then added some Finnabair wax on top. For the tree trunk I painted them with a Finnabair wax.

Christmas Tree Mixed media Canvas

I glued it all on the canvas with hot glue then I added white splashes with watered down white acrylic paint.  Seal it all with a spray sealer when you are done then hang it up and you decor is now complete!


Christmas Tree Mixed media Canvas


Christmas Tree Mixed media Canvas


Christmas Tree Mixed media Canvas


Christmas Tree Mixed media Canvas

What season or holiday should I do next for my next canvas?

The post Christmas Tree Mixed Media Canvas appeared first on Take Time to Create.

Christmas Card Using Yupo Paper

Hello Everyone!

I love making handmade cards for the holidays, I think they add the perfect touch and a little something extra special for the recipient. I have a quick tutorial for a Christmas Card using Yupo Paper.

The video might be the easiest way to see the process, but I will do my best to describe the process.

Materials (affilliate links):

  • Yupo Paper: http://amzn.to/2l5MkYt
  • Prismacolor Markers: http://amzn.to/2krq5YX
  • Christmas paper (not the one I used, but it will work): http://amzn.to/2l39qii
  • Snowflake embossing folder (not the same one I used, but it will work): http://amzn.to/2kqPVwj 
  • Christmas tree die cut (not the same one I used, but it will work):  http://amzn.to/2AdU90U
  • Stickles: http://amzn.to/2iT3qVg
  • Rubbing alcohol

Instructions:

Start with Yupo Paper, what is that you ask? It is a wonderful synthetic paper that is perfect for alcohol markers and watercolors.

I am in love with synthetic paper, so be on the the look out for more tutorials using it.

For the blue background scribble blue alcohol markers all over

Christmas Card using Yupo Paper

Then you take a pipet and alcohol and drop it all around. This will blend the colors and create a really wonderful effect. Play around with it and use more or less alcohol and try different colors.

Christmas Card using Yupo Paper

Let this completely dry before using the embossing folder. I let it air dry over night, but you can use a heat gun if you are careful not to melt the paper, lol.

Once the background is dry use the embossing folder to create a snow flake background.

Cut out the trees using a die cut.

Christmas Card using Yupo Paper

To assemble the card layer a coordinating background paper, then add the embossed, blue Yupo Paper, add the trees (I used foam tape for dimension), stamp the sentiment, and then I added stickles to the trees for detail.

That is it, a wonderful, handmade card that is perfect for everyone on your list.

Christmas Card using Yupo Paper

The post Christmas Card Using Yupo Paper appeared first on Take Time To Create.

Altered Bottle for Bath Soaks

Hello Everyone!

With the holidays approaching it is important to take time to relax and a bath is perfect for relaxing! I made these altered bottles for bath soaks which look great in your bathroom!

They are easy to make and they can also make a perfect handmade gift, or you can sell them at a craft fair.


For this project find a really great bottle. I found mine at Who Give a Scrap. It is on on the larger size, that worked perfectly for me.  Make sure it has a lid and that you clean it thoroughly.

altered bottle for bath salts

Once the bottle is clean and dry add your embellishments. I added burlap and lace around the bottle to start.

altered bottle for bath salts

Then I added a lot of flowers and beads to create the look I was going for. You can add flowers, buttons, keys, and found objects. Anything would look great on the bottle.

altered bottle for bath salts

Once it was all decorated I added the bath salts and the cork. Now I have a great gift, or even something for me.

altered bottle for bath salts

How do you try and relax during the holidays?

The post Altered Bottle for Bath Soaks appeared first on Take Time To Create.

Art Journal from Junk Mail

Hello Everyone!

It is that time of year when all the junk mail comes to your house. I recycle what I can, but sometimes it is just too pretty to throw away. So I save it.

And that is were the problem comes in, I have a stack of junk mail that needs to be dealt with, so I turned a few pieces into art journals.

This is just the tutorial on how I created the art journal, if you want to see what I did to the inside let me know in the comments and I will show you the art (when I am finished with it, lol)

Here is the video tutorial:


So what you do is start with really great junk mail. I had one from Capital One and Tiffany’s. Side note: I have only been to Tiffany’s once and I bought the cheapest pair of earrings there about 10 years ago and I still get their mailers, lol. And their mailers are beautiful!

art journal from junk mail

Once you decided on what you want to alter grab some gesso. I used white, black and clear. The black is fun so I can use some light colors, it breaks up the book. I also added clear gesso over some of the images, that way I keep the image but the page is prepped to take all sorts of mediums.

art journal from junk mail

The cover of the Tiffany book is so pretty and festive! This will be my holiday 2017 art journal. When looking for junk mail to make into an art journal look for mailers that have slightly thicker paper. If it is too thin then the pages will buckle and it won’t hold up.


art journal from junk mail

The white gesso didn’t cover all the images completely, but that is ok, I will fill the page with other art and it won’t get in the way. But if you want the image to be completely gone, the add a few layers.

I left some words uncovered, I thought they we fun and it will help me start the page.

art journal from junk mail

art journal from junk mail

The Capital One mailer was a great size and it will be fun to do more landscape journal pages. I kept the images and some words, and it makes for a great starting point.

art journal from junk mail

art journal from junk mail


It was a lot of fun to prep my new art journals. What piece of junk mail do you have that is too beautiful to recycle? And did you just keep it or did you re purpose it?


The post Art Journal from Junk Mail appeared first on Take Time To Create.


Craft Fair Earrings and Jewelry Making Supply Storage

Hello Everyone!

Christmas craft fair season is upon us! Yikes, I am not ready! Anyone else doing craft fairs and are you ready?

One item I like to see are earrings. On a side note I only make and sell things I will use/wear/display in my home. Too often people try to make only what they think will sell and not what they actually like or that they would wear or use. This is my opinion, and I sure it is different from other opinions. Now I want to sell it all, but I know some things won’t sell and that is ok. And since I like it I will be more likely to use in my daily life.

One thing I do like to sell are cute little earrings. But before I get to the earrings I wanted to show you how  I organize my jewelry findings. I found these really great tool organizers at Harbor Freight.  Here is the link: https://www.harborfreight.com/tool-storage/part-storage/multi-compartment-utility-box-40528.html

They are fantastic, I love how portable they are with the handle and each bin comes out so I take out what I need. There is a lot of room and they fit my needs perfectly.

The organizational bins behind the plastic storage is the metal strip my husband hung along with the magnetic containers from the dollar store. You can read the blog post here: Organizers

The earrings are really cute and fairly simple to make. All you do is add a French hook to a cute charm. I used a zipper pull and some other charms I had in my stash.

I like to use a variety of charms, not just Christmas ones. You never know what people will need or want.


earrings

Once I have a pile made I will package them and get them ready for the craft fair. If you are interested in seeing how I make my packaging and how I display my earrings let me know and I will write a post about it.

The post Craft Fair Earrings and Jewelry Making Supply Storage appeared first on Take Time To Create.

Ebay Mystery Box Unboxing

Hello Everyone!

Have you seen the latest You Tube trend of creators doing an Ebay Mystery Unboxing? This was too tempting to resist, so of course I had to try it, lol.

But before I get into the unboxing, I want to tell you about a Giveaway I am doing on Instagram.

I will be giving one lucky person a Tropicals Prima Watercolors set. Head over to my Instagram to enter –instragram.com/taketimetocreate. Give away ends on Nov 12.

Anyway… on to the unboxing. You can check out my reaction video here:

I have to say, this was so much fun to do. If you have seen other Ebay mystery boxes you might know that some You Tubers have gotten junk. Absolute junk! I mean trash and other horrible things. I was very apprehensive in opening my boxes.

But I lucked out! I purchased 2 boxes from Ebay one was $25 the other was $40 and they both promised to have craft and art supplies in the box. You can pick a random box or a themed box, I went with crafting/art themed ones. But buyer beware, these are mystery boxes and you never know what you will get.

When I opened my box I was pleasantly surprised! They were both filled with awesome goodies and I can’t wait to try them out. Whew! I am so glad they were worth it.

Check out a sneak peak of some the awesome goodies I got! So many wonderful things to tryout and experiment with.

ebay mystery box

What do  you think of the Ebay Mystery boxes? Are you going to try it out?

The post Ebay Mystery Box Unboxing appeared first on Take Time To Create.

DIY Dollar Tree Snowflake Christmas Decoration

Hello Everyone!

I was compensated for this post. This post also contains affiliate links and I will be compensated if you make a purchase after clicking on my links.

Christmas is just around the corner and I am getting excited! I love to make my own decorations, the glittery the better, lol.

Dollar Tree is the perfect place to get supplies to make your own decorations, like these Snowflakes I made.

These snowflakes are so easy to make and they look so cute hanging on your wall.

Materials Needed (affiliate links):

Bulk 5-Stem Christmas House Glittered Poinsettia Bushes, 13 in. atcom

from: DollarTree

Instructions: 

Start with your glittery snowflake and add some tulle as a base layer. Or you can add glitter mesh, or ribbon, or lace, anything really. You just want to make sure you have an anchor for your focal point. Glue the tulle on with hot glue.

DIY Dollar Tree Snowflake Decor

Then you want to glue on your focal point to the center of the snowflake

DIY Dollar Tree Snowflake Decor

Then you glue on accents and decoration all around your focal point. Poinsettias, floral picks, beads, jingle bells, and small ornaments work great for this step. Anything will work, you just want to fill up the empty spaces and make it full and festive.

DIY Dollar Tree Snowflake Decor

There you go, nice and easy and they looks so festive and glittery.  A grouping of the snowflakes would look really great on a wall, or it could be the perfect gift!

I thought it would be fun to show you some other variations I created. I just love making these, I can’t seem to stop, lol

DIY Dollar Tree Snowflake Decor

DIY Dollar Tree Snowflake Decor

DIY Dollar Tree Snowflake Decor

What Christmas decorations do you make?

The post DIY Dollar Tree Snowflake Christmas Decoration appeared first on Take Time To Create.

« Older posts Newer posts »

© 2024 Take Time To Create

Theme by Anders NorenUp ↑

Follow

Get the latest posts delivered to your mailbox:

%d bloggers like this: