Tag: diy project (page 4 of 4)

Guest Post-DIY Sugar Scrub

Guest Post By Kim- DIY Sugar Scrub

Today we have a great DIY for your dry skin. This is a great way to replenish the moisture and exfoliate at the same time. 

Once again I have my sister, Kim, doing a guest post, which I love!! She is sharing a diy Sugar scrub, which is awesome. When I read this post I giggled because it is similar to the recipe that I use all the time. You can tell that we are sisters, haha.  I will post my version at the end.

It has been a while since I have done a guest post, you can read my last guest post here. I have a few in progress but this is one that is a great gift idea for the holidays. Also with so much focus on politics something to pamper ourselves is good.

The finished product

This is what it will look like when all is said and done.

First let me give you a little background on beauty products. Many exfoliating skin care products contain microbeads for the abrasive properties. These are plastic spheres that are less than 5mm in diameter. These are rinsed down the drain and cannot be captured by water treatment plants thereby they make it into waterways and interfere with fish and other wildlife. President Obama did sign a ban on these but it will not take effect until at least mid 2017 and only covers beauty products You can read about that here. They can also be found in cleaning products but that is another post.

I wanted to share with you one way that you can stop using micro beads right now and have great skin.

Disclaimer: I am not a dermatologist and have no skin care training. I just know this works great for me and I love how it leaves my skin.

About a year ago I started to switch out some of my beauty products for more natural versions. I wanted good results but to be friendly to my skin and the environment. I have some issues with skin sensitivity so I am careful what I use.

Here is what I started doing for an exfoliate.

A sugar scrub with coconut oil. I love it and it leaves my skin hydrated and soft. I use it 1-2 times a week I like to rub it on my face and neck right before my shower and then rinse it off in the shower.  If you use this route you need to be careful because some of the oil can stay on the floor of the shower and be a little slippery. I have also used this as a full body scrub and it is great on feet and elbows.

I have used to different recipes and I have provided links to them here. Also I have pinned a bunch more on my “Go Natural” and “Skin Deep Beauty” boards on Pinterest.

The first one I tried was very basic as I wanted to see how it would work. Just 2 parts regular sugar and 1 part Coconut Oil. You can read about it here.

I don’t have any pictures but it was great and now I am excited to try different scents and combinations. Maybe a salt scrub also.

Next I tried another recipe for vanilla scented. You can read about it here.

This was a good recipe but I found The ratio to be off and I needed to add more sugar. I do love the vanilla scent when I use it. A better quality vanilla would probably have a stronger scent but I wasn’t going to use my good vanilla for a scrub and this was plenty for me.

The materials

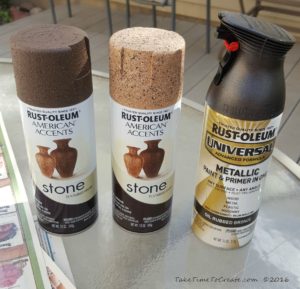
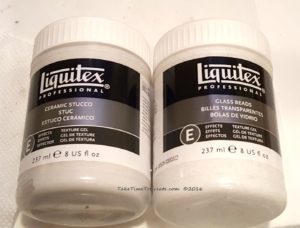
These are the materials you will need.

Be sure that you melt the coconut oil before mixing with the sugar but you don’t want the oil too hot. I live in a warm area of the country so I only needed 10 seconds in the microwave to completely melt the coconut oil.
Midway through the process

After mixing your ingredients it might look like this.

Then mixed together you can see that there is a lot of oil. So I added more sugar and the vanilla.
Looking good!

A less oily mixture.

Next time I will be using the first recipe but adding vanilla or whatever oil or extract i am in the mood for. Also Coconut Oil is great as it doesn’t go rancid quickly. I had my last jar in the shower for a couple of months and it was still fresh and great to use to the last bit I could scrape out of the jar.

As we approach the holidays and the craziness of the end of the year remember to take time for you.

Linda’s version:

I love doing sugar scrubs. Here is how my version is slightly different than Kim’s

  • I don’t use any vanilla, I like the scent the way it is
  • I don’t even melt it, lol. (I try and stay out of the kitchen as much as possible, lol)
  • I just dump equal amounts of coconut oil (I don’t melt it before hand because coconut oil melts in your hand and I am lazy as well, haha) and granulated sugar and brown sugar. I used brown sugar as well because if I use too much granulated sugar it is too rough on my skin.   (I usually make up my scrub as I wait for the water in my shower to warm up)
  • Then in the shower I just take a scoop and smear it all over, but be careful it does make the shower slippery.

Enjoy!


Subscribe via WordPress


The Take Time To Create Crafting Blog RSS Feed

Subscribe via Email

Enter your email address to subscribe to this blog and receive notifications of new posts by email.


Other Ways To Follow


The Take Time To Create Crafting Blog RSS Feed

Subscribe to my RSS feed

The Take Time to Create Crafting Blog Facebook Page

Follow me as Facebook

The Take Time to Create Crafting Blog Etsy Shop

Check out my my Etsy Shop

The Take Time To Create Crafting Blog Pinterest Board

Visit my Pinterest Board

Other Ways To Follow


The Take Time To Create Crafting Blog Instagram

Follow me on Instagram

The Take Time To Create Crafting Blog Twitter Feed

Follow me on Twitter

The Take Time To Create Crafting Blog Email

Send Me an Email


Mixed Media Canvas Celebrating Family

Mixed Media Canvas Celebrating Family

Hello Everyone!

Today I have another mixed media tutorial. I love making mixed media art, it relaxes me and soothes my soul. This is another Finnibair inspired canvas. I love her work, she inspires me so much and I learn a ton from her techniques.

family-mixed-media

This canvas celebrates family. Family is so important and I wanted that to be the focus of this canvas.

I have made other mixed media canvas and you can visit them here:

Frozen Mixed Media

Dragon Mixed Media

Angel Mixed Media

Materials:

  • Canvas, black gesso, brushes
  • Mica powder, spray bottles, stencils, modeling paste, acrylic paint, spray clear coat
  • Flowers, letters, beads, cheese cloth and anything else you want to put on your canvas.

Instructions:

First you add all  your flowers and letters and doo-dad on a canvas. I put black gesso on my canvas before I started. Then I went to town. Add stencils, cheese cloth, flowers, letters, beads, buttons, and broken jewelry. Anything to add interest and texture. I didn’t really care about the colors, just texture because I knew it would all be covered up.

layer-the-pieces-on-the-canvas

Once you have everything secured with modeling paste then cover it all with black gesso. Cover all the ins and outs and little spots,  you want it all black with nothing showing. This will take a while, but it is worth it to take your time and do it right.

add-black-gesso-to-everything

Once it is all dried it is time for the fun part. I added piles of mica powder all over the canvas. Then I took a spray bottle and sprayed water to spread the mica powder and create a shimmery, metallic look.  I did this a few times and once I was done with how it looked I dry brushed acrylic paint on the canvas. I just highlighted the tips of the flowers and the Family letters, The dry brushing was just to add some more detail to the canvas.

add-mica-powder-to-canvas

spray-the-mica-powder

After the paints dried I added some metal flowers to add detail. It was the missing piece to bring it all together.

family-up-close

up-close-detail

I really like how it turned out, what do you think? These are so much fun, I can’t wait to show you the next mixed media project I am working on.

family-canvas-mixed-media

DIY Faux Stone Pumpkins

Hello Everyone!

I hope your October is going well! I can’t believe how fast it is flying by! In fact the whole year is going too fast.

To celebrate everything pumpkin I made this easy, diy faux stone pumpkins.

finished-faux-stone-pumpkins

Materials:

  • Pumpkins ( I used ceramic ones from the dollar store, but almost any pumpkin will work)
  • stone-pumpkins-before-pic
  • Spray Paint Primer
  • Rust-oleum stone spray paint

Instructions:

After cleaning your pumpkin and protecting your work surface spray a coat of primer on all the pumpkins on all sides

add-a-layer-of-primer

Now it is time to paint. Have you seen this faux stone spray paint? It is awesome! I have a feeling that everything will become faux stone. The texture and look changes the closed you get to your project. It is a versatile tool that I have a feeling I will be using a lot in the future.

spray-paint

For 1 pumpkin I wanted to to use the darker color so I sprayed a base of oil rubbed bronze before the stone.

add-a-layer-of-oil-rubber-bronze

Then go to town painting the pumpkins. I did add a layer of the lighter color to the darker pumpkin because it was not matching well. But just keep going and paint layers according to the directions until you are happy with the results.  I am thrilled with how they turned out! So very cute

start-adding-the-faux-stone-spray-paint

If you want you can spray a  sealer over the top to protect them.  I think these would look really cute outside as part of your outdoor decorations. Just be sure to protect them first.

completed-pumpkins

And here they are as part of my DIY Painted Halloween Village display.  I think they added a nice touch to the display.

finished-houses-in-my-home

DIY Painted Halloween Village

Hello Everyone!

Halloween is fast approaching, and of course I get it in my head that I want to do some new Halloween decor.  At least this year I am getting it done before Halloween and not after, haha.

I saw a Halloween Village at the Dollar Store and thought it would be perfect to paint for Halloween

finished-village

Materials:

  • Ceramic houses (I found mine at the Dollar Store, but there are a lot of options out there. You could even use Christmas houses)
  • Metallic Paint
  • Gesso
  • Brushes, Stucco, Beads

Instructions:

When I saw these houses I thought that they were very cute, but the colors were not great. I didn’t think that they went together very well and the figurines were terrible.

before-house-2

before-houses

before-up-close

Before the painting fun I had to prep the houses. I cleaned them then added a layer of Stucco to the roofs and anywhere there needed to be a rough detail. Then I added some beads to the grass area.


stucco-and-beads

add-stucco-and-micro-beads

After the texture was dry I added a layer of black gesso. This gave me a blank canvas to work on. I did have to go back and touch up areas that I missed.

add-gesso

After the gesso was dry it was time for the fun painting! I used metallic acrylic paint and I mixed some Mica Powder with soft gloss gel for the green. I just dry brushed the colors onto the housed, adding and blending as I went. Once I was happy with the look I went on to the next house, until I was finished with the project.

paint-colors

keep-painting

start-painting

Here is an up close picture of the detail of one of the houses and the bridge.

up-close-detail

And here it is on display in my home. I really liked this project, it was fun to watch the housed change right before my eyes. Good thing I bought more houses from the Dollar Store, now I can create even more villages, haha

finished-houses-in-my-home


DIY Star Wars No Sew Tablet Cover

Hello Everyone!

Have you ever wandered around a fabric store and see some fabric that just jumps out at you and demands that you buy it? No, is that just me?

Well that is what happened with this Star Wars fabric, it demanded to go home with me and to be made into something awesome. I think I did the fabric justice by making a no sew tablet cover.

DIY Star Wars No Sew Tablet Cover

Materials:

~ Fabric I used this awesome Darth Vader fabric for the outside and I used sweatshirt fabric for the inside to help protect my tablet and provide a little cushion

~ Ribbon

~ Hot Glue and Velcro

Instructions:

~ I laid out the 2 fabrics with wrong sides together and cut out how much I needed. There wasn’t any measuring just make sure you have a little room on the sides and enough on the length to create a flap. I left a little extra on the side (but not too much) so I had somewhere to put my stylus pen.DIY Star Wars No Sew Tablet Cover

~ Hot glue the fabric together around the edges. I did a little at a time and used a popsicle stick to help smooth out the edges with out burning my fingers.

DIY Star Wars No Sew Tablet Cover

~Once you have the edges glued then fold up the fabric, make sure you have your tablet to measure what you want the pocket to end. Then glue the edges together.

DIY Star Wars No Sew Tablet Cover

~ Then hot glue ribbon around the edges. My ribbon was not wide enough to wrap around the edge of the fabric so I glue some on the front and the back of the fabric. Glue ribbon every where that you see a raw edge.

DIY Star Wars No Sew Tablet Cover

DIY Star Wars No Sew Tablet Cover

~ Then glue on Velcro to the flap to close your cover and you are done.

DIY Star Wars No Sew Tablet Cover

I am in love with the fabric, I think I need to go back and get more to make a circle skirt.

In a upcoming post I will show you how to make a sew version of a tablet cover.


DIY Star Wars No Sew Tablet Cover

DIY Star Wars No Sew Tablet Cover

How to Reupholster an Office Chair

Hello everyone!

An office chair has got to be one of the most pieces of furniture that a person can own. You spend a ton of time in your chair so it should be comfortable and good looking. I had a chair that was wonderful, it worked great and I had it a long time. But it broke. So I had to search for a new one. After searching high and low I found one at a surplus store. It was in great condition and for only $15, I thought it was a steal. The only problem was the green fabric covering it. The color was ok, a dark green, but it was itchy and that was not ok. So I decided to recover so it didn’t drive me crazy sitting on it for 8 hours a day.

How to Reupholster an Office Chair

I think it turned out very cute. I found the fabric at Who Gives a Scrap. I talked about this awesome donation center last week. You can revisit that post here. They had this great upholstery fabric for only $2. Can’t beat that price. Here is how I went about recovering the chair.

Materials:

~Chair (this one wouldn’t be too bad if it wasn’t for the itchy fabric. Now I know why they had it for sale at the surplus store.)

How to Reupholster an Office Chair

~ Fabric (The stripped patter is cute and for only $2 I could pass that up.)

How to Reupholster an Office Chair

~ Staple gun, screw driver, glue gun, ribbon for edging

Instructions:

~ The first thing I did was take off the arm rests with the screw driver. I could have taken the whole chair apart and this might have made the process easier, but I decided to work around everything except the arm rests.

How to Reupholster an Office Chair

~ Then I measure the fabric and started stapling it on. The way this chair is constructed is a little weird. It has a plastic back and the original cover was Velcroed on, but I didn’t want to go that trouble so I decided to staple over everything.

How to Reupholster an Office Chair     How to Reupholster an Office Chair

~ I got the top part done then I went to town on the seat of the chair. The stripes made it easy to match the top to the bottom. I stapled everywhere then I went back and added more. I wanted to make sure everything held.

How to Reupholster an Office Chair     How to Reupholster an Office Chair

~ Once everything was secure and stapled on I hot glued on a tan ribbon that coordinated with the fabric. Then I put the arms back on that that was it. It took me a couple of hours to complete but it was worth it to not have an itchy chair.

How to Reupholster an Office Chair     How to Reupholster an Office Chair

Once I finished my son loved it so much he has asked me to do a chair for him. But if my chair is ever missing I know who to took it. Smile

How to Reupholster an Office Chair

TBT Handmade dollhouse from my childhood

Hello everyone!

Come with me as I take a small walk down memory lane.

Don’t you just love finding things from your childhood? Because I do! When my sister was in town the other day she helped my mom with some cleaning and when ever there is cleaning there are discoveries to be made. The great discovery of the day (at least to me) was when  my sister found this doll house that my mom made for me when I was a child. There were some other crafting discoveries made that day that I will share with you on another day.

TBT Handmade dollhouse

I loved this doll house! My mom made this from a pattern for my small dolls, I think they were called Glamour Dolls. I took this with me when we went to Utah to see family and I played with it all the time at home.  You can tell that it was well loved by how dirty it is (I could blame it on it being in storage for so long, but that is not were all the dirt came from…)

TBT Handmade dollhouse

The dolls’ hair is a little crazy, and again I can’t blame that all on the storage. I was rough on dolls’ hair, I loved to cut  and dye and style my dolls’ hair. By the time I was done with them they looked fabulous, haha! And because I was my mom’s favorite child (haha) she even made clothes for my tiny dolls (which I am sure there were not easy to make). I am not quite sure why my dolls are all in sleeping clothes, maybe it is because pajamas are my favorite clothes…

TBT Handmade dollhouse


This doll house was great! The sides zip up and down and the roof is Velcroed on so everything is self contained. My mom made it with plastic canvas on the inside which helped it hold its structure, but over time the plastic has begun to disintegrate so the house is no longer holding its shape. But that is ok, I think it still looks cute. The inside has a bed, couch, and chair. The furniture is easy to move around, but this arrangement was how I liked it best. The detail that my mom put into this house is wonderful, there are ruffles around the bed and the pillow even has ruffles, you can’t see it but the inside of the windows have lace curtains on them, there is detailing on the front door and there are shutters on the window. Now that I am older I can really appreciate the time and hard work my mom spent on making this doll house.

TBT Handmade dollhouse


I remember playing with this for hours and my My Little Ponies would come by and play with the girls and my Barbie’s would stop by as well (I am sure that my Barbie’s felt like they were visiting a Hobbit house, but they came by any way) I played and pretended with this house for hours and it was so exciting to see it again.

IMG_0119

TBT Handmade dollhouse

TBT Handmade dollhouse

Thank you for taking this trip with me down memory lane. What toy did you have from your childhood that you played with all the time?

Turn an Ikea bookcase into a bench

Hello Everyone!

Isn’t Ikea one of the most wonderful places on Earth? I mean they have everything, all in one place!

Well a little while ago I was looking for the perfect bench to put in my kitchen, near the door. I couldn’t find anything that I liked, but I did see people on Pinterest turning an Ikea bookcase into a bench.

Turn an Ikea bookcase into a bench

It is very simple to do.

Materials:

~ bookcase the is strong enough to handle the weight when tipped on its side. I used the Ikea Expedit, but I don’t think they have that anymore. But check around they might have a suitable alternative.

~ Plywood for the top

~ Foam cushion

~ Fabric

~ Staple gun

Instructions:

~ First assemble the bookcase. They might take awhile and you might need help. If you want to raise the height now is the time to add legs to the bench. I didn’t want them, but you may want something different

~ For the cushion, cut the plywood the size of the bench top

~ Then  you make a sandwich of fabric on the bottom, ( I used a strip to help me keep it all in line. The fabric possibilities are endless) then the foam and lastly the plywood. Then stretch and staple all around.

Turn an Ikea bookcase into a benchTurn an Ikea bookcase into a bench

Turn an Ikea bookcase into a bench

I used this same technique when we redid the entry closet. You can see that transformation: here

Turn an Ikea bookcase into a bench

And that is it. A very easy way to transform a room and increase your storage.

Is there any Ikea transformations that you have done in your house?

Newer posts »

© 2024 Take Time To Create

Theme by Anders NorenUp ↑

Follow

Get the latest posts delivered to your mailbox:

%d bloggers like this: