Category: sewing

Teacup Embroidery Kindle Cover

Teacup Embroidery Kindle Cover

Embellishing your Kindle cover with an embroidered teacup motif is a great way to personalize your cover 

Hello Everyone!

I think almost everyone has a favorite item, something that goes with them everywhere they go. For me it is my Kindle. I have had many Kindles and I love everyone one (I will say that there needs to be some improvement to the reader app, but that is a discussion for another day) I take my Kindle everywhere I go and any time I have a minute I open it up and read.

With something that I enjoy so much I thought it needed a better cover than just  a plain black one.

teacup embroidery

If you remember from a previous post I am taking an embroidery class at the Loopy Ewe. You can see my other project here: Embroidery ElephantI am loving this class and I am learning a ton of things. For this practice project I wanted to do something a little different so I decided to embellish my Kindle cover. 

I found these great patterns at Urban Threads! I have to say they have the best patterns, so creative and they seem to have something for almost every project I need to do. For this project I actually used 2 patterns and combined them to what you see here.

teacup embroidery

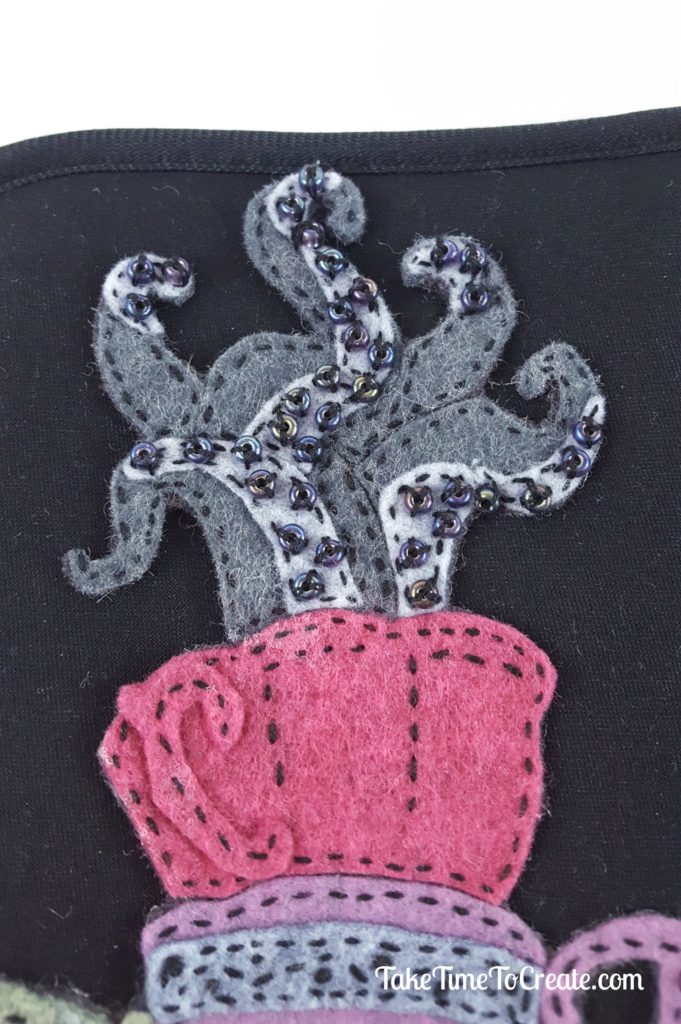
The tentacles needed to have a little more detail added so I stitched on these beads. I think they were the perfect touch for this project.

teacup embroidery

I have been really enjoying creating new thing and learning a new skill. This has been a great class to help me expand my horizons and explore a new hobby. I can’t wait to show you what I make in the next class!

The post Teacup Embroidery Kindle Cover appeared first on Take Time To Create.

TBT Handmade dollhouse from my childhood

Hello everyone!

Come with me as I take a small walk down memory lane.

Don’t you just love finding things from your childhood? Because I do! When my sister was in town the other day she helped my mom with some cleaning and when ever there is cleaning there are discoveries to be made. The great discovery of the day (at least to me) was when  my sister found this doll house that my mom made for me when I was a child. There were some other crafting discoveries made that day that I will share with you on another day.

TBT Handmade dollhouse

I loved this doll house! My mom made this from a pattern for my small dolls, I think they were called Glamour Dolls. I took this with me when we went to Utah to see family and I played with it all the time at home.  You can tell that it was well loved by how dirty it is (I could blame it on it being in storage for so long, but that is not were all the dirt came from…)

TBT Handmade dollhouse

The dolls’ hair is a little crazy, and again I can’t blame that all on the storage. I was rough on dolls’ hair, I loved to cut  and dye and style my dolls’ hair. By the time I was done with them they looked fabulous, haha! And because I was my mom’s favorite child (haha) she even made clothes for my tiny dolls (which I am sure there were not easy to make). I am not quite sure why my dolls are all in sleeping clothes, maybe it is because pajamas are my favorite clothes…

TBT Handmade dollhouse


This doll house was great! The sides zip up and down and the roof is Velcroed on so everything is self contained. My mom made it with plastic canvas on the inside which helped it hold its structure, but over time the plastic has begun to disintegrate so the house is no longer holding its shape. But that is ok, I think it still looks cute. The inside has a bed, couch, and chair. The furniture is easy to move around, but this arrangement was how I liked it best. The detail that my mom put into this house is wonderful, there are ruffles around the bed and the pillow even has ruffles, you can’t see it but the inside of the windows have lace curtains on them, there is detailing on the front door and there are shutters on the window. Now that I am older I can really appreciate the time and hard work my mom spent on making this doll house.

TBT Handmade dollhouse


I remember playing with this for hours and my My Little Ponies would come by and play with the girls and my Barbie’s would stop by as well (I am sure that my Barbie’s felt like they were visiting a Hobbit house, but they came by any way) I played and pretended with this house for hours and it was so exciting to see it again.

IMG_0119

TBT Handmade dollhouse

TBT Handmade dollhouse

Thank you for taking this trip with me down memory lane. What toy did you have from your childhood that you played with all the time?

Jazzing Up a Simple T-shirt

Jazzing Up a Simple T-shirt

Continuing with another DIY for my birthday dinner I will show you what I did to jazz up a simple t-shirt from Old Navy. I had this plain black shirt in my closet that I never wore. I have a lot of plain black shirts, but this one never called out to me choosing my outfit for the day. So I decided it was time to spruce it up with some lace. A very easy DIY that turned a boring shirt into something that I wear all the time.

diy lace shirt

Here is how you do it:

Materials:

~ pre-washed t-shirt (you want make sure it is washed first in case there is shrinkage) I got mine from Old Navy on clearance

jazz up a plain t shirt with lace

~ lace

~ needle and thread, or sewing machine or glue

fabric glue

Instructions:

~ I wanted to try gluing the lace, I have never used this glue so I thought I would give it a try. I just glued the lace to the bottom of the shirt. The glue hold well and did wash well, but it took longer than sewing that is because I had to do it in sections and wait for each section to dry before I could move on to the next one.

glue lace to shirt

~ Since my lace does not stretch I decided to start and stop the lace at the seams on the bottom, that is so there is stretch and movement. I am not sure this was necessary, but it worked for this shirt. There is a small gap on the sides of the shirt, but it look intentional.

~ I sewed the lace to the sleeves, this was easier and faster than gluing. Just take the lace and sew a straight seam around the sleeve. This shirt is more like a tank top so the lace only covers a small part of my shoulder.

sew lace to shirt

I am loving how this turned out and I have worn it a few times since I make it. It can be dressed up for an evening out or dressed down for something more casual.

Easy diy add lace to a t shirt

I think I have a few more shirts in my closet that might need a little TLC.

diy lacy shirt

Ladies Hankie clutch for my large crochet hooks

20150531_072655 I have just started crocheting. It is becoming one of my favorite hobbies, and even though I just started crocheting only a few month ago I seemed to have collected a lot of hooks. I have a crochet hook zippered pouch by Boye, but there are no slots for the larger hooks. So I figured I would make a clutch type bag to hold my hooks. As I was wondering around the flea markets I found these old hankies that had crocheted edges and I knew I found my fabric for my clutch! It was very simple to make. Here is what you need: 2 hankies, similar in size Fusible interfacing Needle and thread or sewing machine Velcro or button or snap Directions: _20150606_181325 Iron both hankies really well. They need to be flat.20150530_172835 Sew Velcro to the inside hankie. Fuse Fusible interfacing to the wrong side of the inside hankie according to the directions on your interfacing package. I don’t think it really matters what interfacing you use, you just need something to help the hankies keep their shape. (I am sure there are people out there who have preferences and I would love to know more about it if anyone would like to share. I am new to sewing as well as crocheting) _20150606_181354 Once the interfacing is on sew the hankies together along the border. My hankies did not fit perfectly, but I made due and did the best I could. I have the larger hankie on the outside and just stitched around. _20150606_181701 Fold the hankies in thirds and see how it all lines up. Sew the Velcro to the outside of the clutch lining up with the other

Velcro.

_20150606_181252 _20150606_181234

Sew the 2 sides of the clutch to make the pocket. And now you are done! Congrats on creating your new clutch for crochet hooks or whatever else you want to put in it. I would love for you to share your versions of the hankie clutch.20150531_072624

© 2024 Take Time To Create

Theme by Anders NorenUp ↑

Follow

Get the latest posts delivered to your mailbox:

%d bloggers like this: