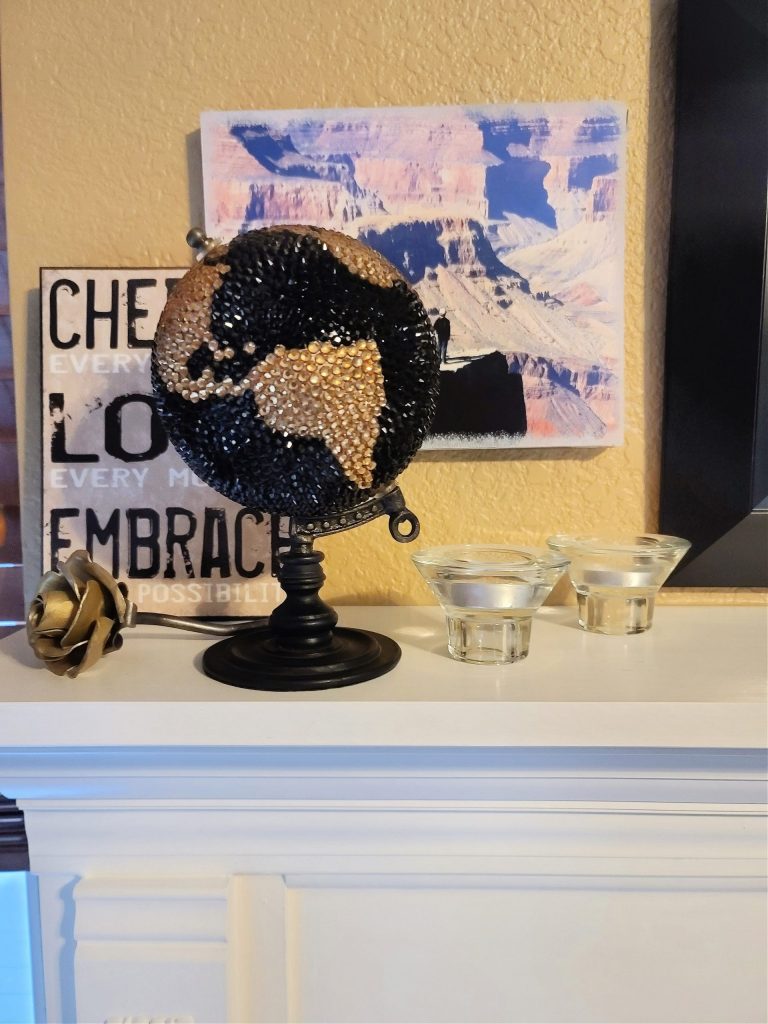
What do you do when your globe is just a boring black and gold? You add rhinestones! So many rhinestones!
This is not a difficult craft, but it is time consuming. It did take me many hours, so put on a movie and go to town. It may take a long time but it is so worth it in the end.
You can add rhinestones to anything I already have a lot of things lined to to be blinged out.
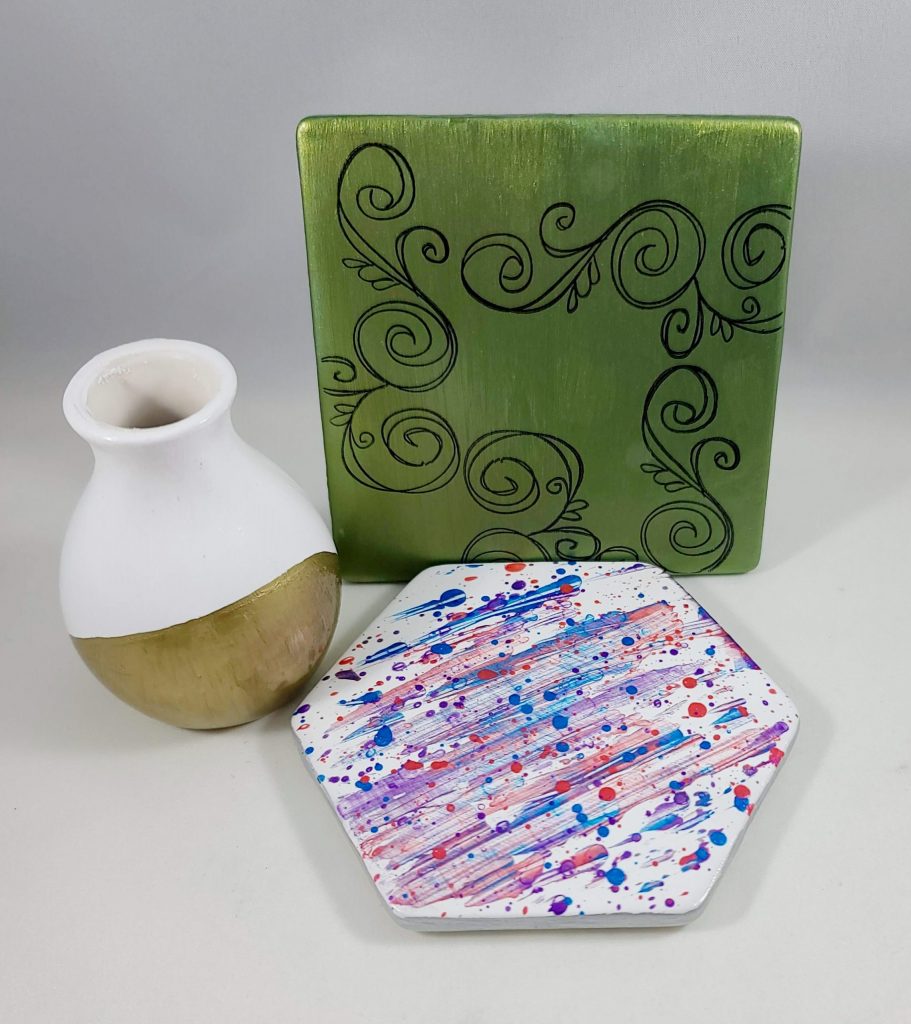
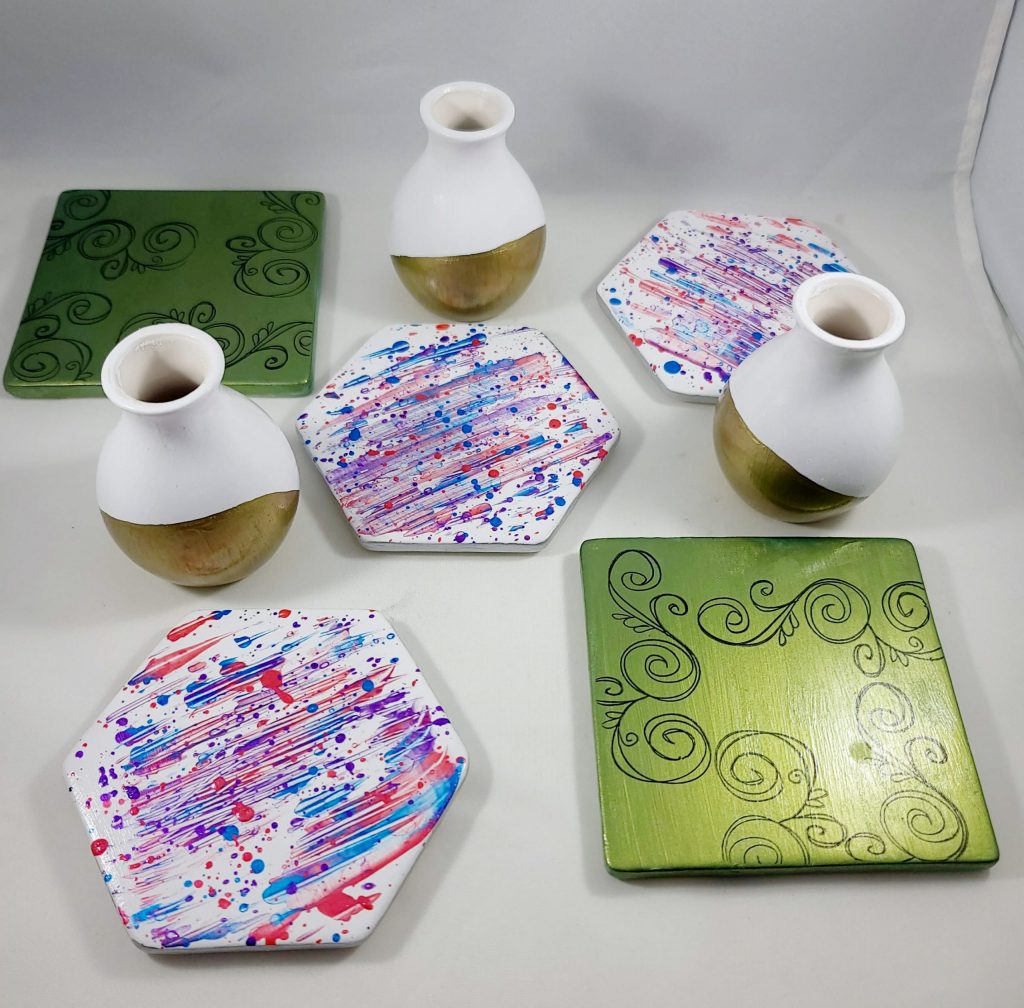
I found these super cute unfinished ceramic pieces from Target and I just knew that I had to get them and paint them. This is such a fun and easy project that you can do with kids or as gift
I just took some acrylic paint and went to town creating a unique look. I finished by sealing them with a couple of coats of Mod Podge.
You can customize these for events or these can be a fun activity for older kids to do. There are endless ways to customize these. I had such a great time with them I think I might go pick up a few more.
If you are interested in any of the projects that I do on my channel I am starting to list some of them on Etsy. Check it out and see what is available. Esty: http://www.etsy.com/shop/taketimetocreate/
It has been way too long since I have posted. I apologize for such a lengthy absence.
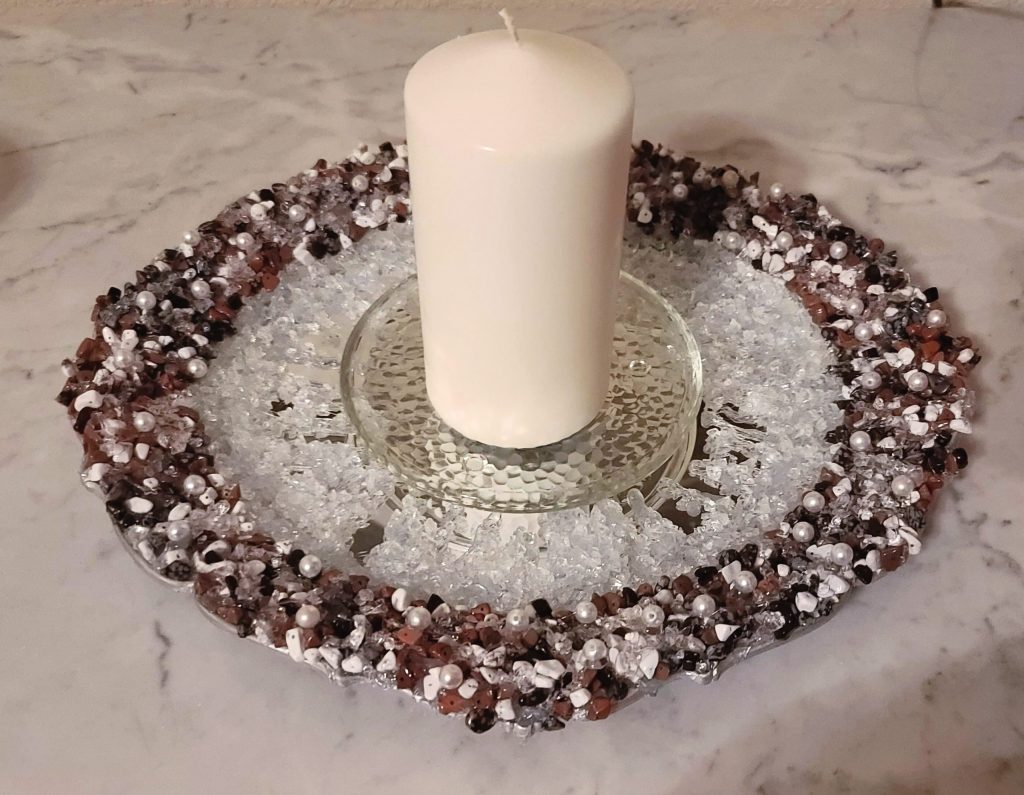
I am back today with a fun rock chip mirror. I have been seeing these all over Pinterest and I just knew I had to make one for the master bedroom
The video goes over how I did it in detail.
It did take a while with gluing all the little rock on, but once I got in the groove it seemed to go pretty fast. I decided to make it into a candle holder rather than hang it as a mirror, but either option will work great.
This would be fun to do in different colors for different holidays, or a wonderful gift to make.
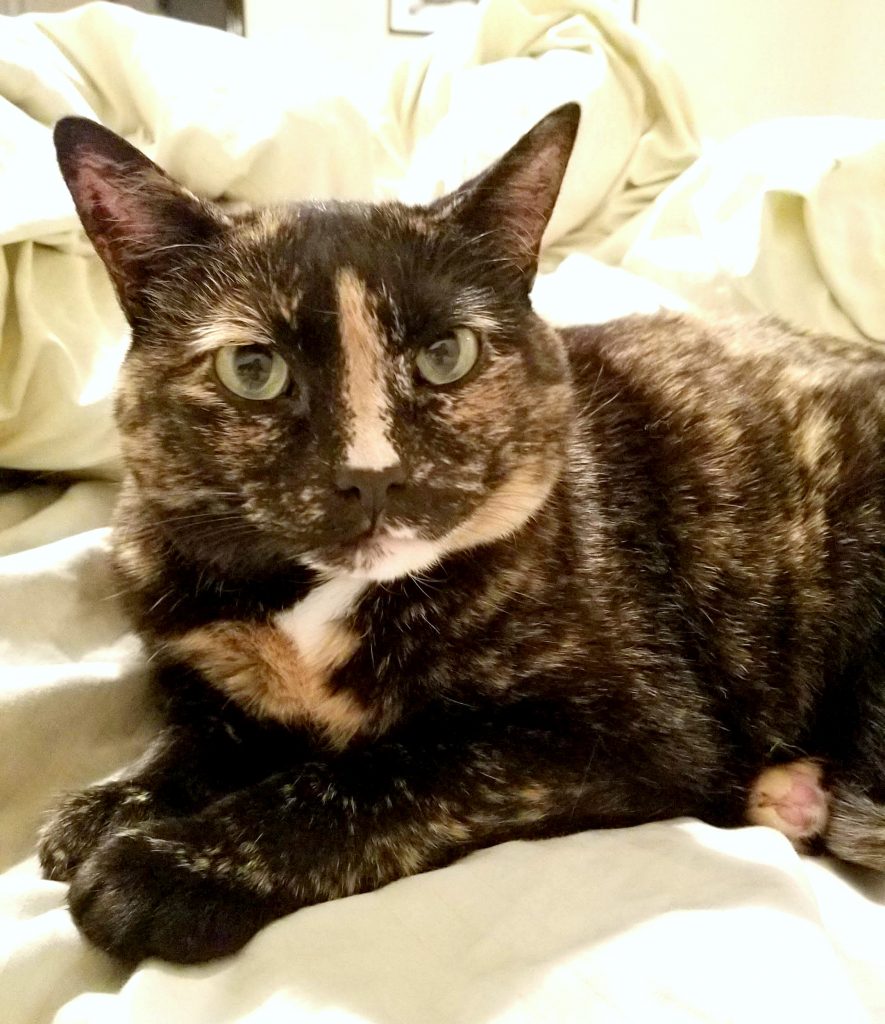
I have a cat that thinks she is a princess, and since she is a princess she needed a pink velour bed with gold trim. And since I don’t sew, I had to create a no sew version.
Our cat rules the house, lol. And since she does this pretty pink pillow is perfect for her.
Starlight
This pillow is easy to create. Take 2 pieces of fabric and glue them together with fabric glue. If you want trim add it now. Make sure you leave a hole so you can stuff the pillow with ploy fill.
Stuff your pillow and then glue the hole shut. That is it. Such a fun, easy way to create a new space for your pet.
No sew cat bed
I placed the bed on the trunk that Starlight sleeps on. The trunk is super hard and I thought she would appreciate the soft pillow. In true cat form she refused to pose for a picture, lol
But at least she has a new bed when she is ready to sleep on it. What other no sew projects do you work on?
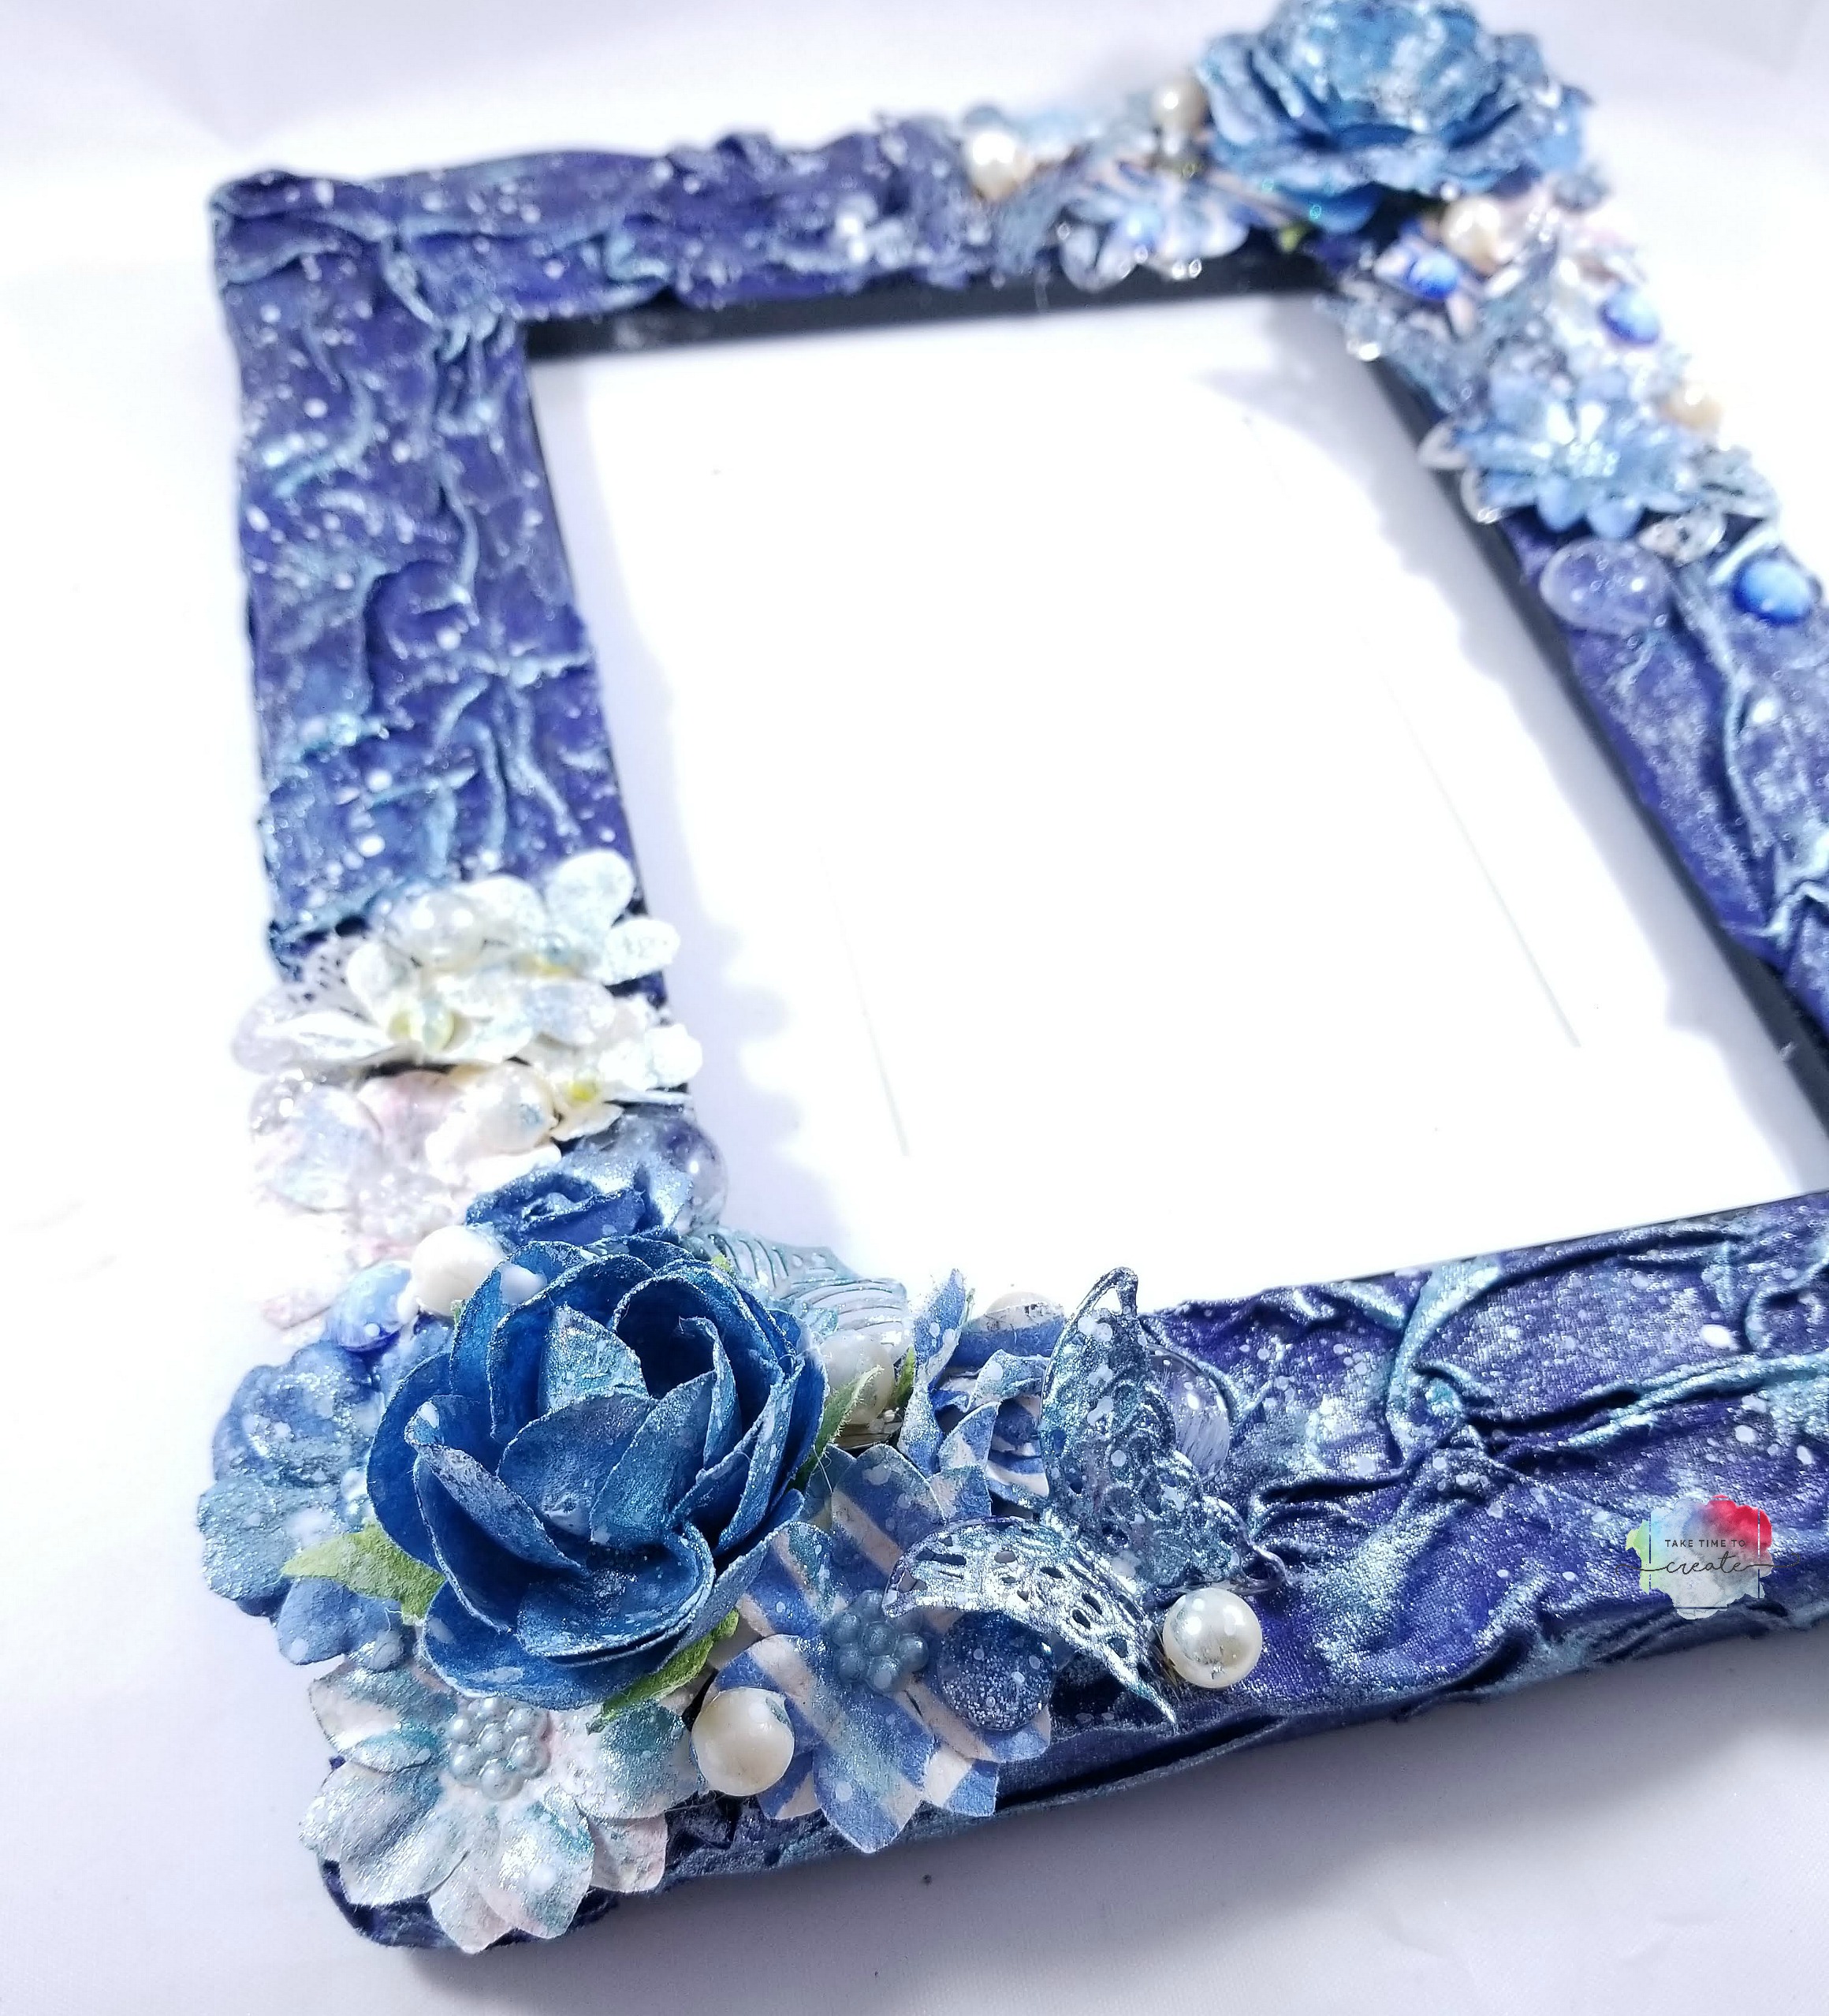
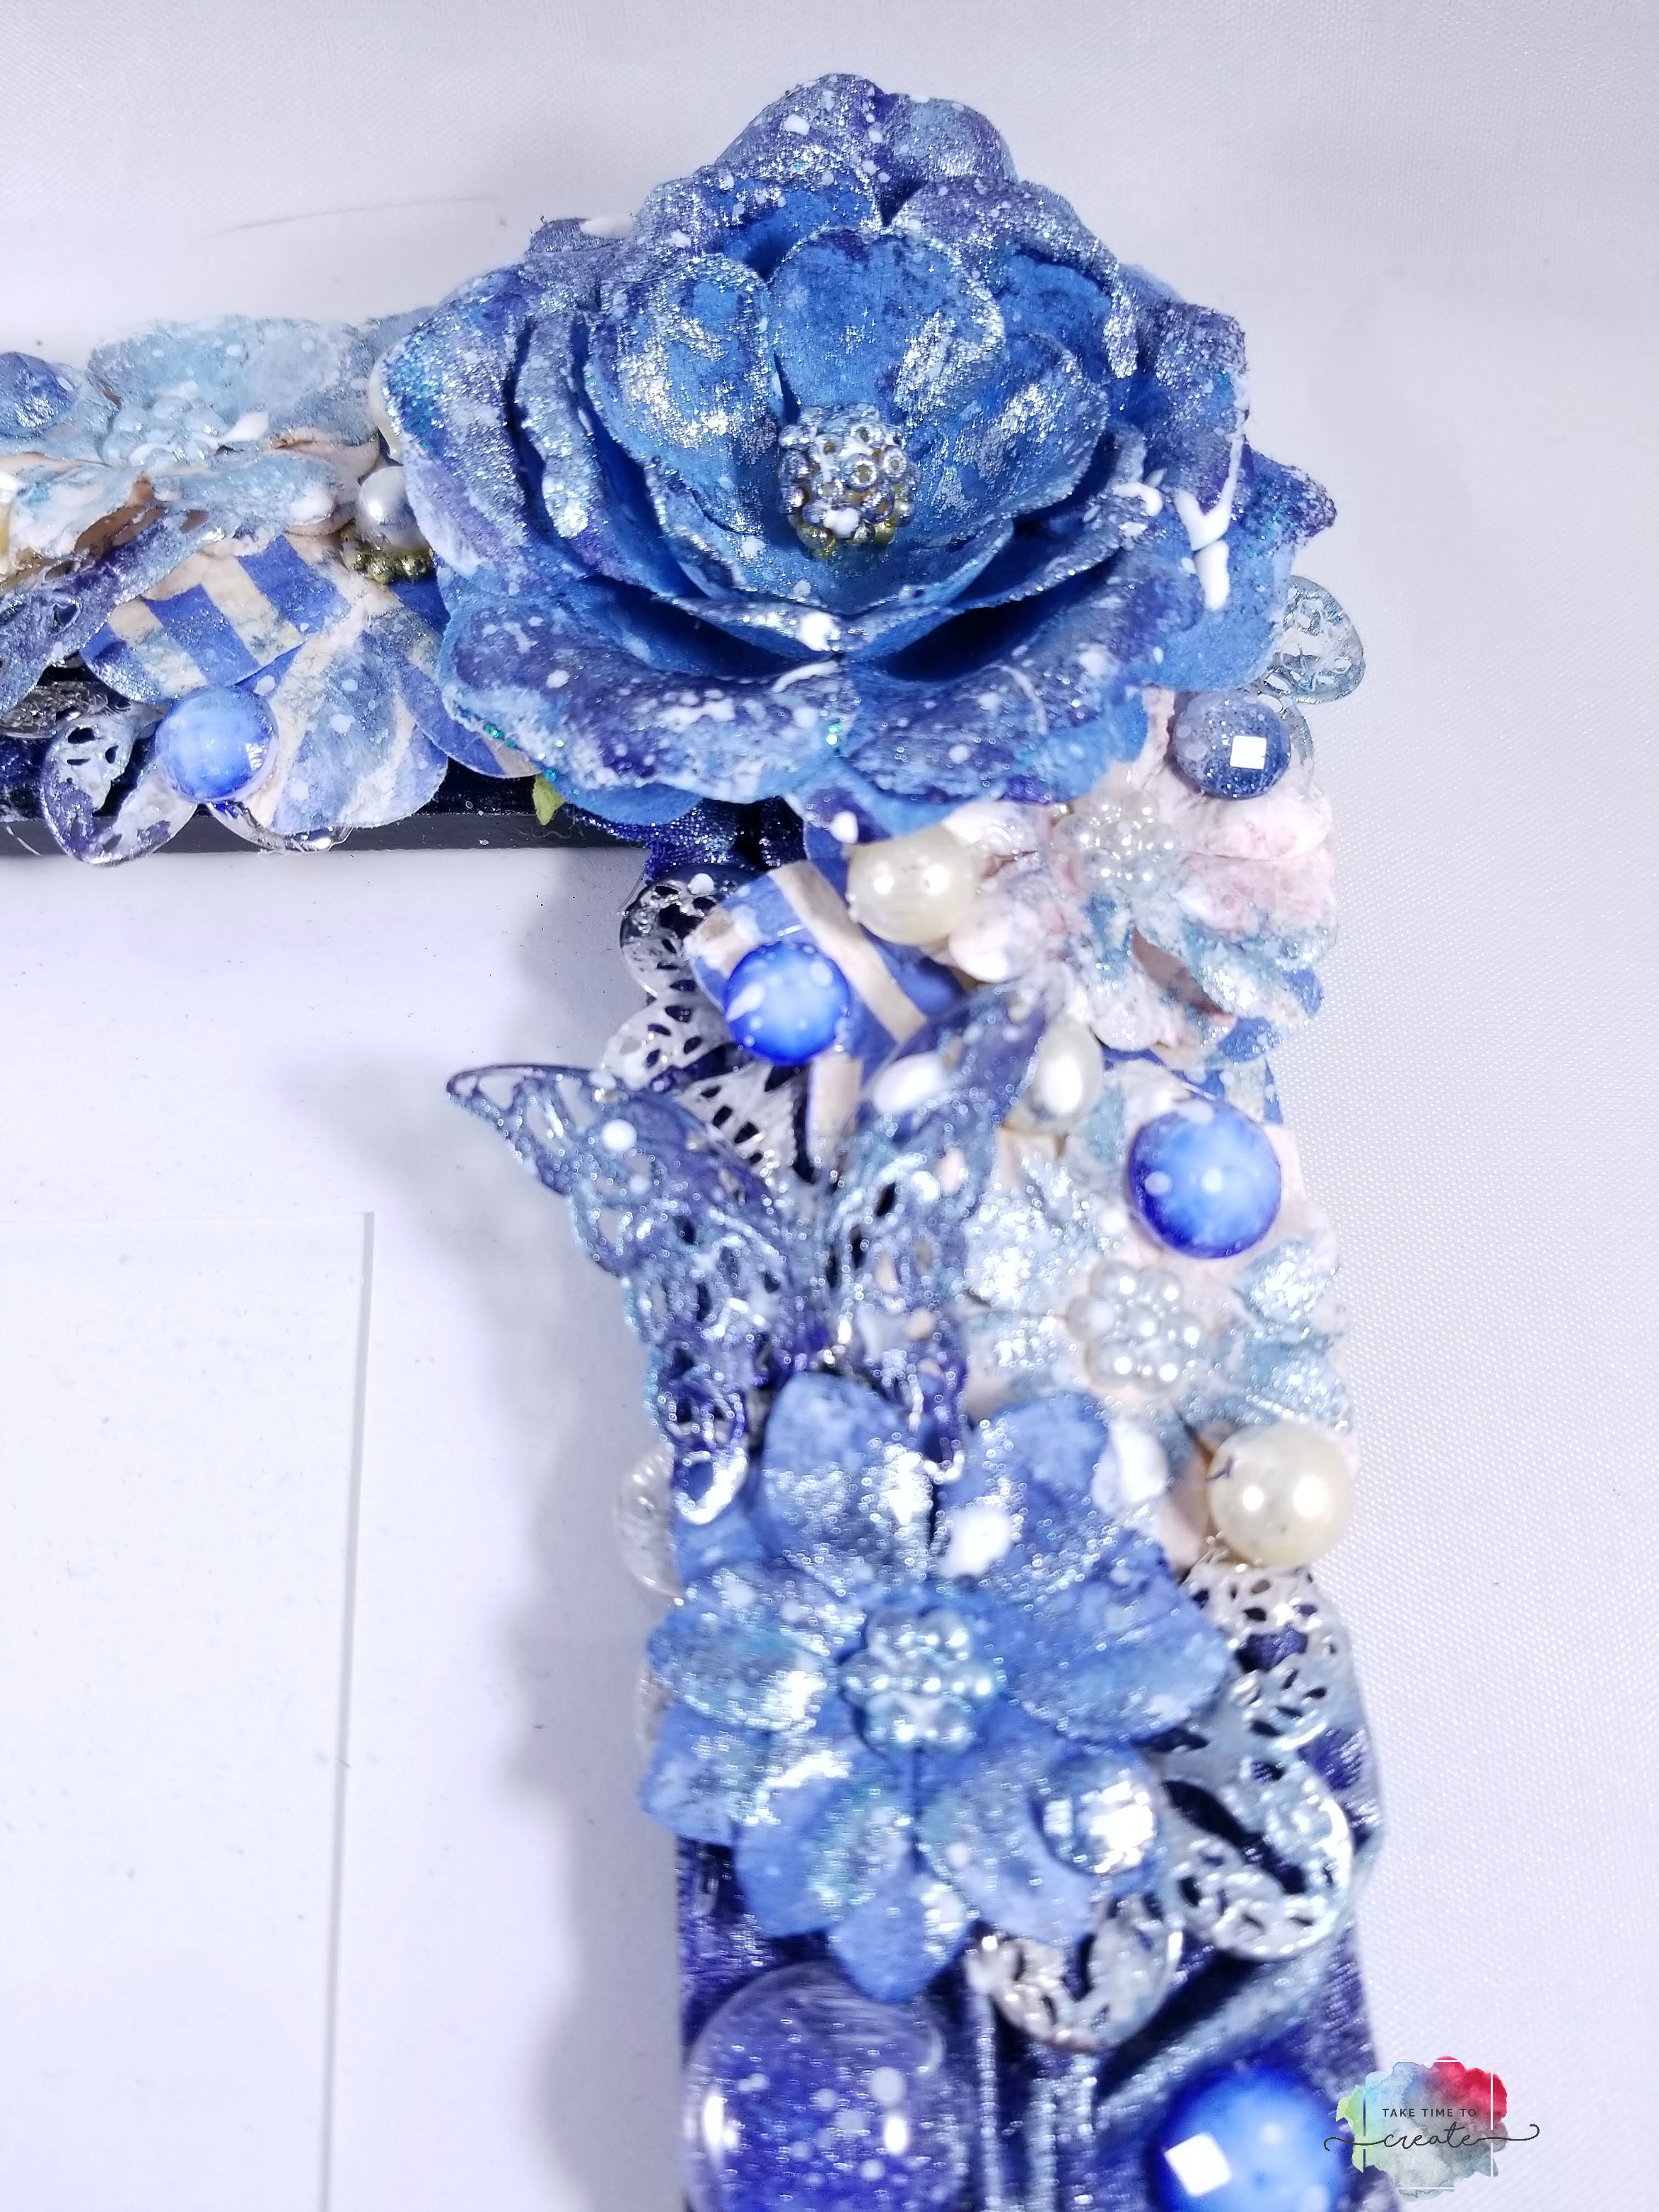
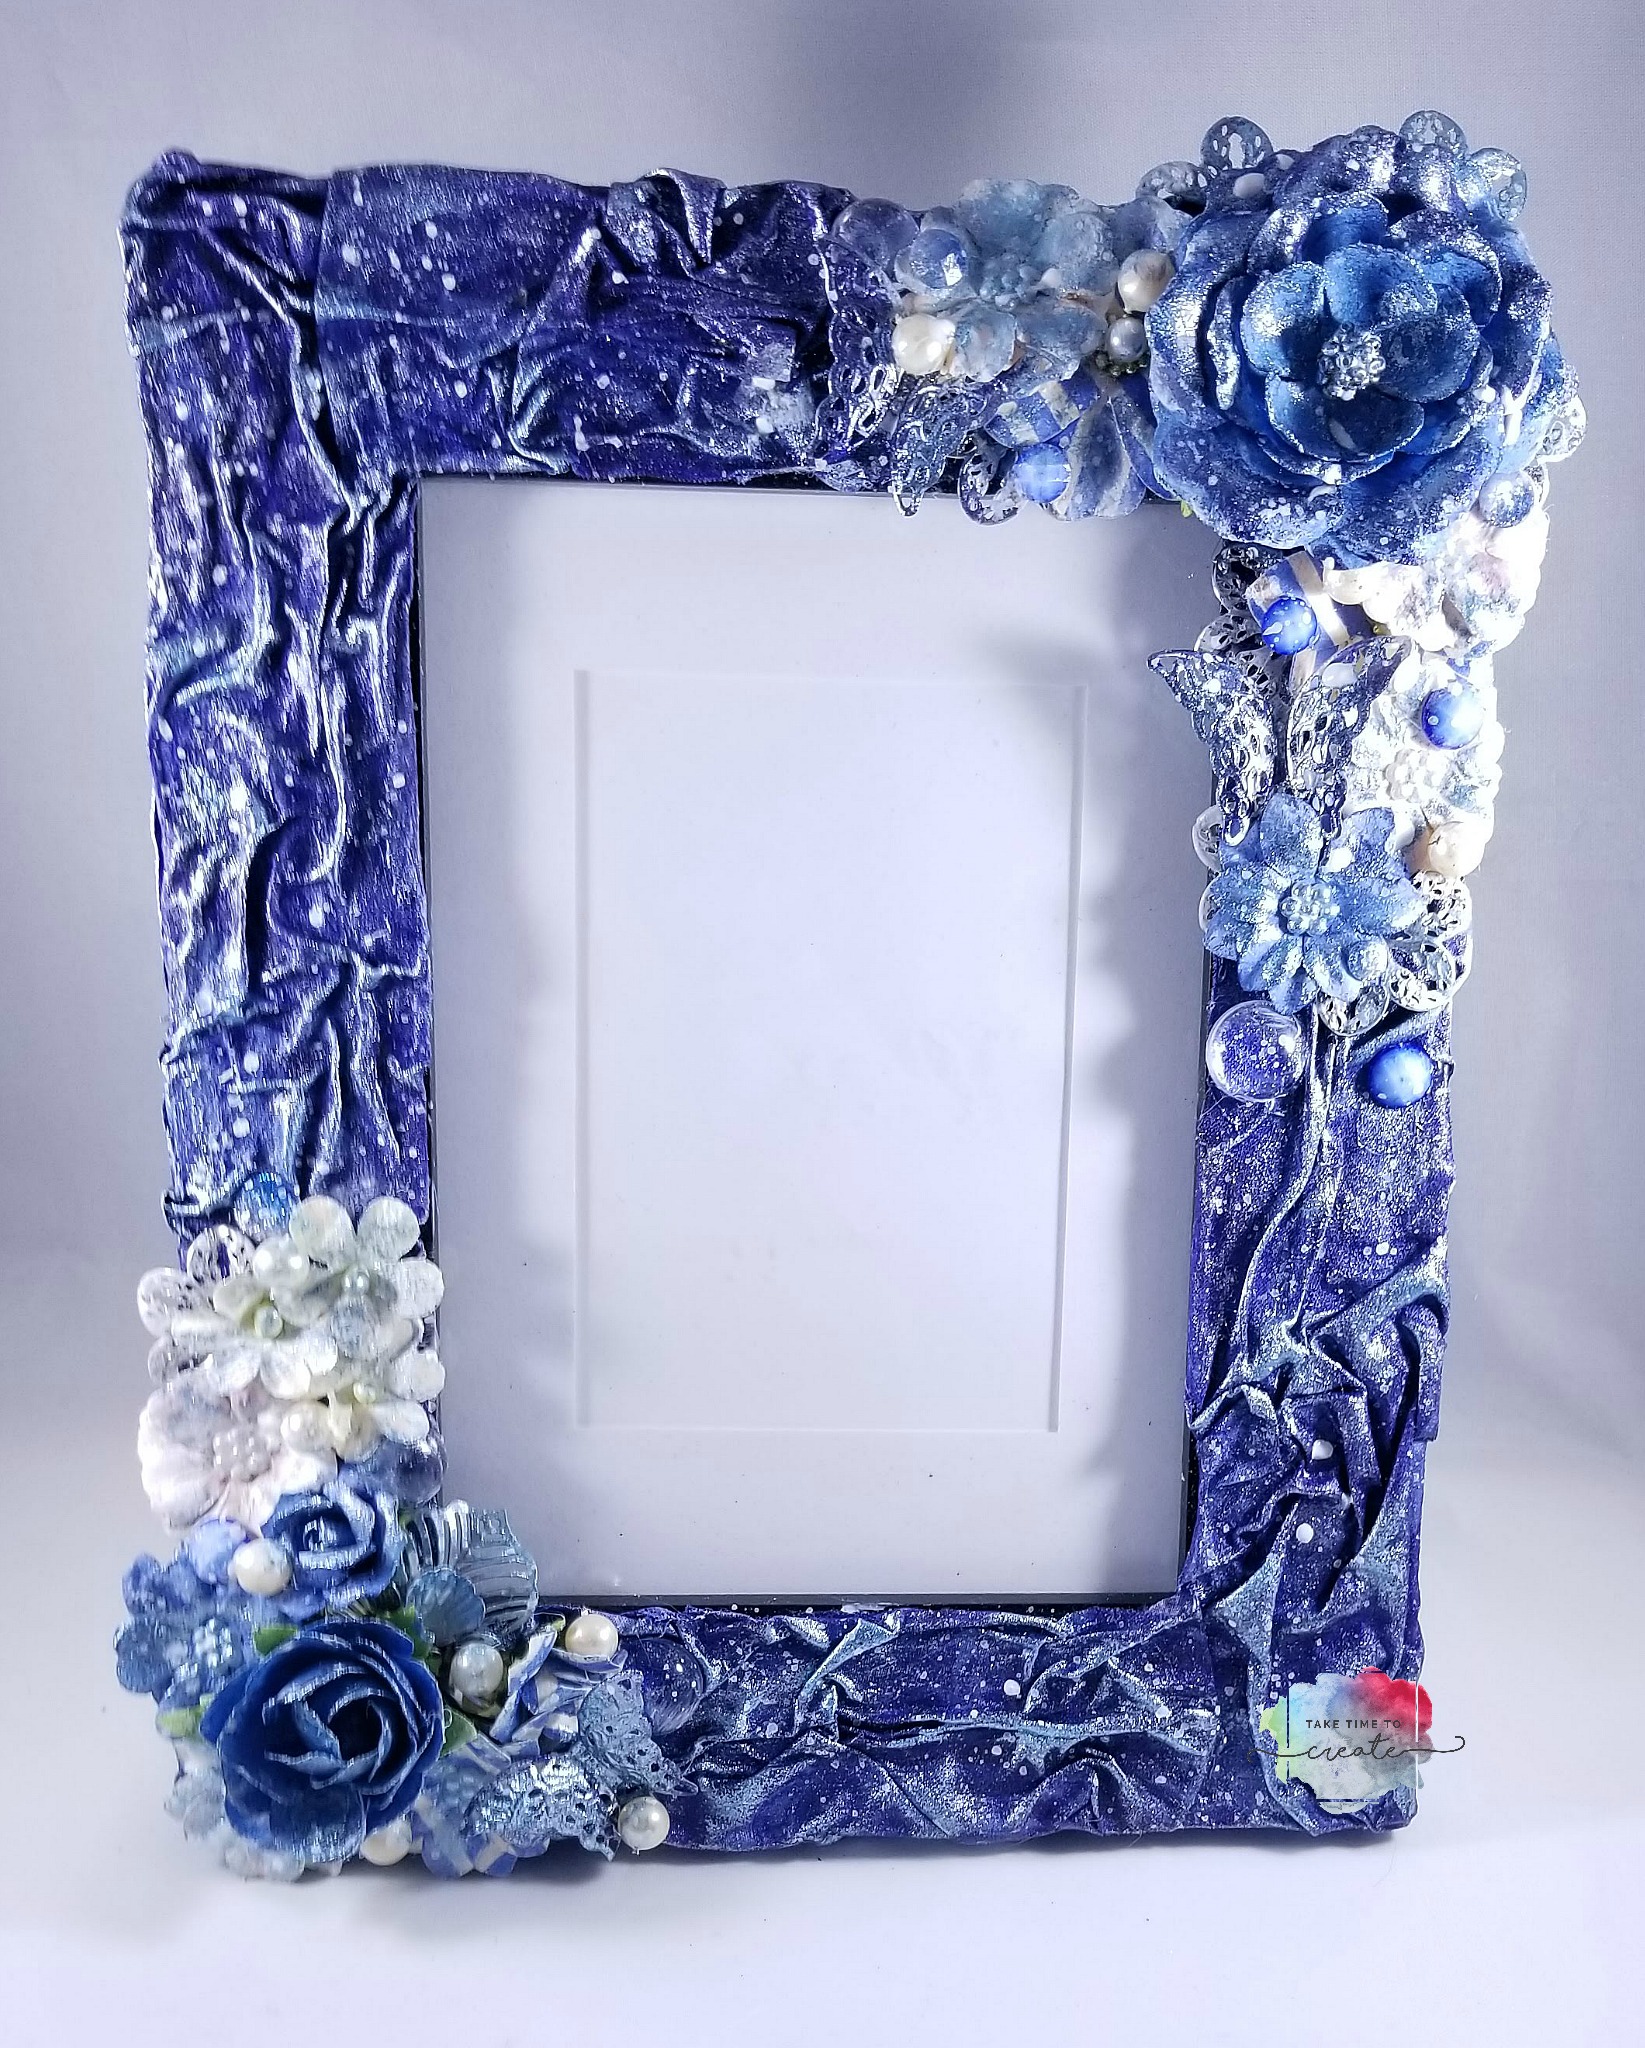
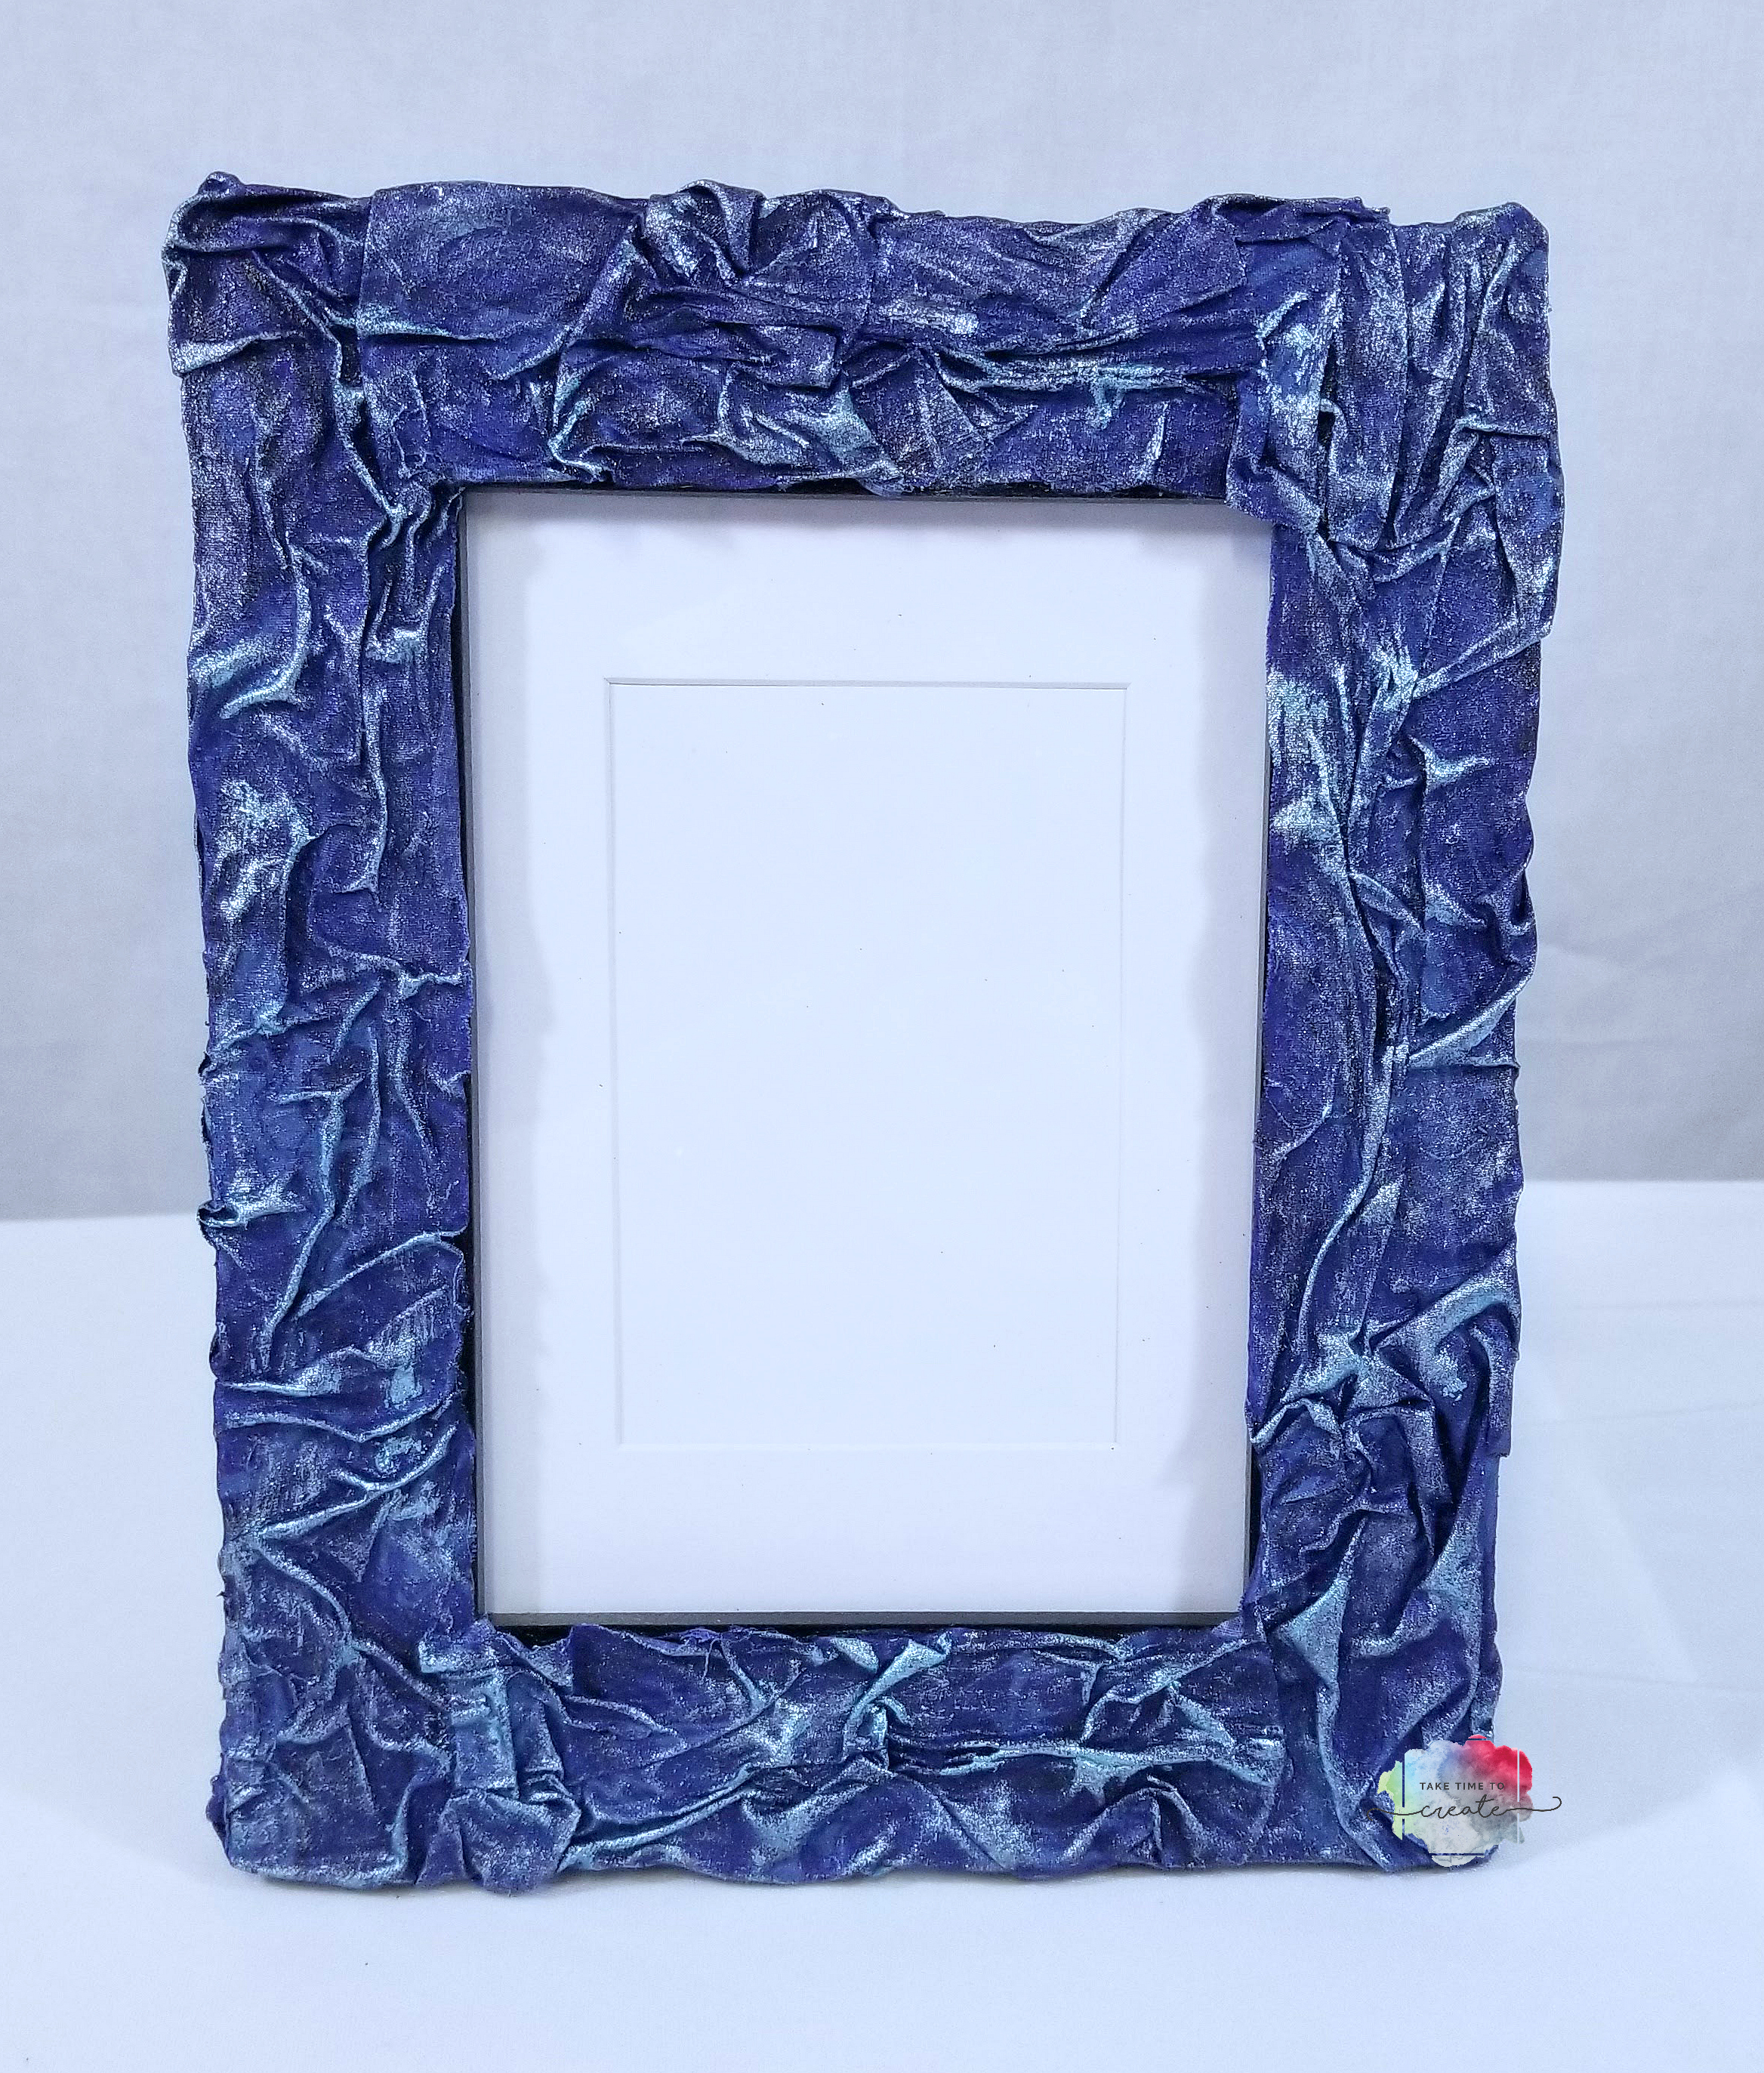
Have you ever finished a project and thought you were done only to realize that you weren’t? Well that is exactly what happened to me with this Blue Mixed Media Fabric Frame.
A little while ago I created the fabric frame and I thought it was pretty cute as is. If you missed that blog post you can catch it here: Fabric Frame
And the original frame was really cute and I did love it, but as I thought about it I thought it needed more. And by more, I mean a lot, lol. So I embellished it, and painted it some more. I love how it turned out and it is a personal choice how much or how little you add to your frame.
As you can see the original just has fabric and paint, but the embellished one has flowers, pearls, metal elements, and more added to the frame.
I clustered 2 groupings on opposite corners of the frame. I added a variety of elements to create interest and texture to the frame. If you know what photo you will be putting in the frame you can tailor the elements to the photo, I think that would look amazing.
After the gesso was all dry I painted over everything with Finnabari Sparks and Metallique paints. They were the same colors as the original frame and I thought that would help make it all cohesive.
The last step was adding splashes all over to really blend the original and the new elements together. I wanted it to look like I planned it all at once, lol.
I really like how this all came together. I love adding new elements on top of project I thought I had finished.
What project did you think you finished but went back later to add embellishments to? Share in the comments.
Affiliate Links (similar product if actual one can’t be found)
Today I have a fun, easy fabric frame project for you. I am still on a fabric kick, I have so many ideas using fabric and I can’t wait to share them with you.
For this project I used fabric I got from Annie’s Fabric Club. This is not sponsored, but I really like the fabric I got, and I am looking forward to next month’s fabric. Here is the link to the club if you are interested in joining: https://www.creativequiltersfabricclub.com/
This is such a fun, easy project that only takes a few materials
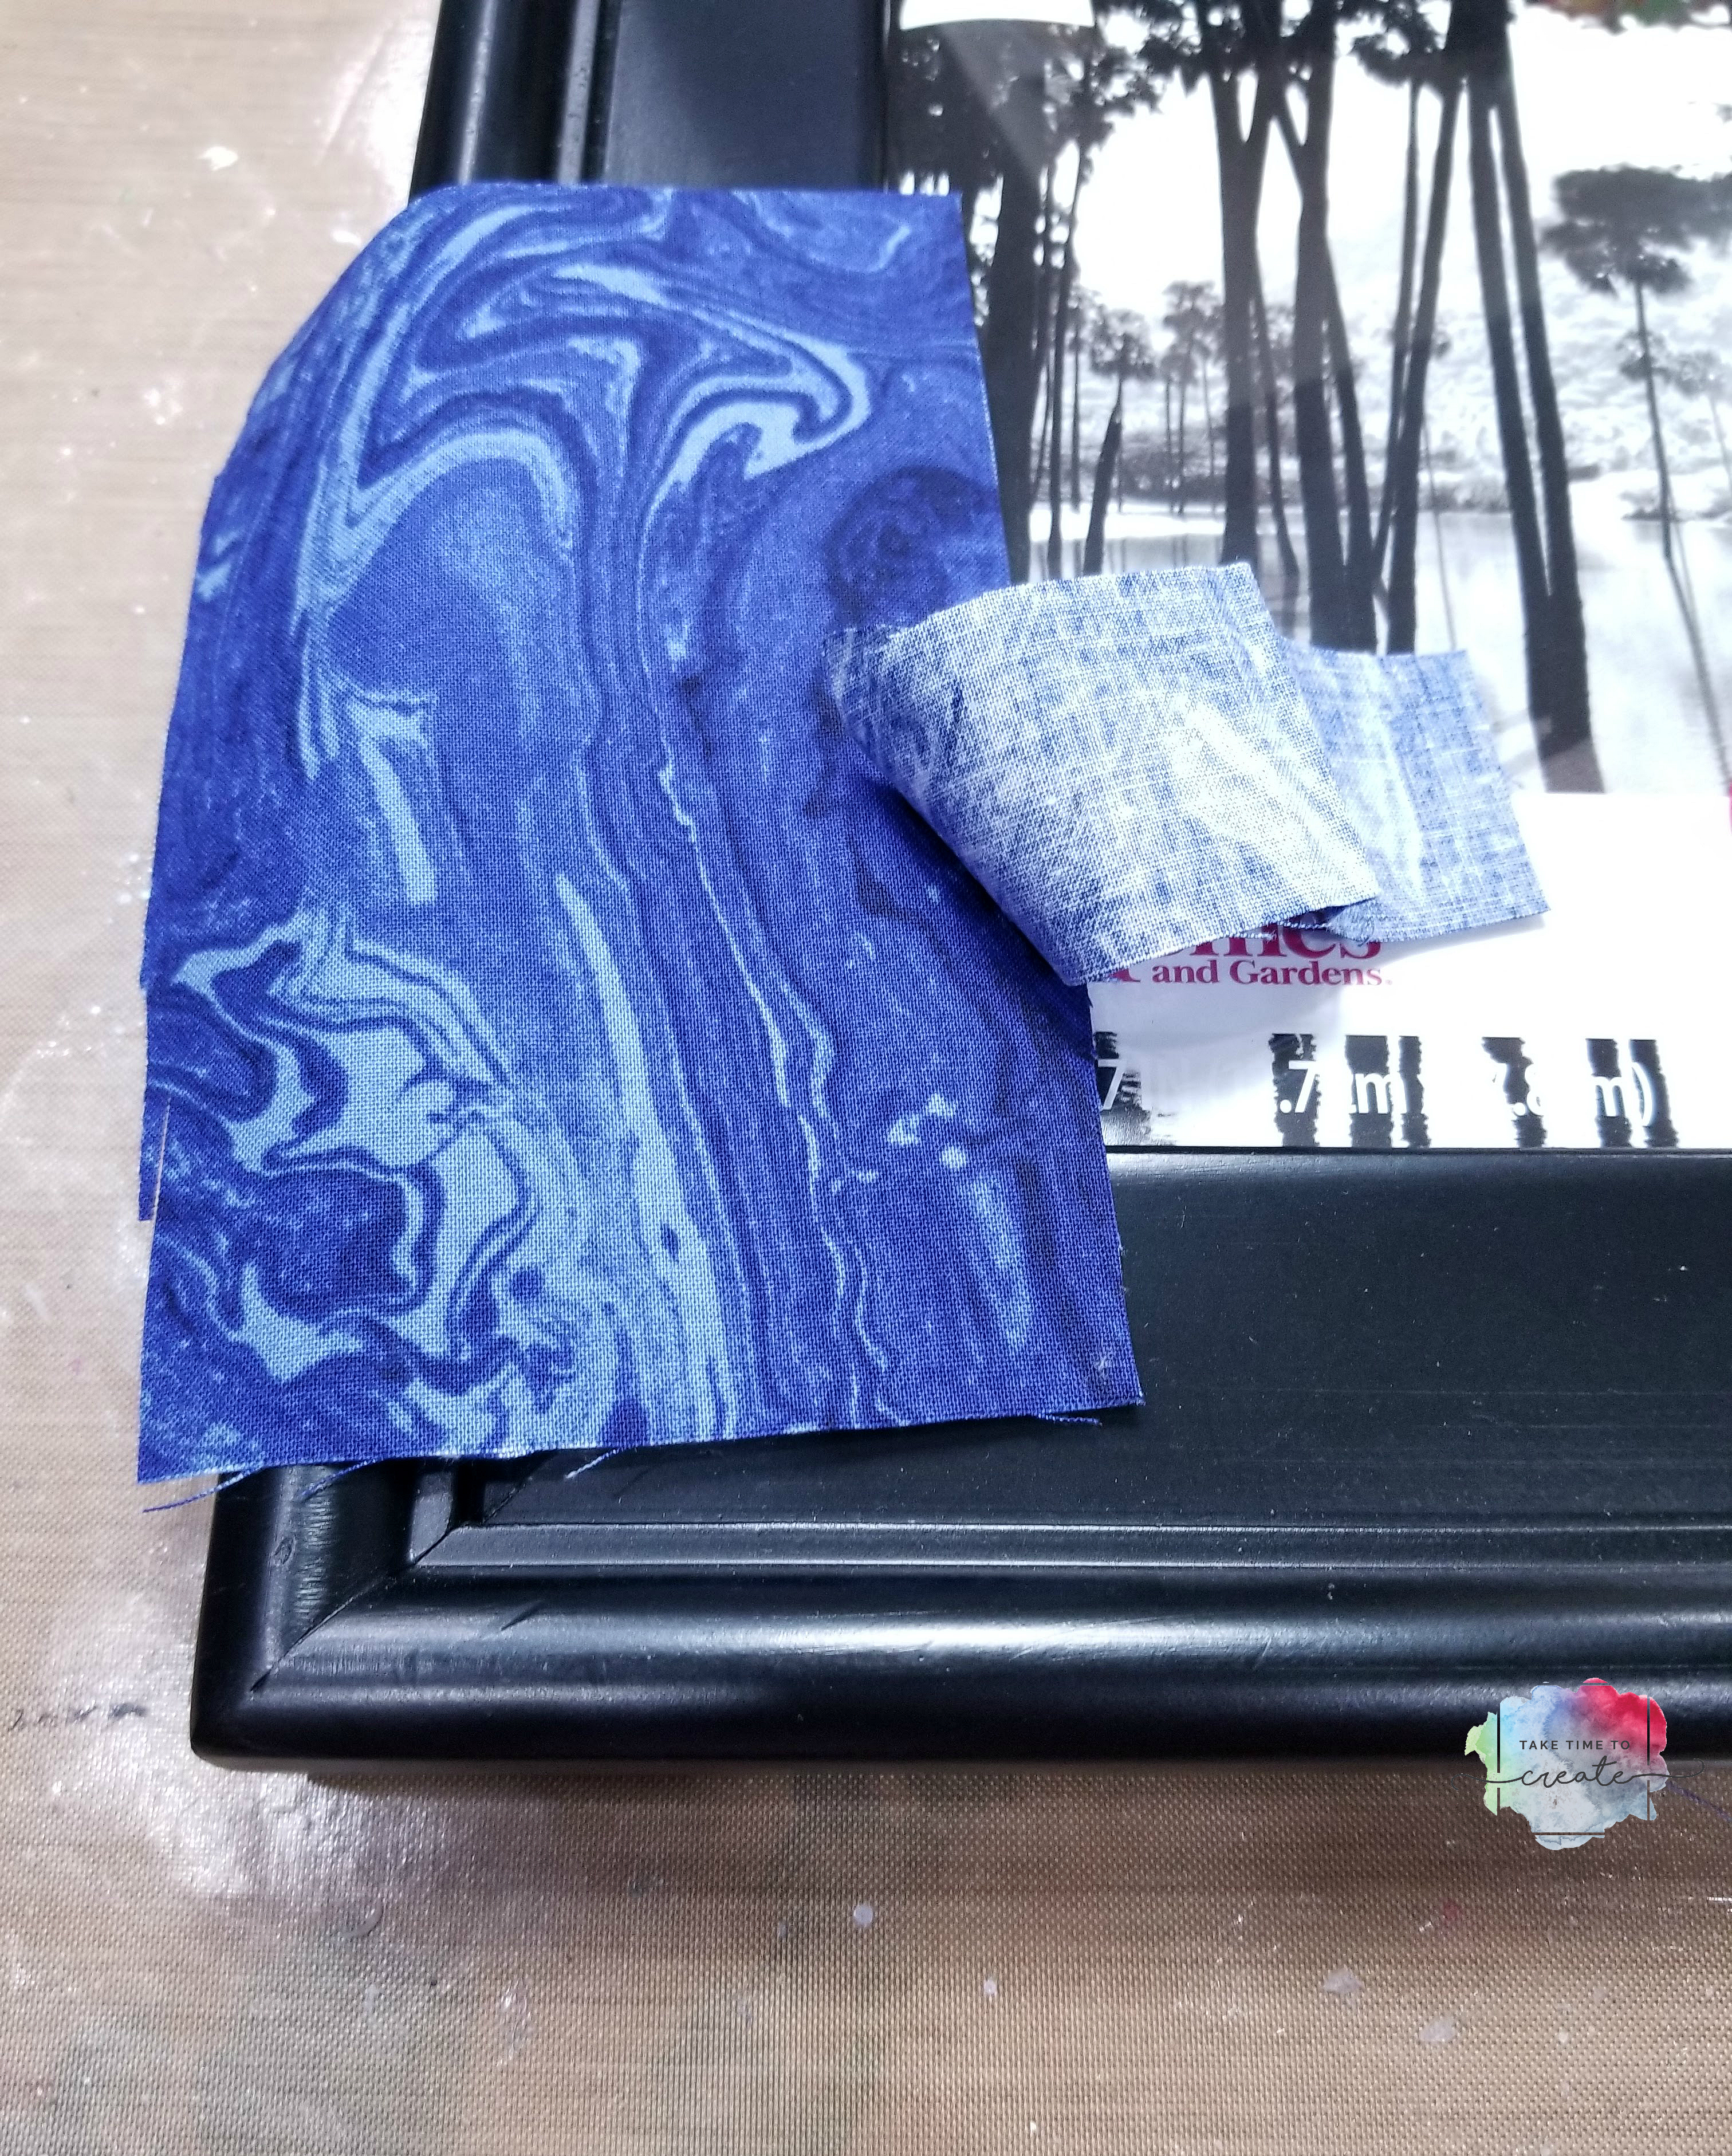
Gather all your material including the fabric and your frame. The frame should have a wide enough border that gives you plenty of room to add fabric. The color of the frame doesn’t matter a lot because you will be covering it in fabric.
To get started cut your fabric in strips that are a little wider than your frame. Spread heavy gloss gel on the frame. Coat your fabric strip in Gloss gel and add to frame, crinkling it up as you go. While everything is wet take the time to get all the wrinkles and texture you are wanting.
Take your time and make sure it looks like what you are going for. Before you let your frame dry clean up the edges and back with a baby wipe. Let the frame dry. Once dry you can leave it at this step if you want, or you can go on to the next step which is adding paint.
After the fabric dried (leaving it over night is best) I dry brushed on a Finnabair Metallique and a Finnabair Sparks paint to add some detail and sparkle. I really love her paints and they add that bit of interest that I am looking for. .
And that is it, the frame is done! These are so much fun and easy to make, I think I will be making a lot more as gifts this year.
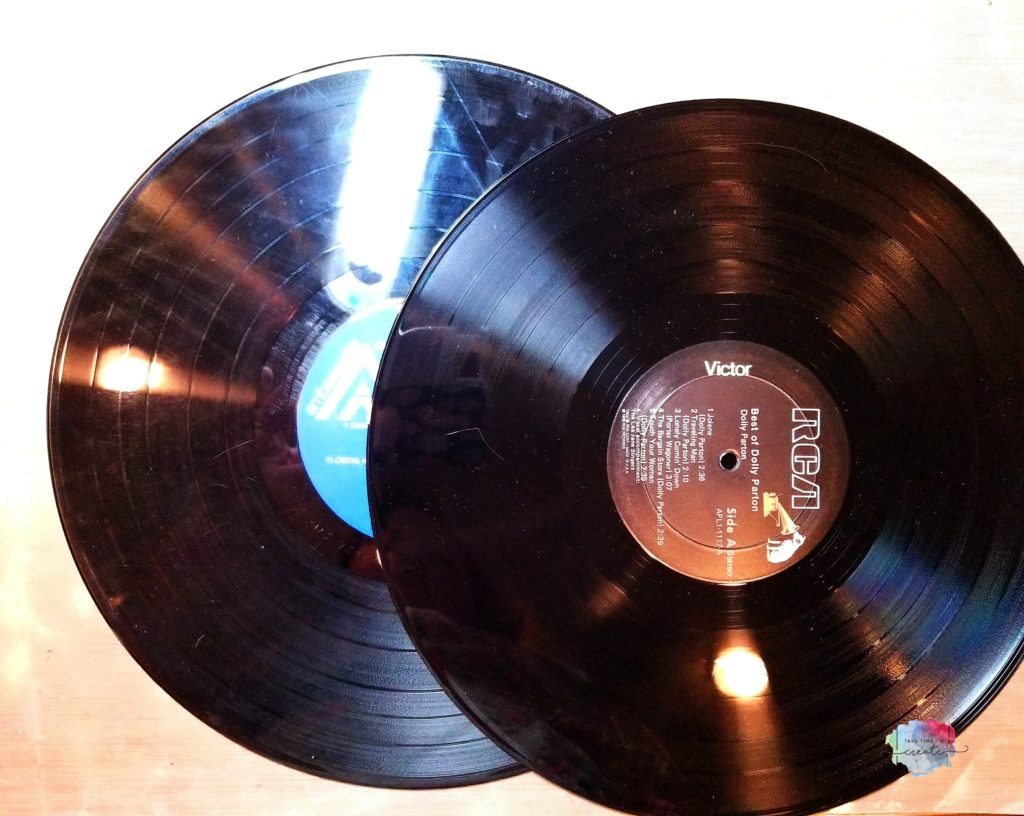
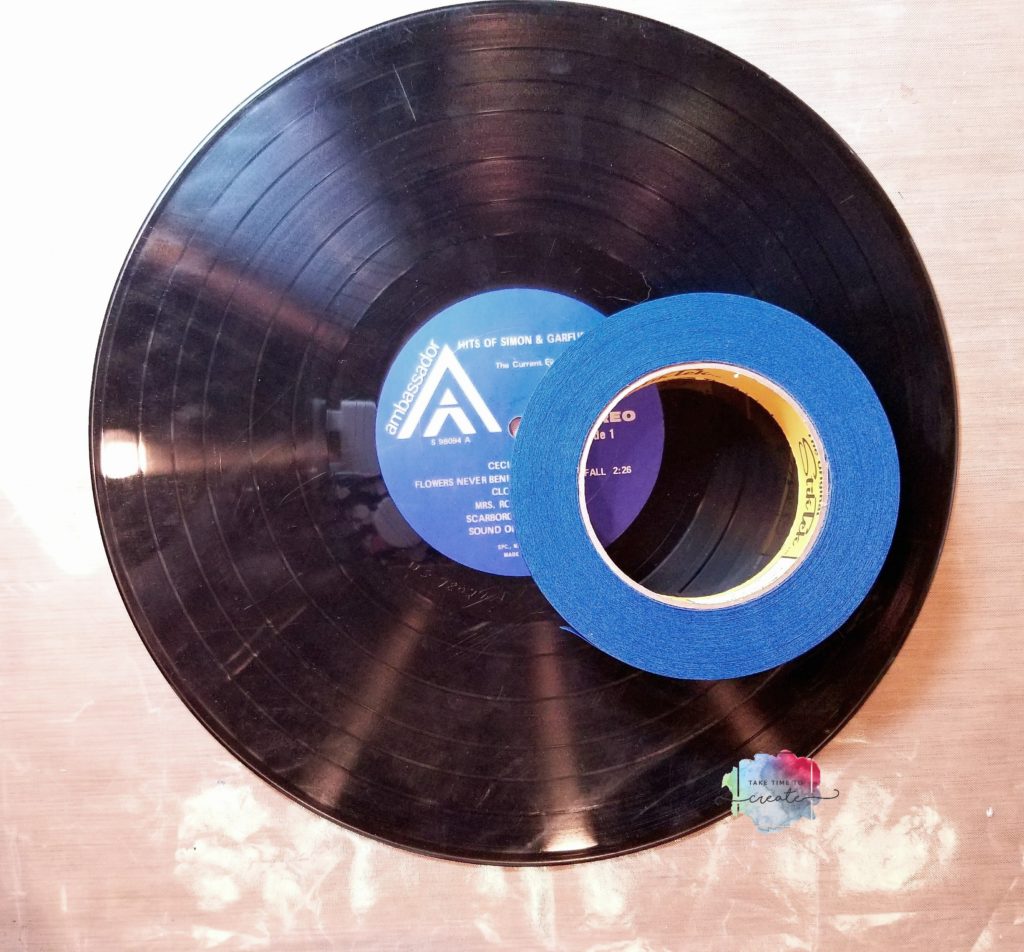
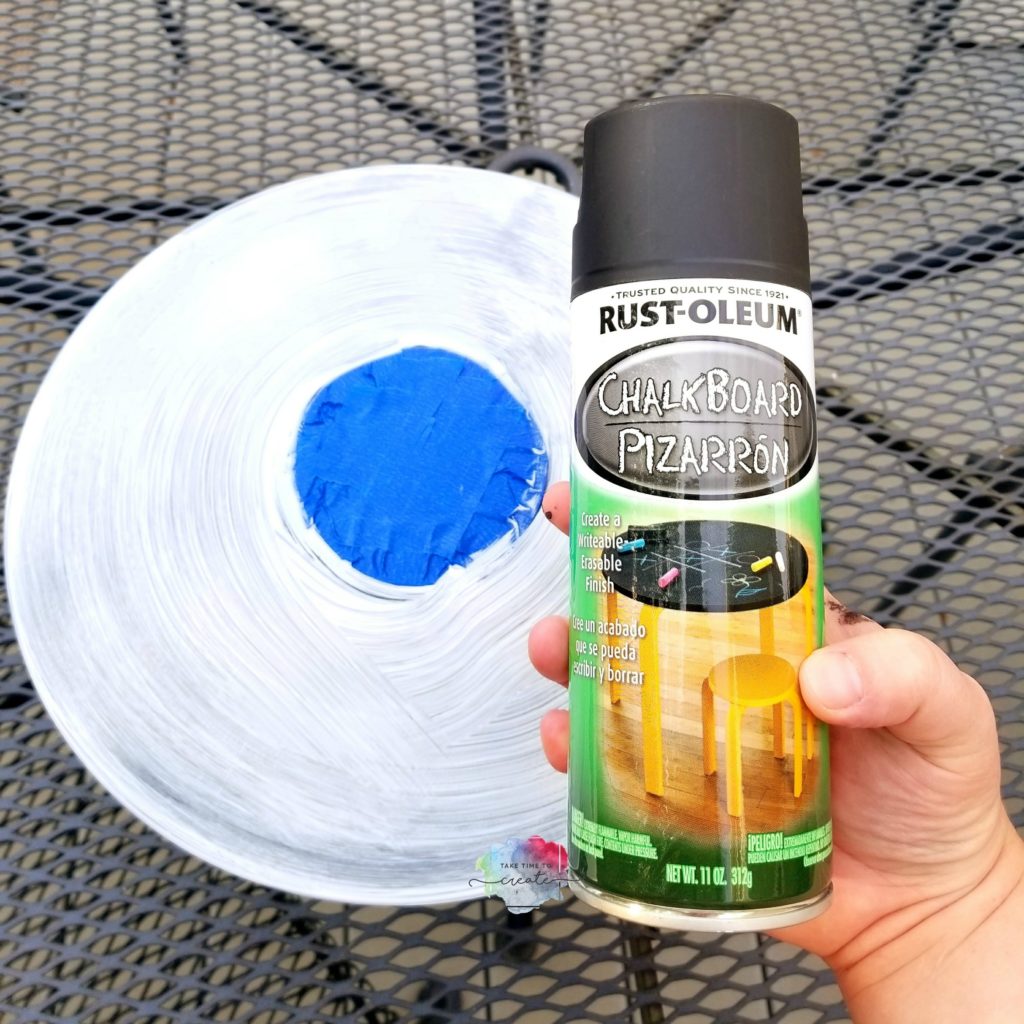
What do you do with all those old records that are just laying around? Well, today I decided to turn some of them into a really cute chalkboard. BTW- I have a ton of records so be prepared for a lot more record tutorials, lol.
You can check out the video on how I did it.
This is such an easy tutorial, you can make a few at a time, perfect for dorms, offices, or even gifts.
Materials:
Record
Primer (I used Kilz 2)
Chalkboard paint (I used the spray paint version)
Tape
Instructions:
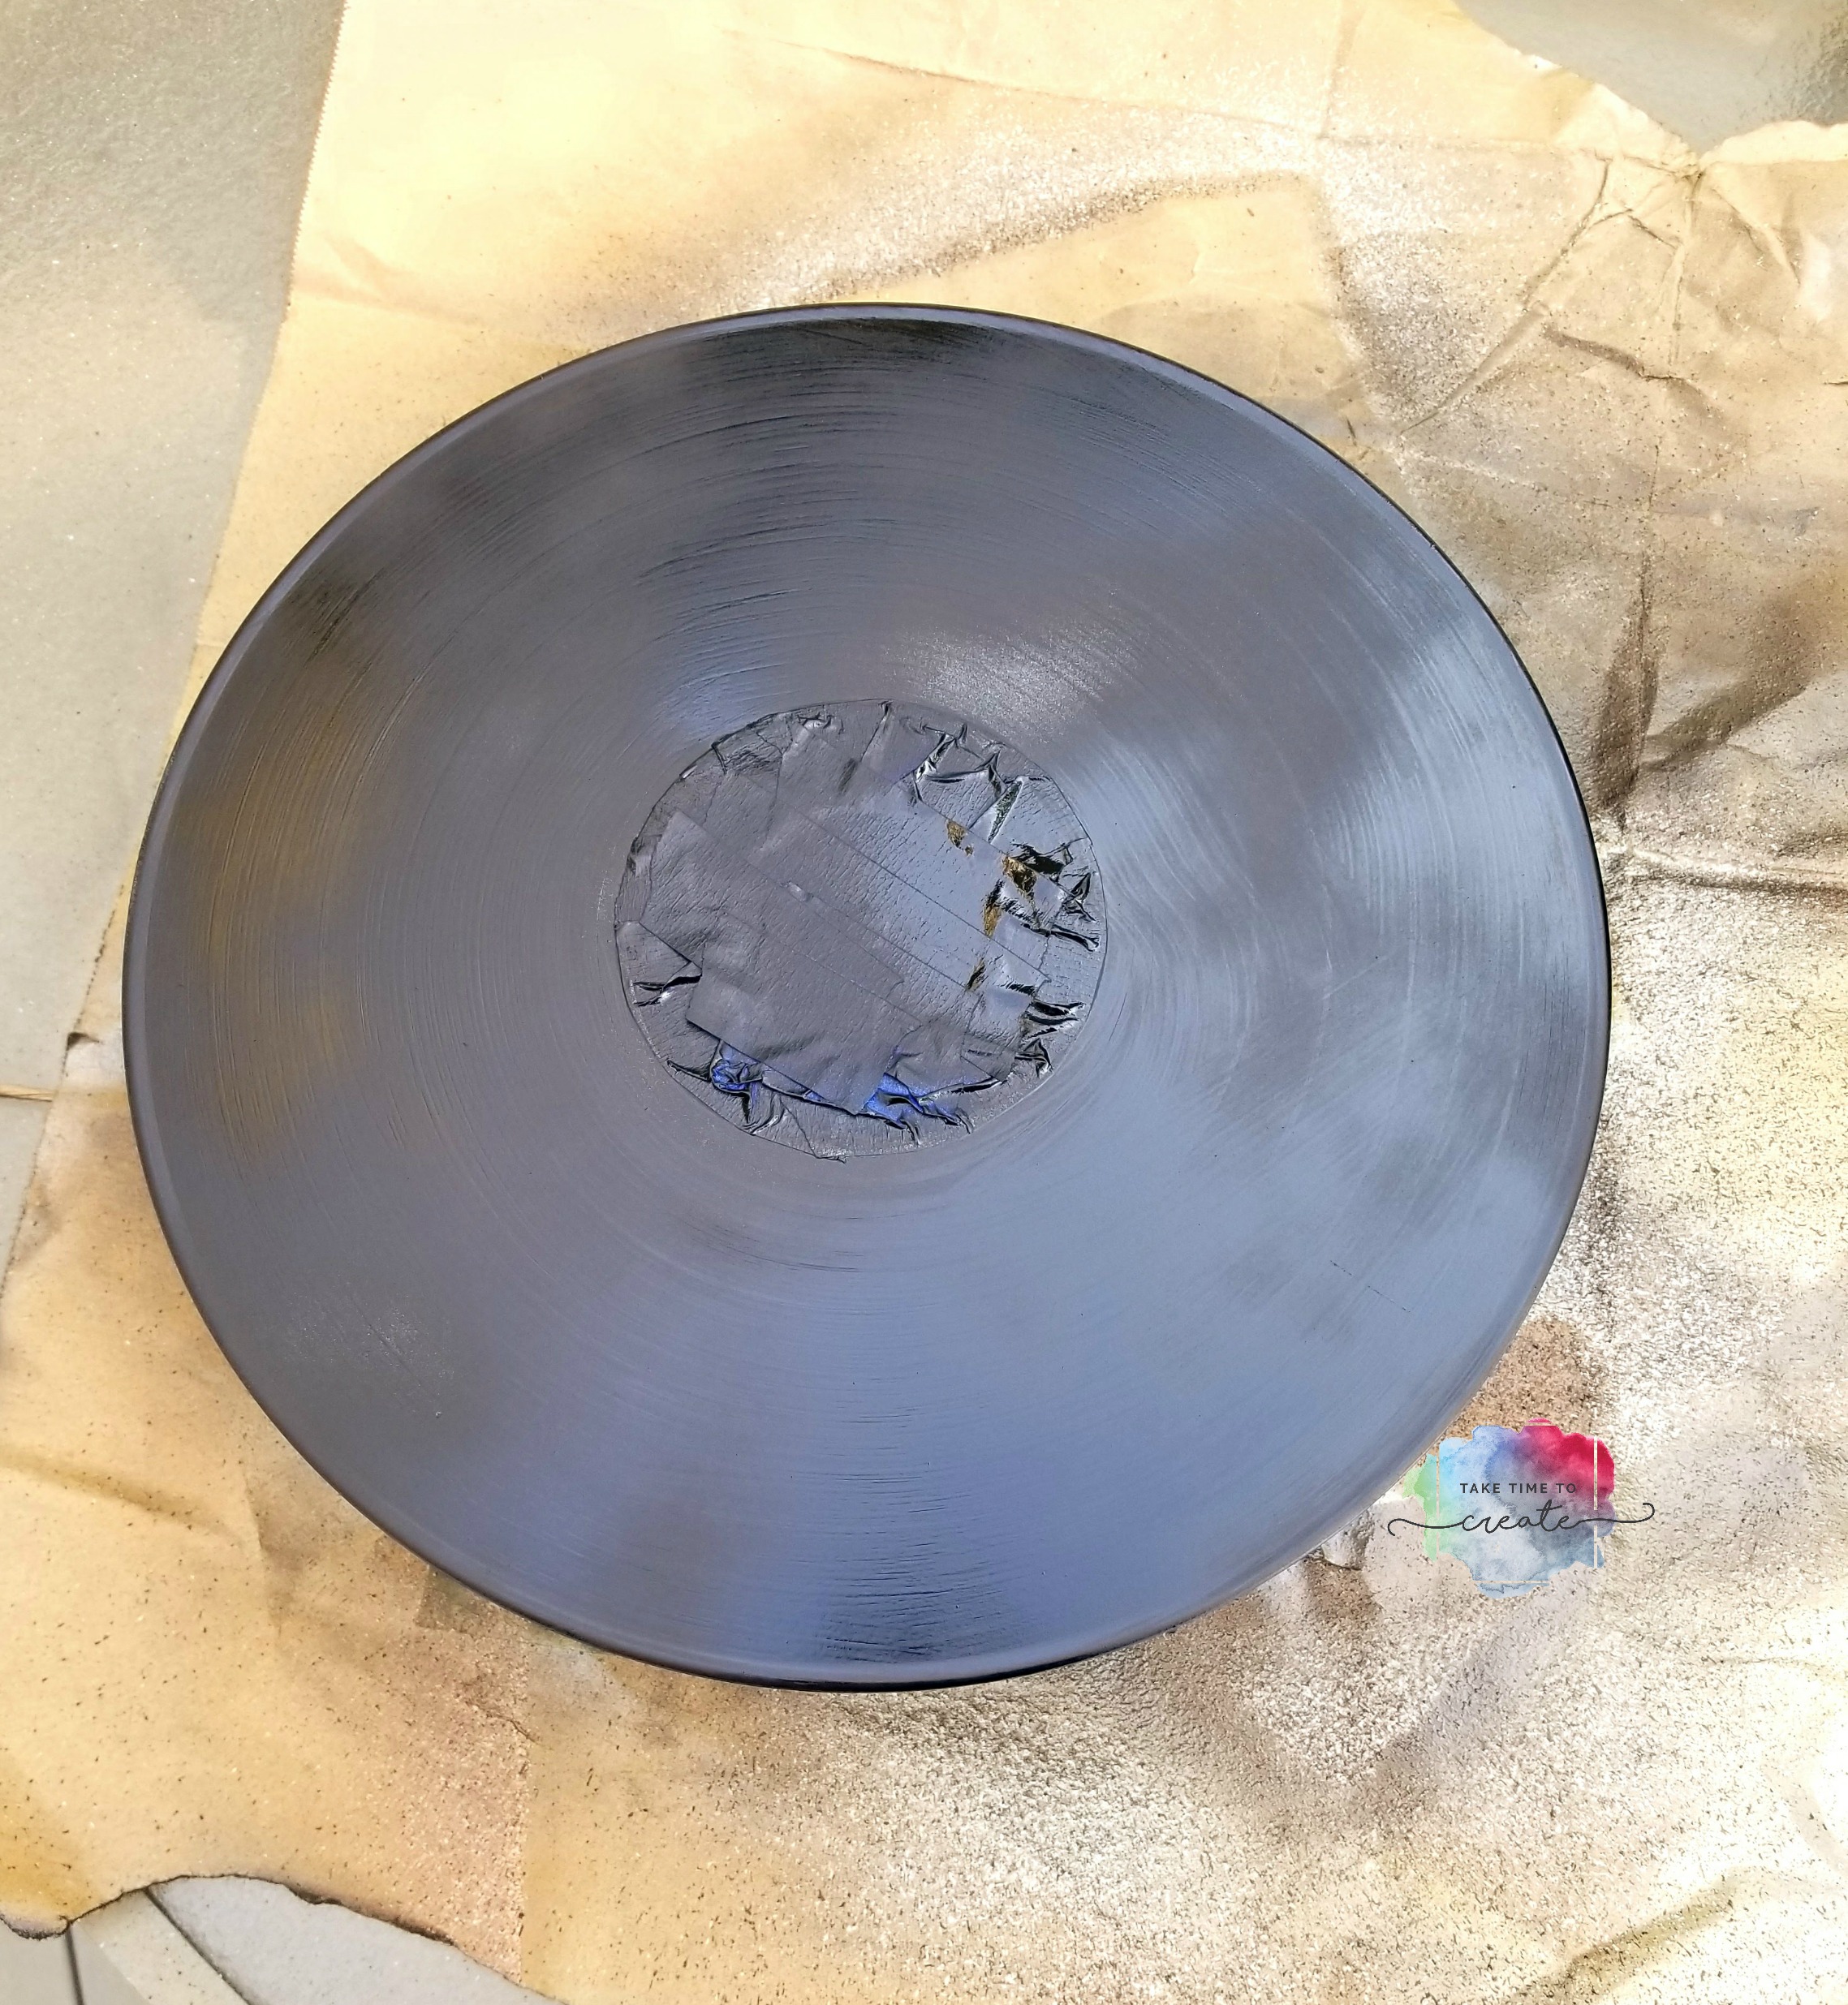
Clean the record before you get started. I really liked the center of some of the records so I taped over them to protect them from the paint.
The others I just left and painted over the whole thing. I really like both versions.
Then I primed the records. Actually, I just primed 2 of them and just painted the other 2. I think it worked out just fine without the primer, so that is up to you what you want to do.
Then I applied 3-4 coats of chalkboard paint on the record. Do this outside. Follow the instructions on the can they are all a little different.
Once they were fully dry and after 24 hours I conditioned the record by rubbing chalk all over it and cleaning it off. Then they were good to go! Old records repurposed into a really cool chalkboard!
Now, the question I always get asked, is how do you hang the record once you are done. You can use a plate hanger, or velcro command strips, or nail, or screw it in through the hole. Or you can get a picture display stand and out it on your desk. They are a ton of way to display your new record.
I am in love with how this turned out.
What have you made with old records? I am needing some ideas for the stack I have acquired!
Yikes! Can you believe it? School is just right around the corner! Or maybe it has already started for some people.
To help ease the transition I have a school supplies inspired DIY! These are perfect for dorms, or even the office. Do you want to know the best part? They are all a little geeky 🙂 Which is perfect!
The video can be found here:
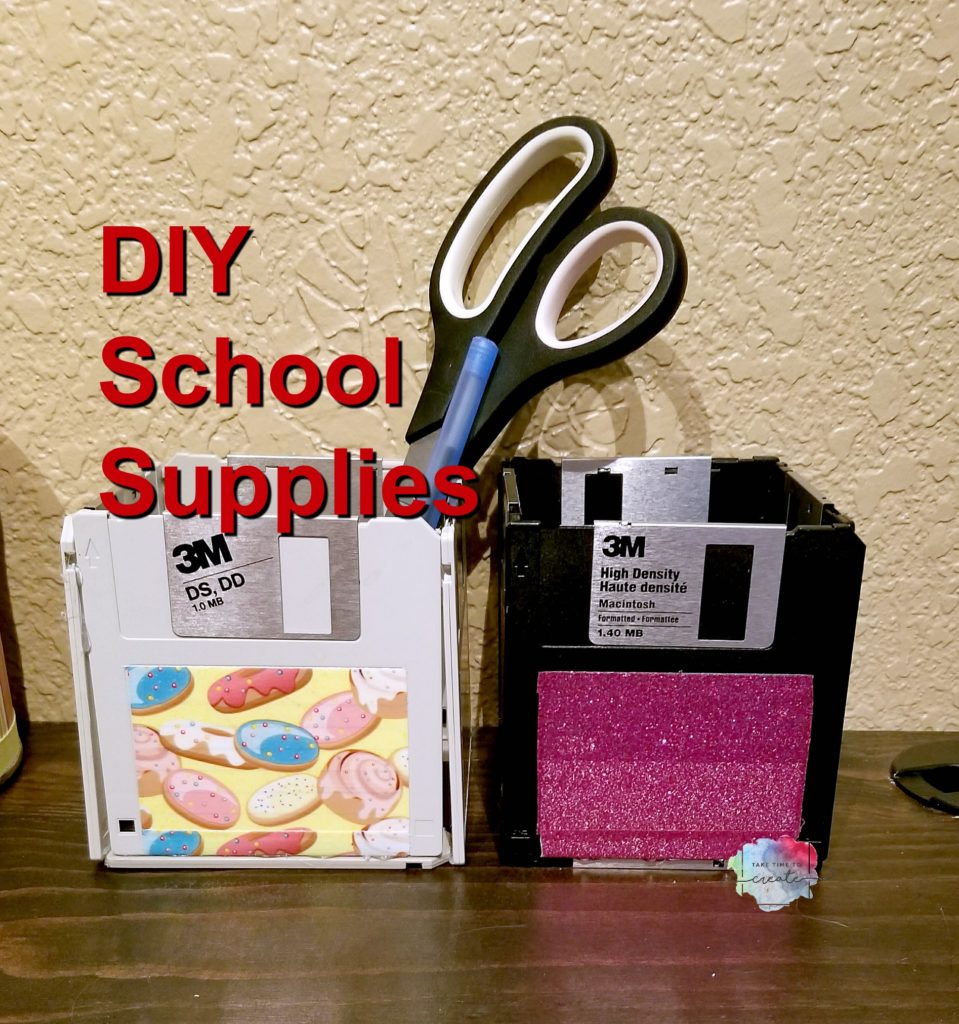
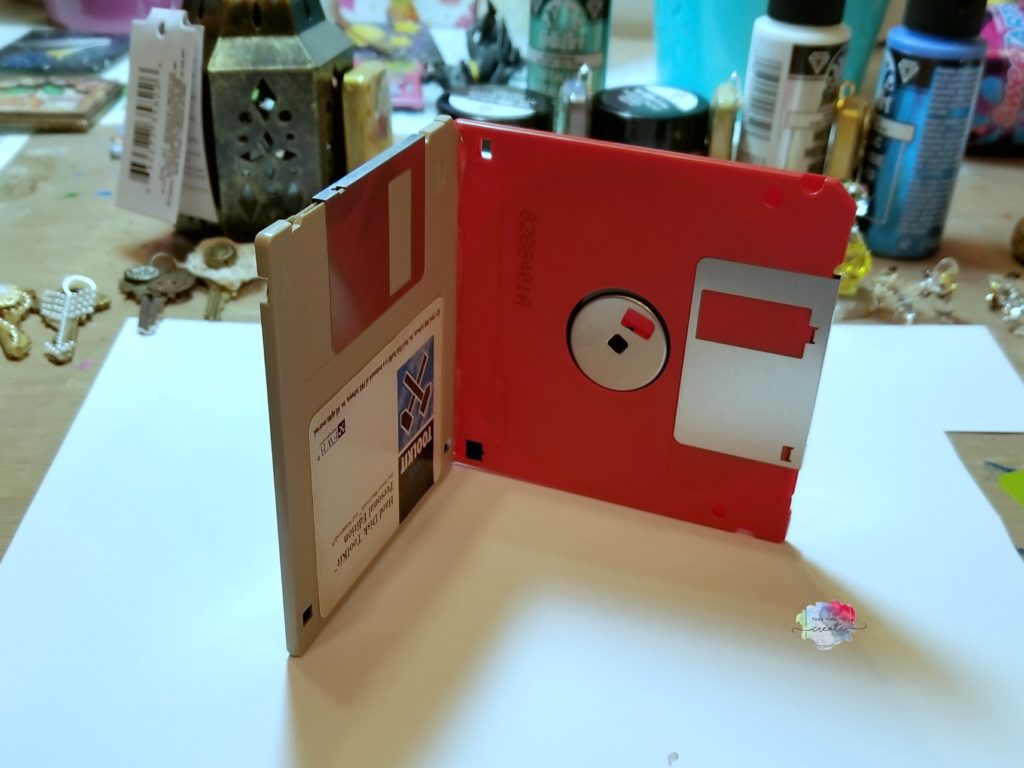
Let’s start with the first project: Floppy Disc Pencil Holder
Grab your floppy discs from the basement and smile a little when you think of all the people that told you to throw them away, you knew they would come in handy someday, lol. Well today is the day!
I used duck tape to cover up the label and make it look a little cuter, but you could use washi tape or paint them.
Then just hot glue the sides together and then to bottom. Now you have a cute place to put all your pencils and pens
The next 2 are magnets. First is the Action Figure Magnets
Find some really awesome action figures from the Dollar Store and glue a magnet to the back (Loctight or E6000 or any strong glue should work) .
That is it. Now you have a really cute magnet to hold all your important papers.
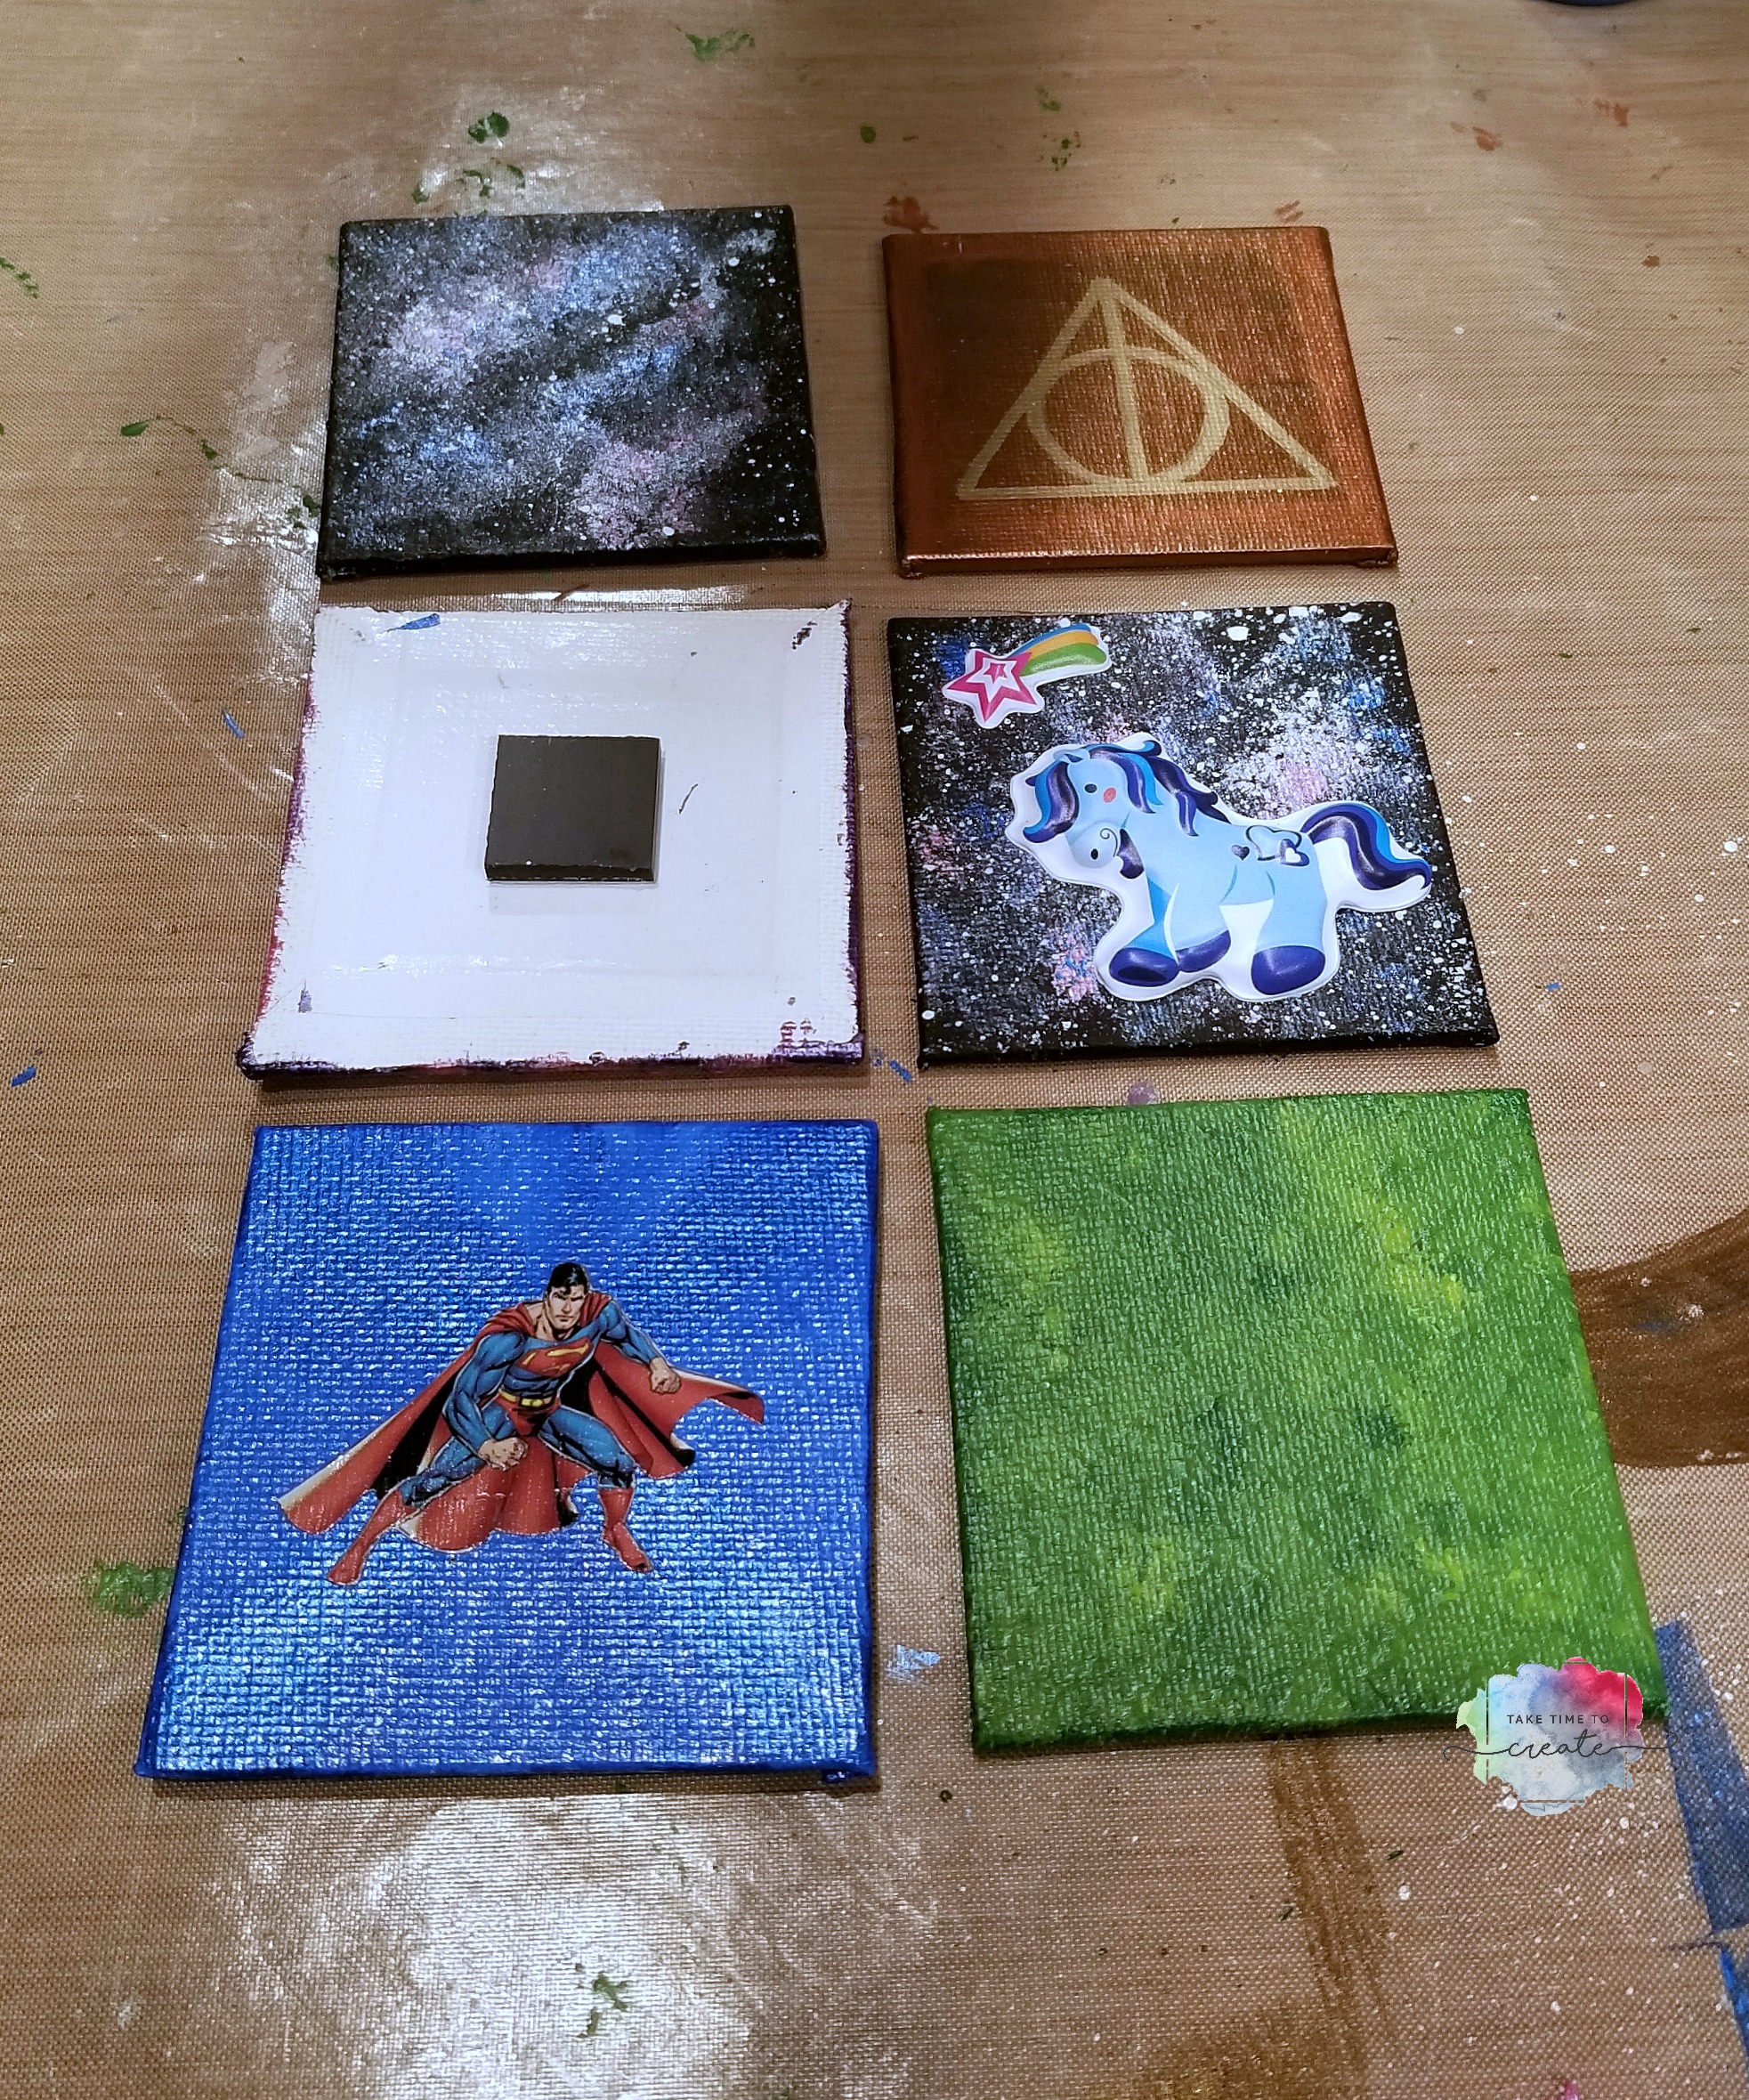
The last project are these Canvas Magnets
Paint the mini canvas in any way you want, I did a galaxy, or stickers, or used a paint pen depending on what I wanted to do. In the video I show how I painted my galaxy if you are wanting to one like that.
Then you glue a magnet to the back and you now have a super cute magnet!
Now you are ready for school! What supplies are you making this year?
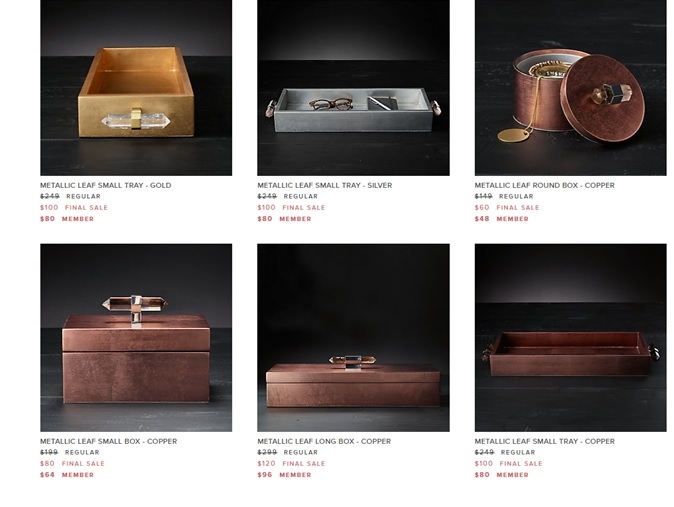
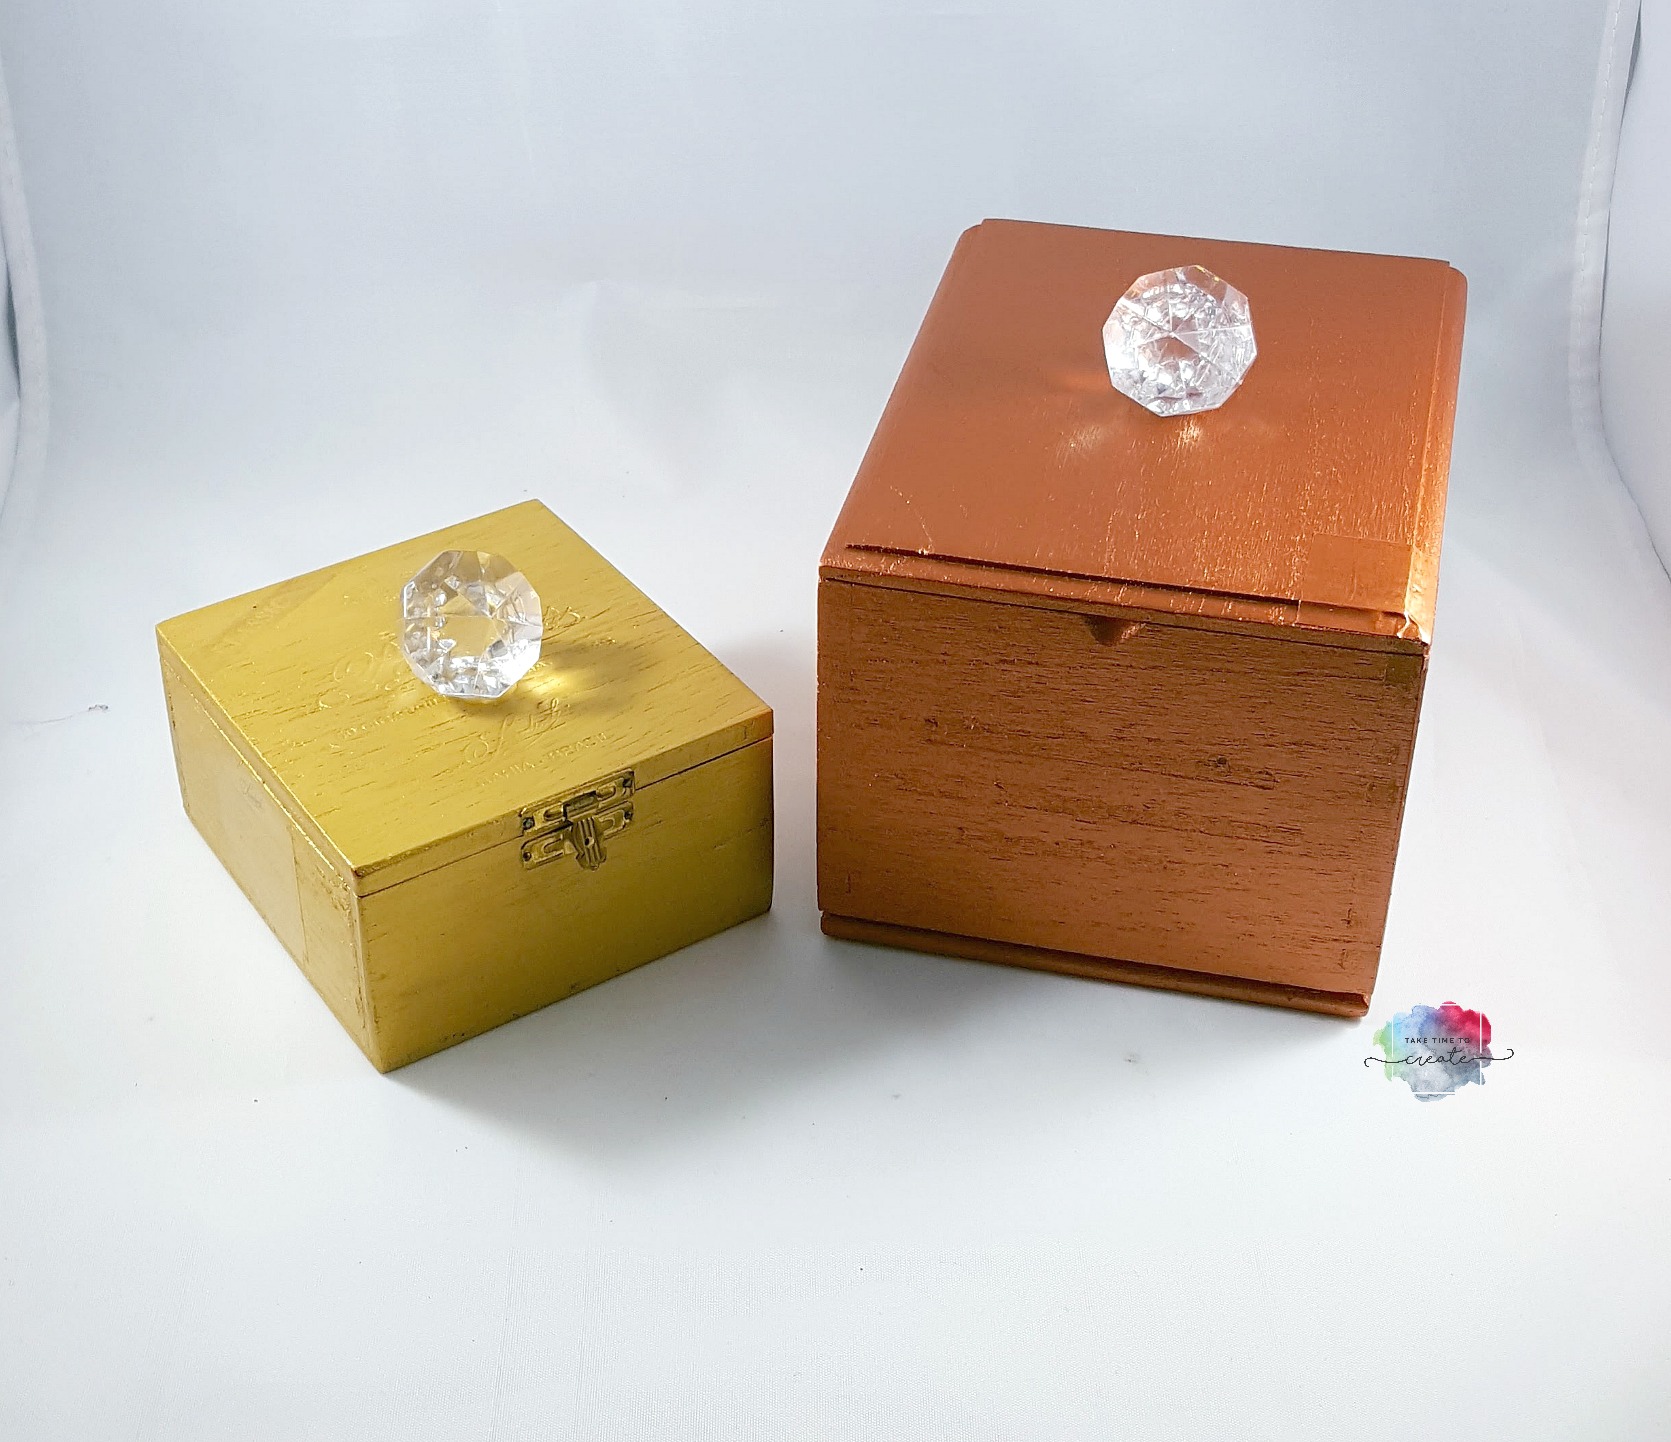
Today I have another Restoration Hardware Inspired project!
As many of you know, I love RH, they have amazing home decor items! I did a chandelier inspired project a few years ago, you can find that here: Chandelier
I found these beautiful metallic boxes on the RH website. I love the wood and the beautiful gem on top. But the price is a little out of my reach right now.
But it is easy to make one! My is not exactly the same… but that is all part of the fun in doing an inspired project.
Materials:
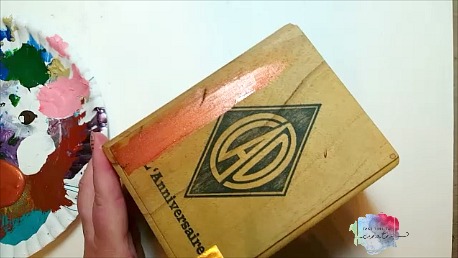
Box. I used a wooden cigar box, but any wooden box will do. The cardboard cigar box probably won’t work as well, but if that is all you have then just paint the printing with white paint first then it should work ok.
Metallic paint. I used the Folk Art paint I had in my stash, but use what you have
Gem. I had this giant plastic gem that worked great. Of course I got my box and gem from Who Gives A Scrap, lol.
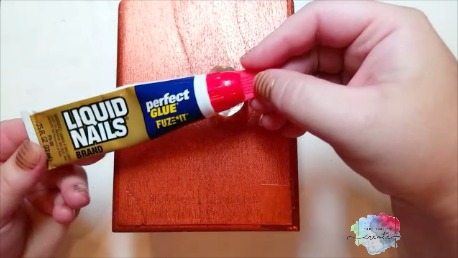
Glue. Use a glue that will work on wood and plastic, I used Loctite glue.
Instructions:
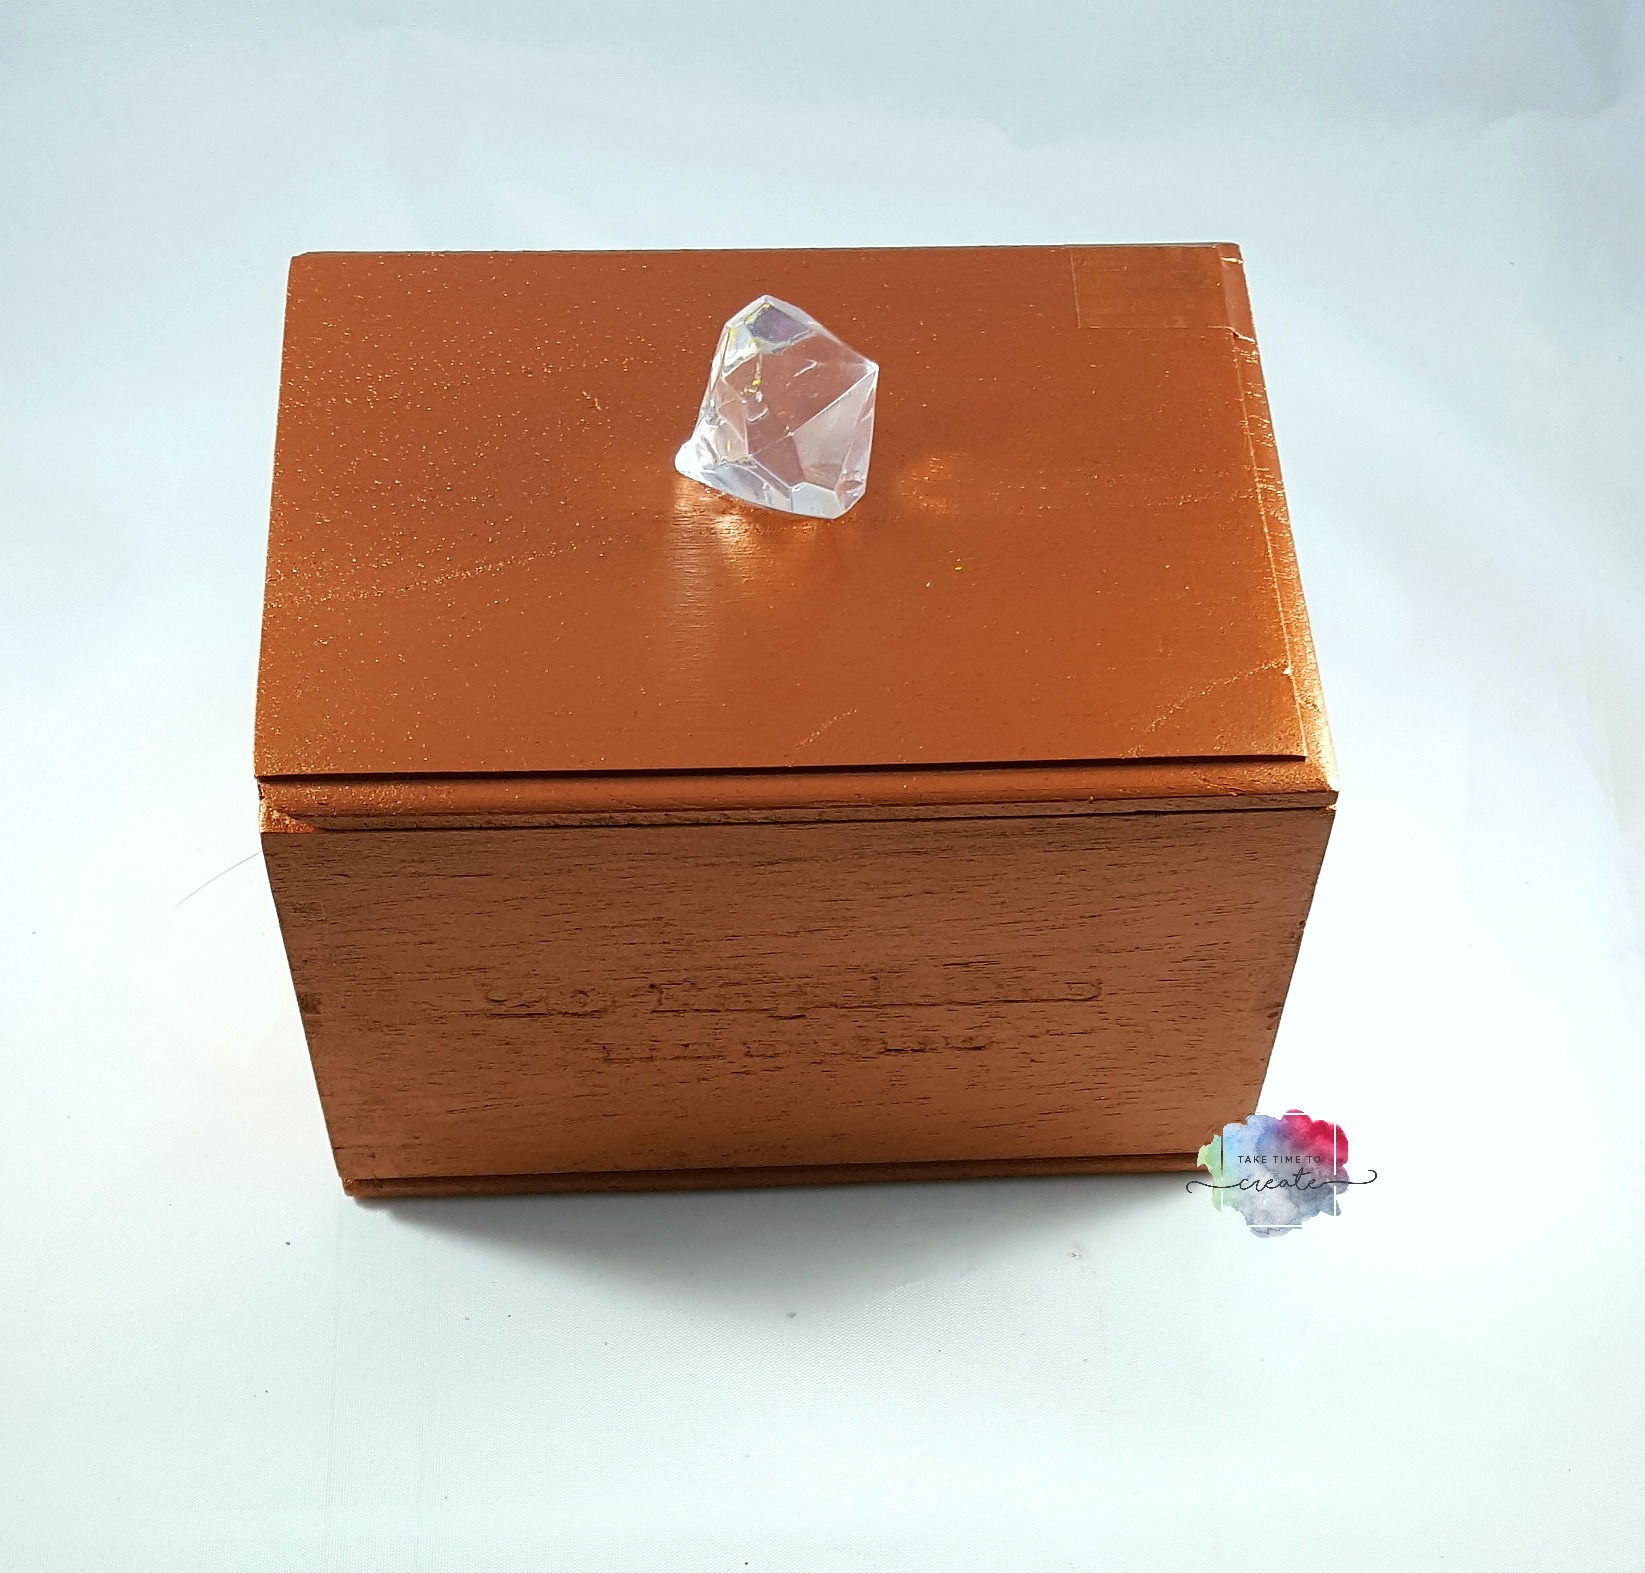
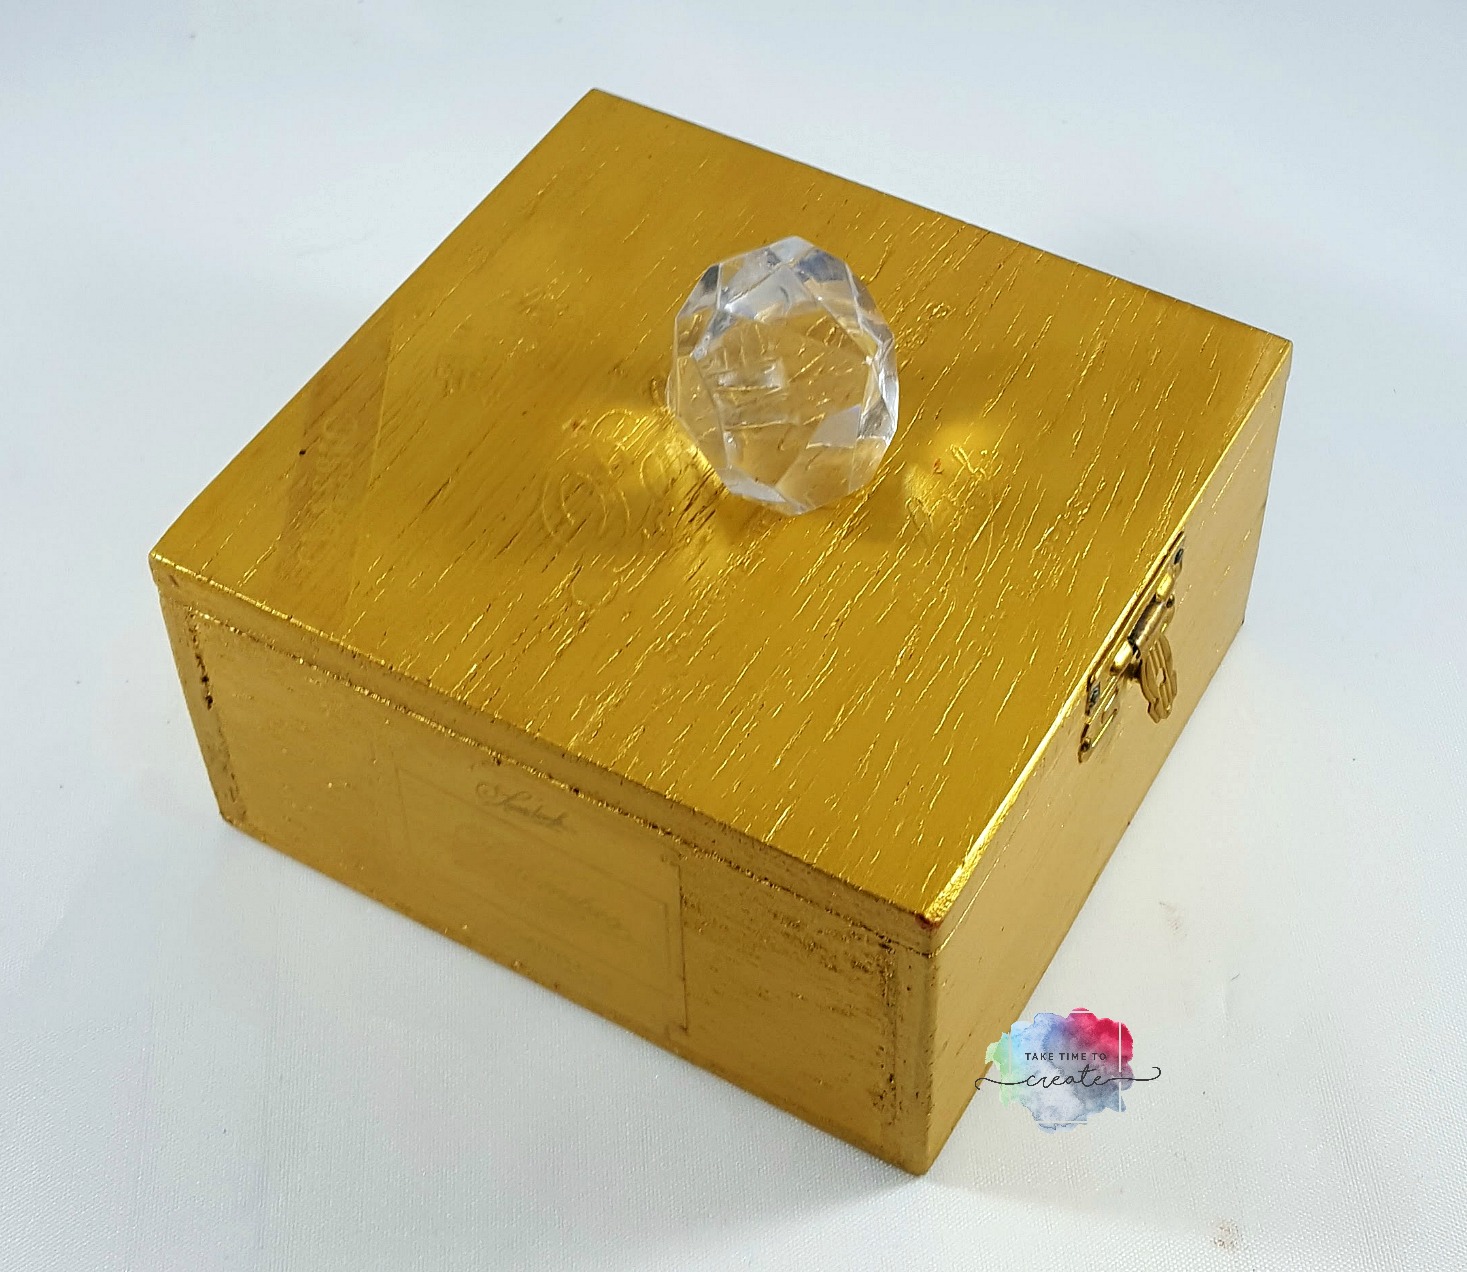
Pick your color and paint 2 coats on the box. I used a gold and a copper paint that looked really cool. If you want to make it look more like the RH box you can sand it first and use a wood filler it you want to cover up the writing. I wanted the rustic finish with the metallic and gems, a little contrast that I like.
Once the outside and inside are completely dry then glue your gem on with your glue. I liked the gem on the top, but you can place it anywhere that looks good.
Once the glue has dried overnight you can add a spray sealer if you want. I wanted to protect the paint so I did add a gloss spray sealer.
And there you have it, a RH inspired box. So very cute and it is great to give as a gift, or put the gift inside and use it as the wrapping.
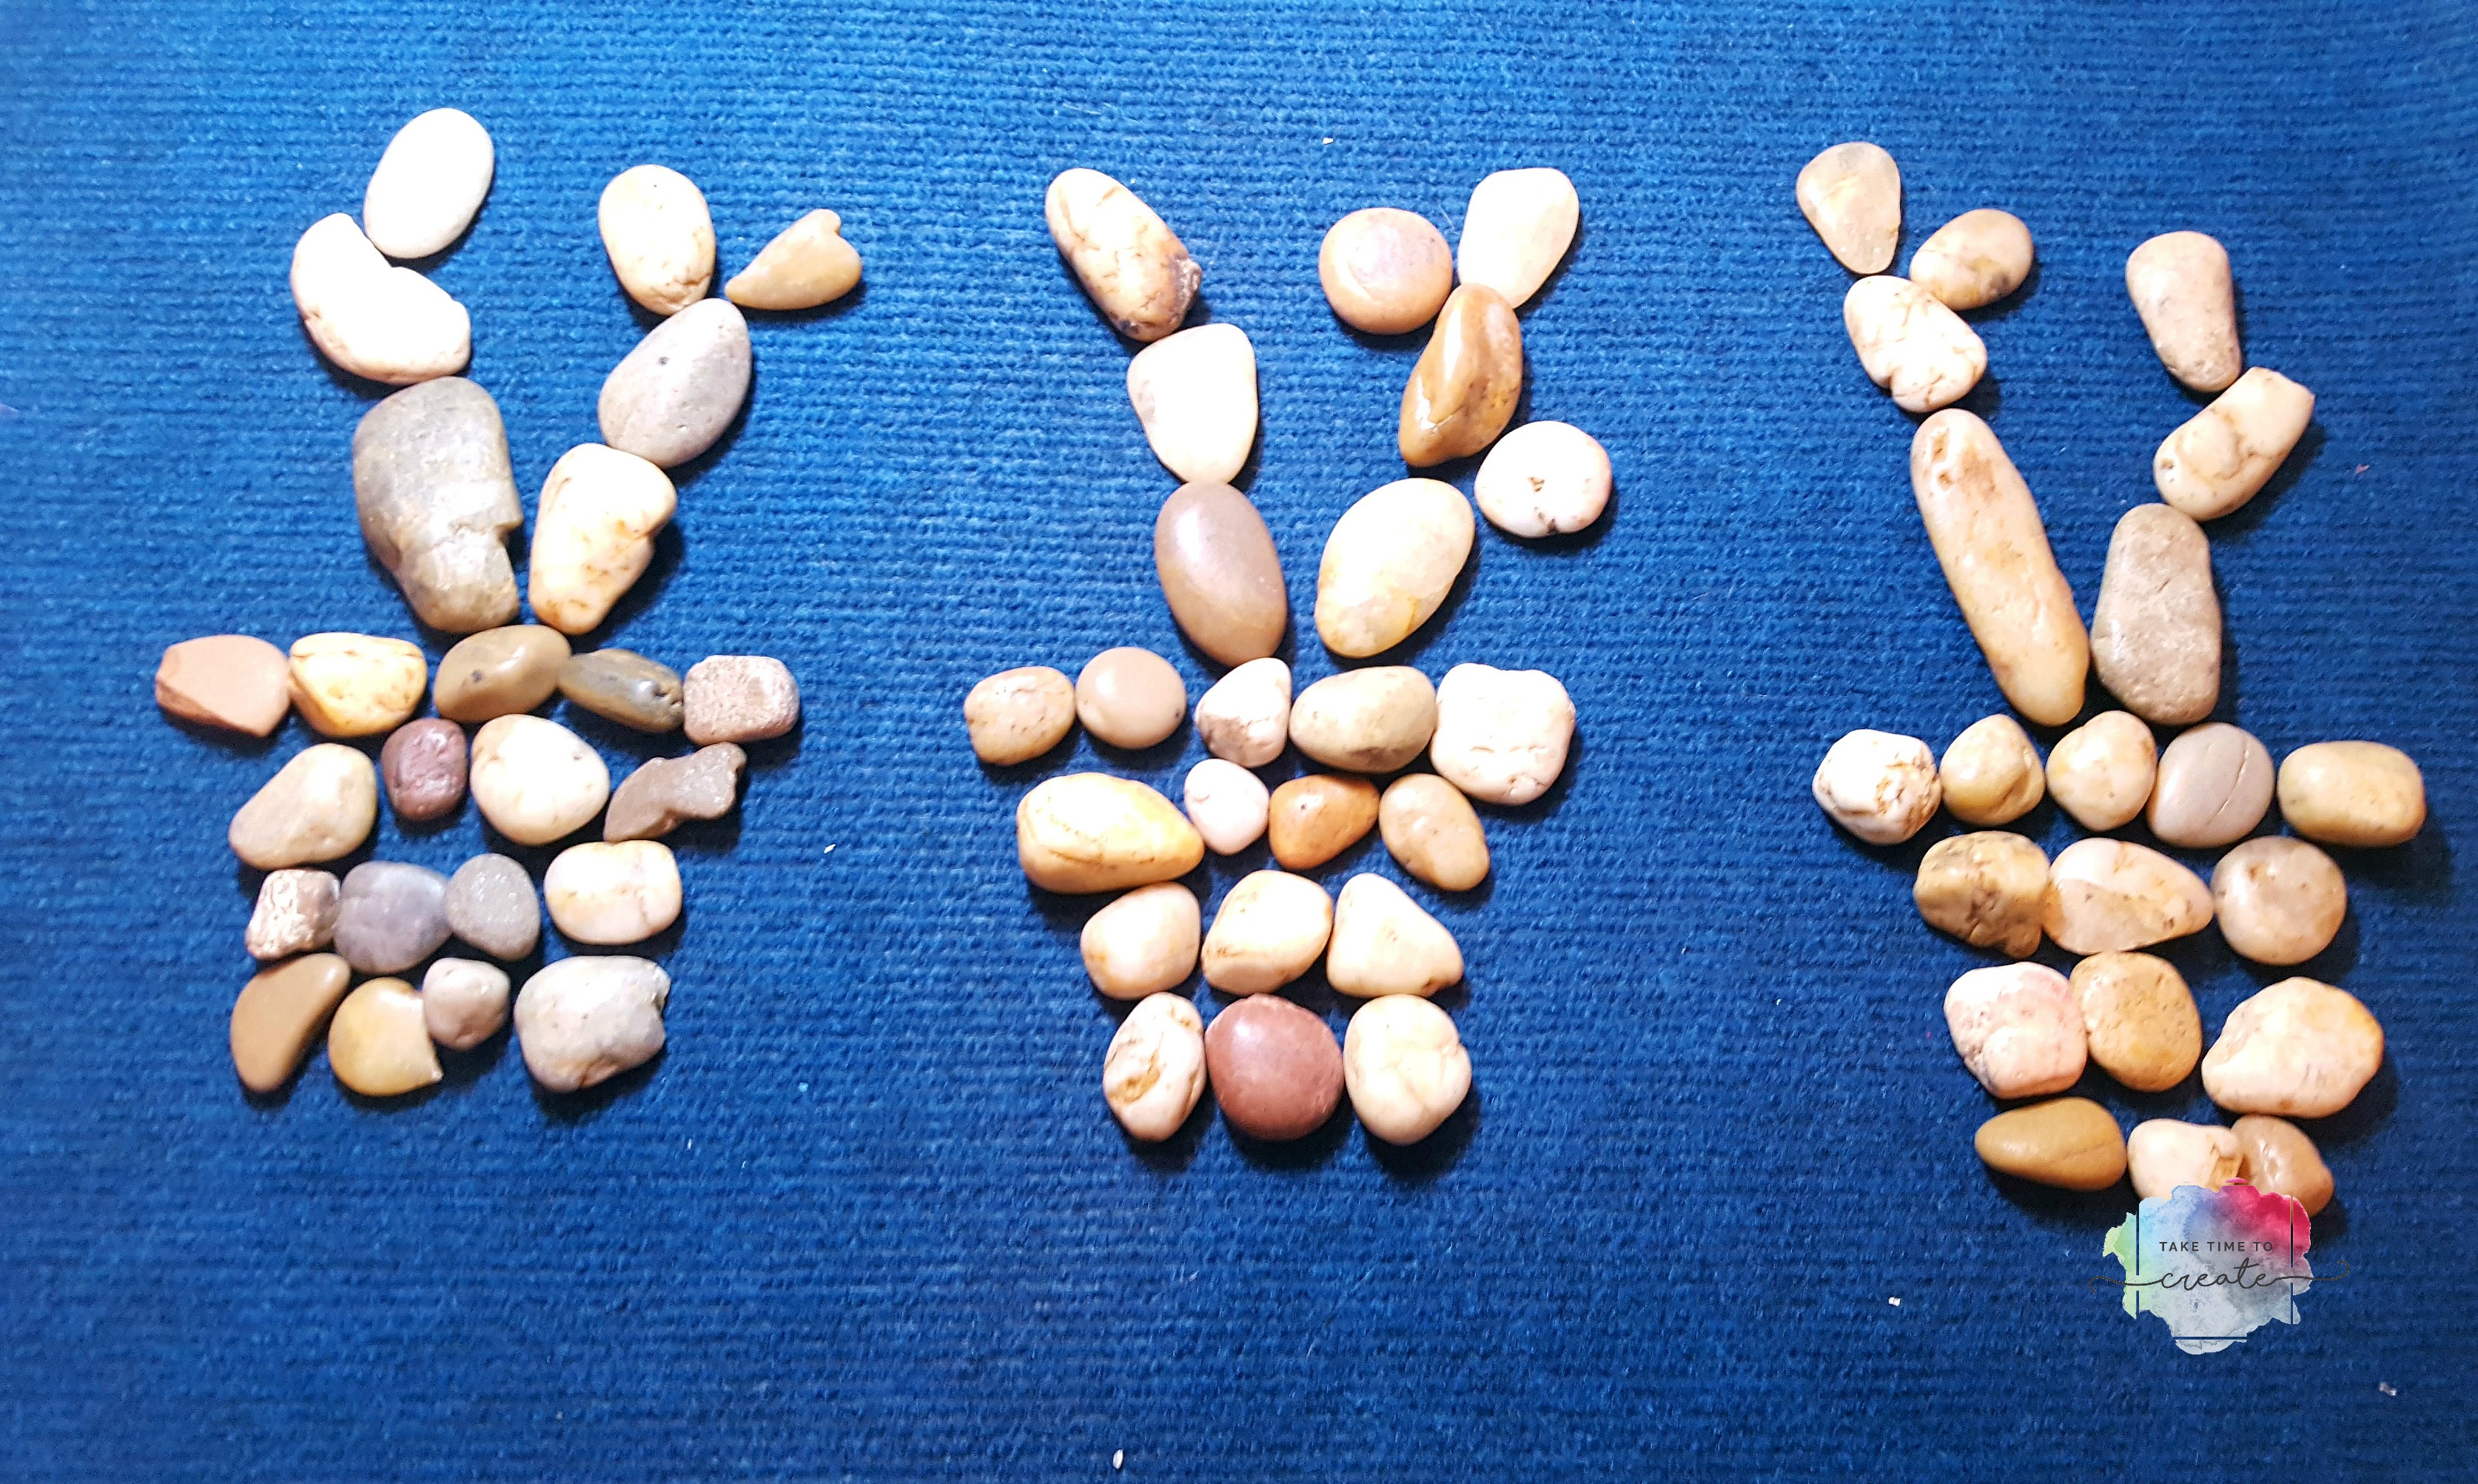
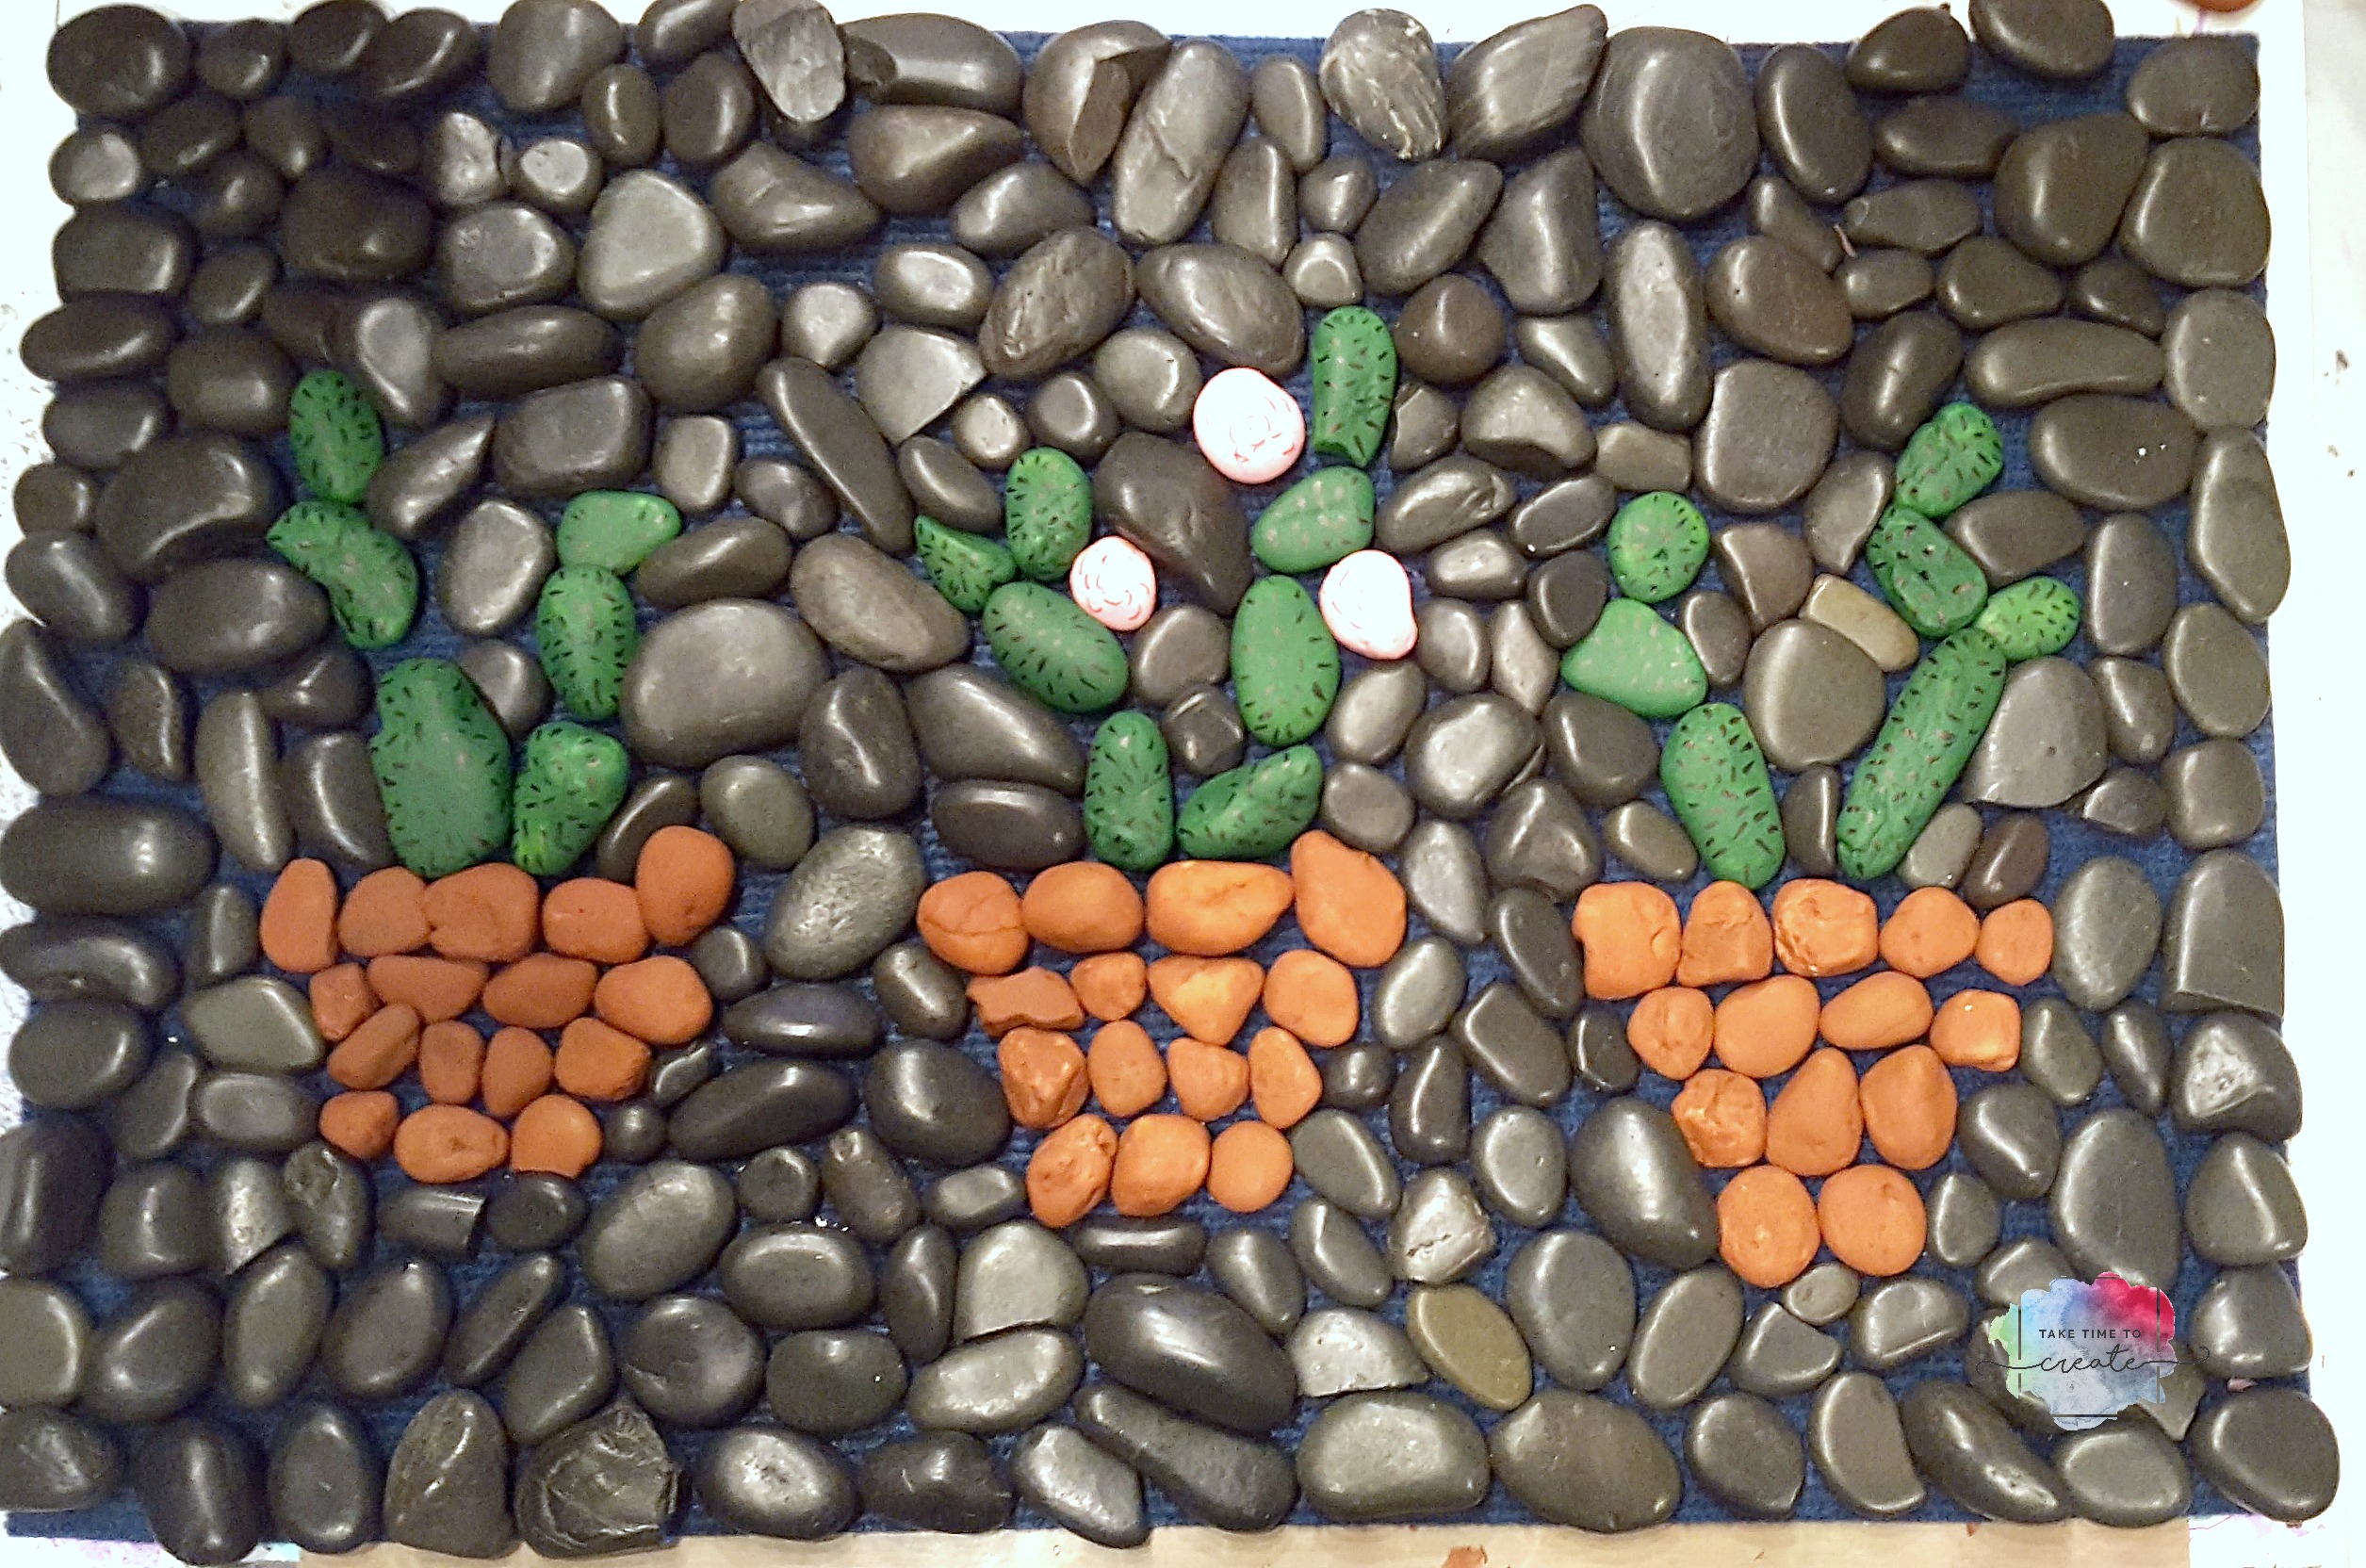
I am loving summer! The long, hot days, endless sunshine. We have been spending a lot of time on our back porch, and I noticed that we needed a new outdoor mat in front of our door.
So I gathered some materials and created this DIY cactus outdoor mat.
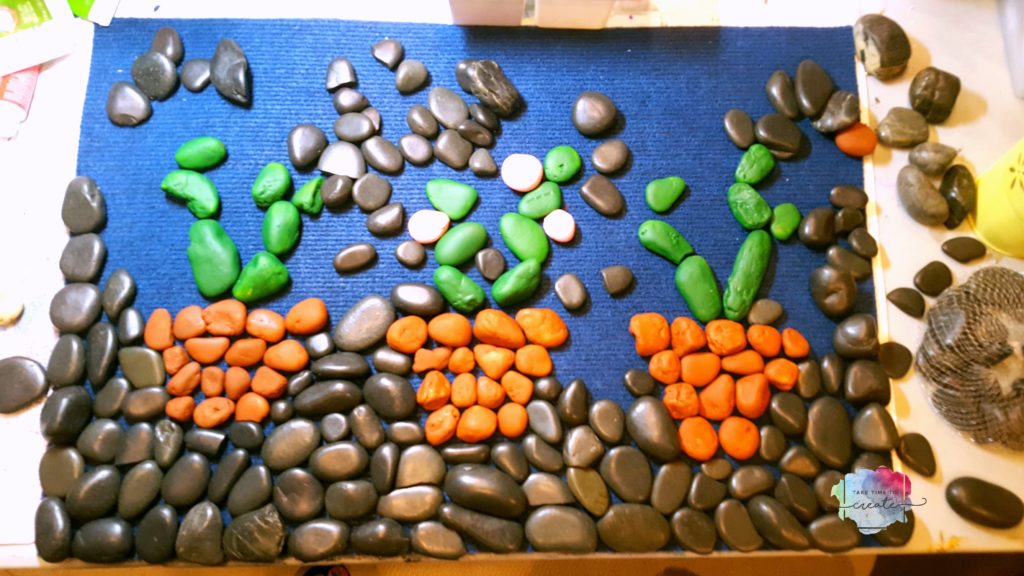
The first thing you do is grab an outdoor mat ( I found mine at the dollar store) and some rocks (Dollar store, lol) and start arranging them. I made some rough cactus shapes to start.
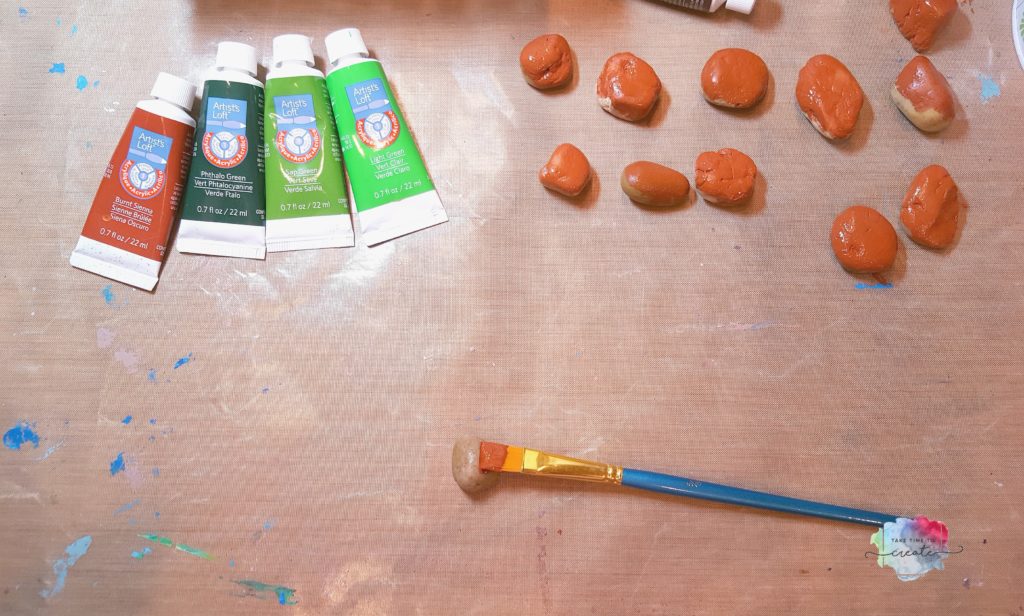
Once I had a good idea what it would look like I started painting the cactuses. I used acrylic paint (Artists Loft) and painted the cactus green and the pot brown.
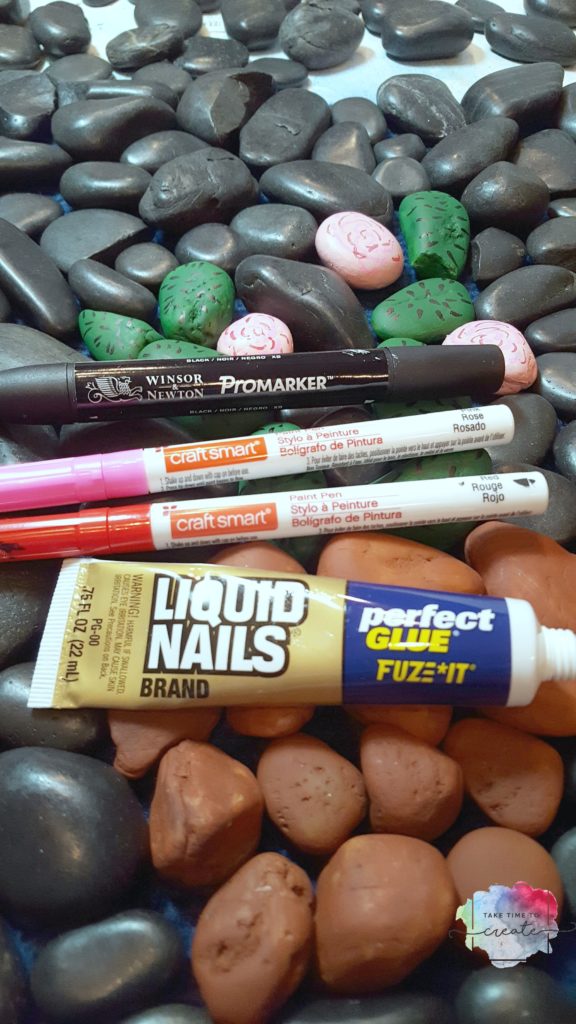
For the pink flowers I painted some swirl details with a paint pen.
To glue the rocks to the mat I used Liquid Nails.
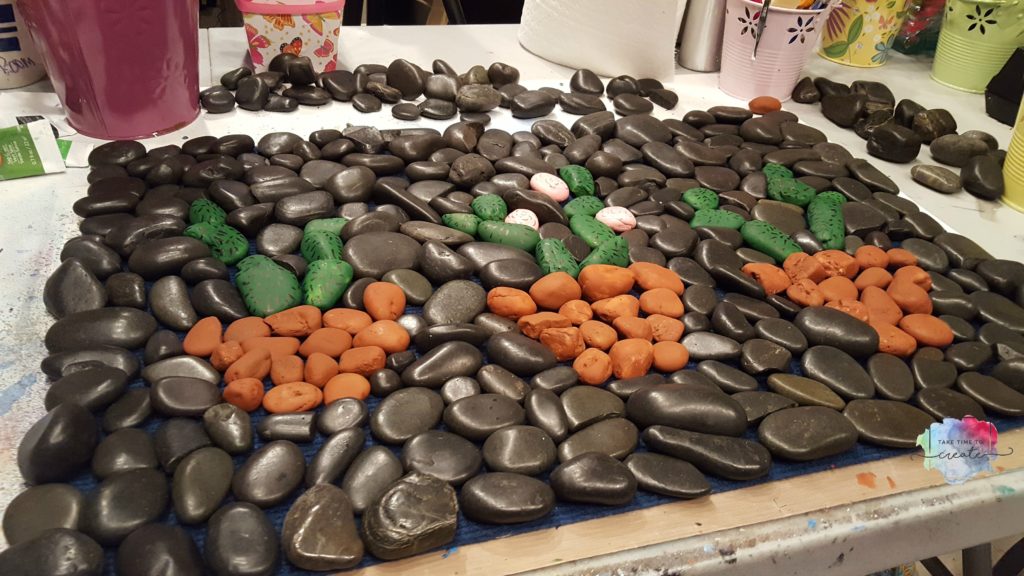
But before the gluing happened I arranged all the rocks on the mat. I used black stones to around the cactuses to outline them and to give them definition and interest. This part does take a while to fit it all in, but it looks so cool when it is done.
I ended up using about 10 bags of rocks, this is because I was mostly looking for particular shapes to fit in certain areas. I do have left overs for my next project.
I let it dry overnight then I took it outside and spayed a couple of coats of spay sealer on the mat.
I am loving how it turned out! So cute and the perfect detail for my backyard!