Category: Holiday (page 2 of 2)

DIY Christmas Tree Earrings

DIY Wire Christmas Tree Earrings

Make the holidays merry with these easy DIY wire Christmas Tree earrings.

Hello Everyone

Do you ever dream about crafts, or is that just me? The other night I was dreaming about making wire Christmas Tree earrings, I know a little random but since I dreamt it I just had to try to make them.

Now the funny thing is is that I have never made anything like this before. I don’t usually work with wire, but I found that I love this technique and I have more ideas to make more jewelry.

Christmas tree earrings

I just love how my Christmas tree earrings turned out

Materials

  • Thin Wire- You can find it on Amazon here: Artistic Wire
  • French Hooks- You can find it on Amazon here: French Hooks
  • Star beads- I found mine at Oriental Trading- link here: Star bead, but the local craft stores might have something similar
  • Pliers and clippers and round objects in various sizes (this is to wrap the wire around)

Instructions:

You need to have a variety of round objects in various sizes. I started with a large marker and started wrapping, then I went to smaller marker then a pencil

Starting to wrap my Christmas tree earrings

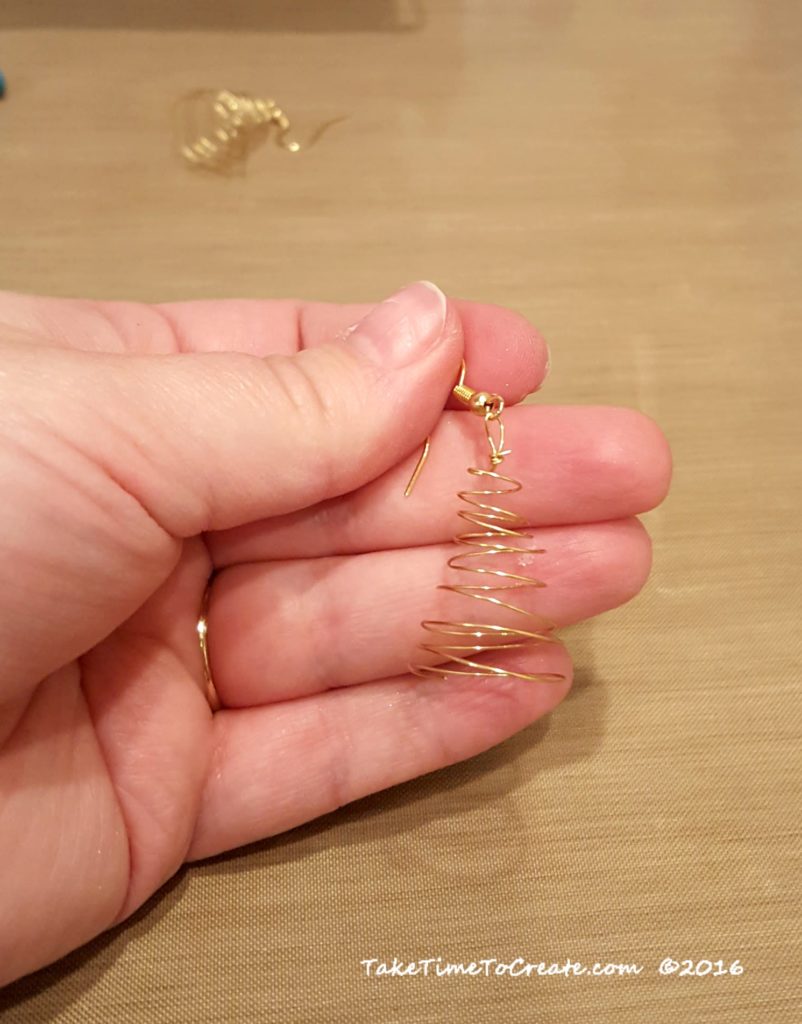
I am starting to wrap my Christmas tree earrings

A smaller wrap for my Christmas tree earrings

Switching to a smaller wrap

The whole idea is to make the tree get smaller as you wrap it around. I wrapped it around each object about 3 times.  The wire I used was a bit thin, but it is a nice dainty look, but next time I think I will use a wire that is a bit heavier duty. This wire likes to bend a bit too easily for my liking. but I did like how it turned out.

Once I finished wrapping I added a french hook. Then I spent some time adjusting the wire to make sure it looked like a tree. I hind sight I probably should have used green wire, but I didn’t have that in my stash, so gold it is, lol.

When I looked at it I thought it was a bit too plain, so I thought I would add a star bead to the top.

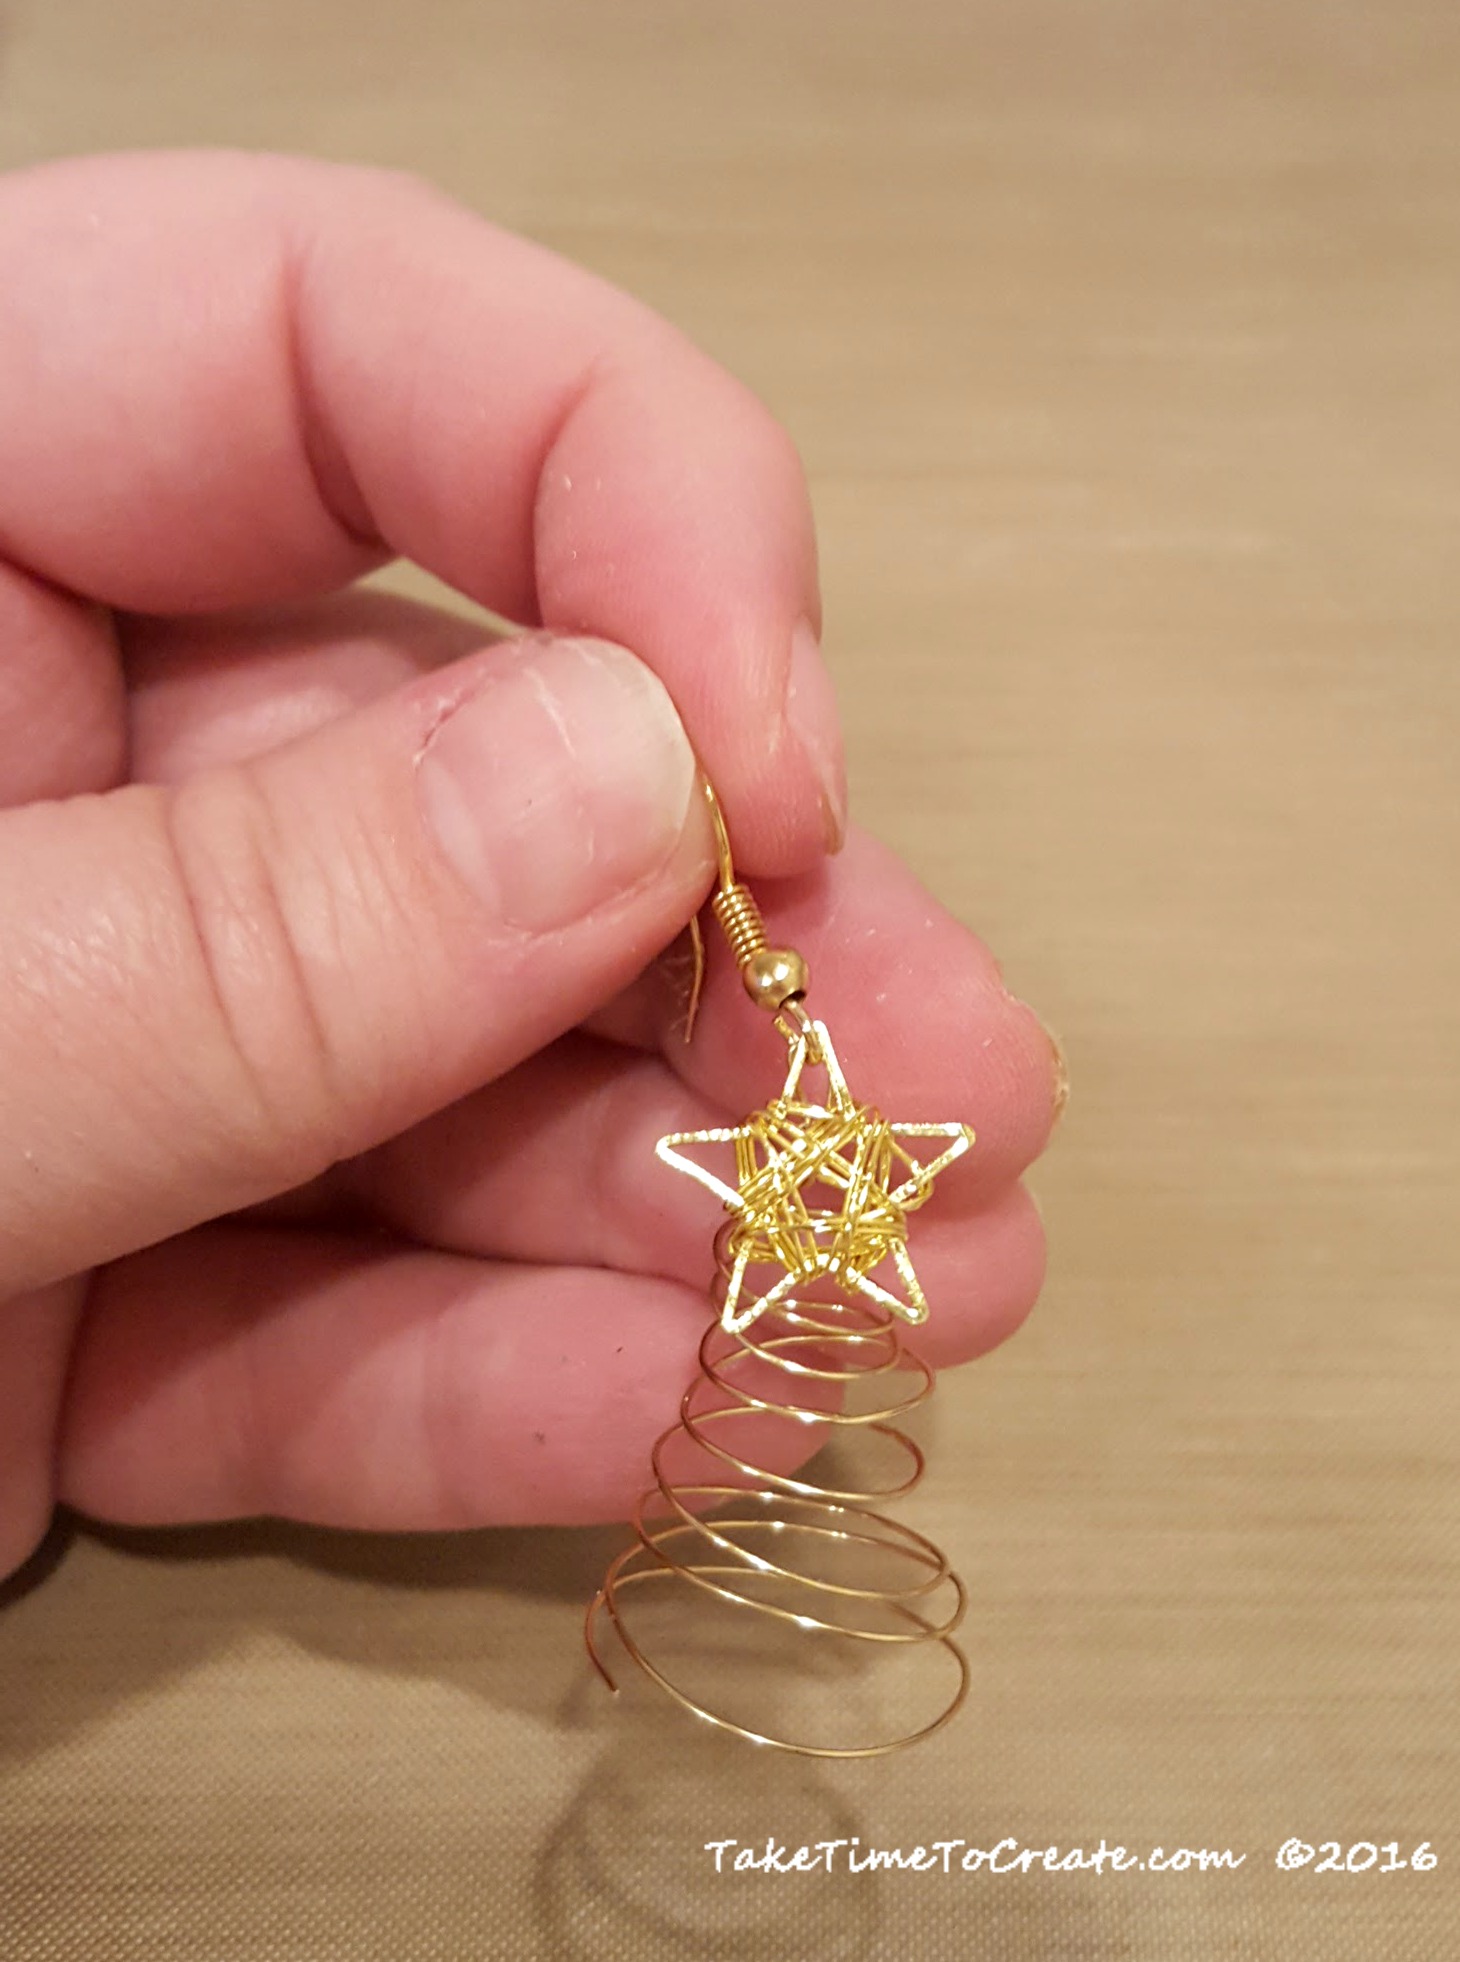
I think the star bead is just what the trees needed! These earrings will be perfect the holiday parties this year.

Christmas tree earrings

The finished Christmas tree earrings


If you enjoyed this post, make sure you Follow Take Time To Create so you don’t miss out on other great posts.

Follow Take Time To Create on WordPress.com


This post contains affiliate links. Thank you for your support.

This post DIY Christmas Tree Earrings appeared first on Take Time To Create

Painted Christmas Houses

Painted Christmas Houses

You can find these really cute ceramic houses just about anywhere, with just a little paint and glitter they are ready to be put on display. 

My finished Christmas houses on display

Hello Everyone!

December is rolling along and it is time for me to think about decorating. The tree is up, and if you follow me on Instagram you probably have seen our tree by now. (@taketimetocreate).

With any holiday I always feel the need to create some new items. This year I made some painted Christmas houses.  I found the unfinished ceramic houses at our creative reuse center Who Gives A Scrap (I love that place!) With a little paint and glitter they were ready to go.

Materials:

  • Ceramic House (You can get these at a creative reuse center, craft stores, and sometimes the thrift stores will have some unfortunutally painted ones that need an update)
  • Paint and glitter found at the craft store. I really liked this paint, it was white with a little pearl look to it. Perfect for Christmas.

paint-and-glitter

Instructions:

Take your plain ceramic house and paint on a layer of white paint. You can always spray paint the houses, but I just decided to hand paint instead.  This is what it looks like before the paint.

(btw, The houses did come with detailed instructions to paint the house in all the colors, but I did not want to take the time to do any detailed painting. haha. So white paint here I come. )

Painted Christmas houses before glitter

My Painted Christmas houses before glitter

Add the paint. This is what it looks like with the paint. Go over everything, all the little details. Don’t forget the inside of the windows.  Touch up where ever you forgot.

Painted Christmas houses before glitter

My Painted Christmas houses before glitter

Then I decided to add some glitter detail to the snow and trees. Just pick a clear holographic glitter that goes with your paint. I put a layer of mod podge on then sprinkled it with glitter.

add glitter painted Christmas houses

Adding Glitter to the painted Christmas houses

Once they are dry they are ready to be put on display.

I think they turned out really cute. You can put lights in the bottom, but I didn’t have any. So this weekend I will pick up some and then they will look even better!

painted Christmas houses on the mantle

Close-up of the painted Christmas houses on the mantle

painted Christmas houses

Here are the finished painted Christmas houses


Subscribe via WordPress


The Take Time To Create Crafting Blog RSS Feed

Subscribe via Email

Enter your email address to subscribe to this blog and receive notifications of new posts by email.


Other Ways To Follow


The Take Time To Create Crafting Blog RSS Feed

Subscribe to my RSS feed

The Take Time to Create Crafting Blog Facebook Page

Follow me as Facebook

The Take Time to Create Crafting Blog Etsy Shop

Check out my my Etsy Shop

The Take Time To Create Crafting Blog Pinterest Board

Visit my Pinterest Board

Other Ways To Follow


The Take Time To Create Crafting Blog Instagram

Follow me on Instagram

The Take Time To Create Crafting Blog Twitter Feed

Follow me on Twitter

The Take Time To Create Crafting Blog Email

Send Me an Email


DIY Ornaments from Magic Towels!

Hello Everyone! With the holidays right around the corner it is time to start thinking about decorating. And since we are on a crafting blog, this post is about DIY Ornaments. This is an easy project that takes magic towels and turns them into ornaments and it is fun to do with the kids. 

DIY Ornaments - Dory

My Finished Dory DIY Ornament

I hope you had a wonderful relaxing Thanksgiving holiday. We had a great time, we went to Florida for the week and it was perfect. Stay tuned, I will do a travel journal about the resort we stayed at.

With Christmas right around the corner I thought I would start doing some holiday crafts and today’s is a DIY ornament.

Materials for your DIY Ornaments:

  • Magic Towels (I used a Dory one and an Avengers one, and I got both from the dollar store)
DIY Ornaments - Magic Towel

We start with a simple magic towel.

  • Ribbon
  • Stuffing
  • Hot glue gun and glue sticks

Instructions:

Cut around the shape that you want to make into an ornament. And cut out that same shape in a plain colored wash cloth.


Cut out magic towel

Next, we cut out the parts we want to turn into ornaments.

Then you start gluing. Glue the pom-pom ribbon ) around the edge and then glue the black ribbon to the top.  I used hot glue for all my gluing, but if you are doing this with kids then you might wan to use fabric glue. You can also sew these together, but me and my sewing machine are not getting along right now, so my hot glue gun came to the rescue.

Then glue the plain wash cloth to the back, but make sure you leave a little gap so you can add stuffing. Add a little stuffing and glue the gap closed.

The ornament's backing

Then, add ribbon and glue together.


And that is it. These are great for kids and easy to do. Kids will like having their favorite characters on the tree.

Avengers ornaments

Here are the finished ornaments.

This post DIY Ornaments from Magic Towels appeared first on Take Time To Create


Subscribe via WordPress


The Take Time To Create Crafting Blog RSS Feed

Subscribe via Email

Enter your email address to subscribe to this blog and receive notifications of new posts by email.


Other Ways To Follow


The Take Time To Create Crafting Blog RSS Feed

Subscribe to my RSS feed

The Take Time to Create Crafting Blog Facebook Page

Follow me as Facebook

The Take Time to Create Crafting Blog Etsy Shop

Check out my my Etsy Shop

The Take Time To Create Crafting Blog Pinterest Board

Visit my Pinterest Board

Other Ways To Follow


The Take Time To Create Crafting Blog Instagram

Follow me on Instagram

The Take Time To Create Crafting Blog Twitter Feed

Follow me on Twitter

The Take Time To Create Crafting Blog Email

Send Me an Email


DIY Leaf Bowl From Dollar Store Leaves

Hello Everyone!

Today I have an easy DIY using leaves from the Dollar Store to make a really cute bowl.

diy-leaf-bowl

I have seen this DIY about 847 times on Pinterest, but I thought that I would add my version to the mix. lol. You can follow me on Pinterest and see all the craziness that I pin.  It is so quick and easy, the longest part is waiting for it to dry…

add-candy-to-leaf-bowl

Materials:

  • Leaves
  • Mod Podge, foam brush, cling wrap
  • Bowl

diy-leaf-bowl-materials

Instructions:

Find a bowl that you can use for the mold. We have had this bowl for over 20 years, in fact Dear Hubby had it when we got married. When I first saw it I mentioned to him that it was a great bowl (it is one in a set of 3) and he said “Thanks, I got it at Ace Hardware when I was getting some tools.” lol. Such a man thing to do. Anyway, the bowls are awesome and have held up great! So I thought it would be a perfect mold.  I think I should use the other 2 bowls and make a set of 3 leaf bowls, that would be so cute!

Next wrap cling wrap to the bowl to protect it

Then start adding mod podge and leaves. I used glossy mod podge because that is what I had, but mat would work great as well. Make sure everything is well covered.

add-layers-of-mod-podge-and-leaves

Once everything is covered add some cling wrap to the top to help keep everything in place as is dries. It does take a while to dry, but eventually it will dry

add-cling-wrap-to-top

Once it is completely dry slowly, and carefully peal off the cling wrap. And there you go a brand new leaf bowl that is perfect for Halloween, Thanksgiving, or Fall. It is a little fragile and not the sturdiest bowl, but it is perfect for candy or pine cones or pumpkins, any light weight decor is perfect.

diy-bowl-from-dollar-store-leaves

diy-leaf-bowl-on-display

The post DIY Leaf Bowl From Dollar Store Leaves appeared first on Take Time To Create.

DIY Skeleton Jewelry and Hair Clips

Hello Everyone!

Another day in Oct and another Halloween Craft. This time it is some DIY jewelry.  This is perfect for people who want to celebrate Halloween without going for the full blown costume. You can wear this at work or school without going over the top and it is easy to take off if needed.

Skeleton Jewerly

This is an easy project that looks so cute when you are done. First find some plastic Skeleton Garland. I found mine at the Dollar Store.

Skeleton garland

Then take it apart. I used different piece for different types jewelry and hair clips.

take the garland apart

I used the arms and legs from 1 skeleton to make hair clips. Just cut off the arms and legs and hot glue them to an alligator clip.

hair clips

arm bones hair clip

For the bracelet cut off some arms and legs, then punch a hole near the top. I used a needle punch, then I added jump rings to connect the pieces. Add a clasp and you are done.

punch a hole

bracelet

I make a pair of skull earrings by adding jump rings and a french hook. Easy to do, and so cute when completed.

skull earrings

For the necklace I just added a jump ring to the top of a whole skeleton. I also made a necklace out of just the head.

skeleton necklace

I also made a hair clip out of a whole skeleton. This one was fun to wear.

skeleton hair clip

The skeletons made great jewelry and hair clips, they were fun to take apart and reassemble in new ways. And since they are light weight they are easy to wear for long periods of time.  These are great for almost anyone to celebrate Halloween or for anytime when they want to wear skulls and skeletons.

The post DIY Skeleton Jewelry and Hair Clips appeared first on Take Time To Create

DIY Halloween Erasers

Hello Everyone!

Update: Check it out this post has been added to Fun Family Crafts!!!

One of the best ways to spruce up your desk is to add some custom DIY erasers.  They are so easy to do and they look so cute on your desk at work or school. They also make perfect gifts, or they would be tons of fun to make at a party.

diy-halloween-erasers

Materials:

There are affiliate links below

  • Eraser Clay (I found this one on line at Amazon, but there are different brands, so pick one that works for you)

ceatibles-diy-eraser-kit

  • Molds (I used ice cube trays from the Dollar Store, or you can free form your designs)

mold-trays-for-eraser

  • Oven

Instructions:

The first thing you do is knead your clay. You want to warm it up and make it pliable and easy to work with.

knead-the-eraser-clay

Once the clay is easy to work with then press it into a mold you like. ( I used a mold because shaping things out of clay is not the easiest thing for me. Molds just made the process a lot easier) You can make almost anything out of the clay. It is really easy to work with.

press-clay-into-mold

Once you have your design pop it out of the mold. I just put a little on the bottom of the mold then I popped it out and added a layer on the bottom of the design to smooth out the bottom. You can also add enough clay to fill the whole mold. It does make a larger eraser, but it looks really cool. You can layer colors or mix them to make a new color. There are so many possibilites.

diy-erasers

Bake the erasers according to the directions and let them fully cool before using.

bake-according-to-directions

They actually work. When I first got this product I thought they might be a little gimmicky and not work well, but I was pleasantly mistaken they actually work really well!

diy-erasers-actually-work

They turned out so cute I think I might need to make more for every holiday!


halloween-erasers

The Post DIY Halloween Erasers appeared first on Take Time To Create.


DIY Faux Stone Pumpkins

Hello Everyone!

I hope your October is going well! I can’t believe how fast it is flying by! In fact the whole year is going too fast.

To celebrate everything pumpkin I made this easy, diy faux stone pumpkins.

finished-faux-stone-pumpkins

Materials:

  • Pumpkins ( I used ceramic ones from the dollar store, but almost any pumpkin will work)
  • stone-pumpkins-before-pic
  • Spray Paint Primer
  • Rust-oleum stone spray paint

Instructions:

After cleaning your pumpkin and protecting your work surface spray a coat of primer on all the pumpkins on all sides

add-a-layer-of-primer

Now it is time to paint. Have you seen this faux stone spray paint? It is awesome! I have a feeling that everything will become faux stone. The texture and look changes the closed you get to your project. It is a versatile tool that I have a feeling I will be using a lot in the future.

spray-paint

For 1 pumpkin I wanted to to use the darker color so I sprayed a base of oil rubbed bronze before the stone.

add-a-layer-of-oil-rubber-bronze

Then go to town painting the pumpkins. I did add a layer of the lighter color to the darker pumpkin because it was not matching well. But just keep going and paint layers according to the directions until you are happy with the results.  I am thrilled with how they turned out! So very cute

start-adding-the-faux-stone-spray-paint

If you want you can spray a  sealer over the top to protect them.  I think these would look really cute outside as part of your outdoor decorations. Just be sure to protect them first.

completed-pumpkins

And here they are as part of my DIY Painted Halloween Village display.  I think they added a nice touch to the display.

finished-houses-in-my-home

DIY Painted Halloween Village

Hello Everyone!

Halloween is fast approaching, and of course I get it in my head that I want to do some new Halloween decor.  At least this year I am getting it done before Halloween and not after, haha.

I saw a Halloween Village at the Dollar Store and thought it would be perfect to paint for Halloween

finished-village

Materials:

  • Ceramic houses (I found mine at the Dollar Store, but there are a lot of options out there. You could even use Christmas houses)
  • Metallic Paint
  • Gesso
  • Brushes, Stucco, Beads

Instructions:

When I saw these houses I thought that they were very cute, but the colors were not great. I didn’t think that they went together very well and the figurines were terrible.

before-house-2

before-houses

before-up-close

Before the painting fun I had to prep the houses. I cleaned them then added a layer of Stucco to the roofs and anywhere there needed to be a rough detail. Then I added some beads to the grass area.


stucco-and-beads

add-stucco-and-micro-beads

After the texture was dry I added a layer of black gesso. This gave me a blank canvas to work on. I did have to go back and touch up areas that I missed.

add-gesso

After the gesso was dry it was time for the fun painting! I used metallic acrylic paint and I mixed some Mica Powder with soft gloss gel for the green. I just dry brushed the colors onto the housed, adding and blending as I went. Once I was happy with the look I went on to the next house, until I was finished with the project.

paint-colors

keep-painting

start-painting

Here is an up close picture of the detail of one of the houses and the bridge.

up-close-detail

And here it is on display in my home. I really liked this project, it was fun to watch the housed change right before my eyes. Good thing I bought more houses from the Dollar Store, now I can create even more villages, haha

finished-houses-in-my-home


Newer posts »

© 2024 Take Time To Create

Theme by Anders NorenUp ↑

Follow

Get the latest posts delivered to your mailbox:

%d bloggers like this: