Restoration Hardware Chandelier

I am in love with Restoration Hardware! I love everything in their stores, online, and catalogs! They are amazing, but, I can’t afford most things that they offer. I saw this beautiful chandelier and I knew I had to have it. I loved the iron and crystal combination, I knew it would be perfect in my foyer! But I looked at the price…$2195! Whew, too much! So I got to to thinking, I could probably make something similar.
Here is the original:

 Isn’t it beautiful? If you want to purchase it here is the link: Restoration Hardware
Here is my version. What do you think? Is is close? I think it turned out great and all for around $150! The directions are below:

Here we go:
I started with a plain chandelier that I pick up at a local building re-use store. It was only $15, but it needed a lot of cleaning before it was ready

 Yuck, really dirty! But with a little elbow grease it cleaned up nicely and was ready to transformed into a new chandelier.

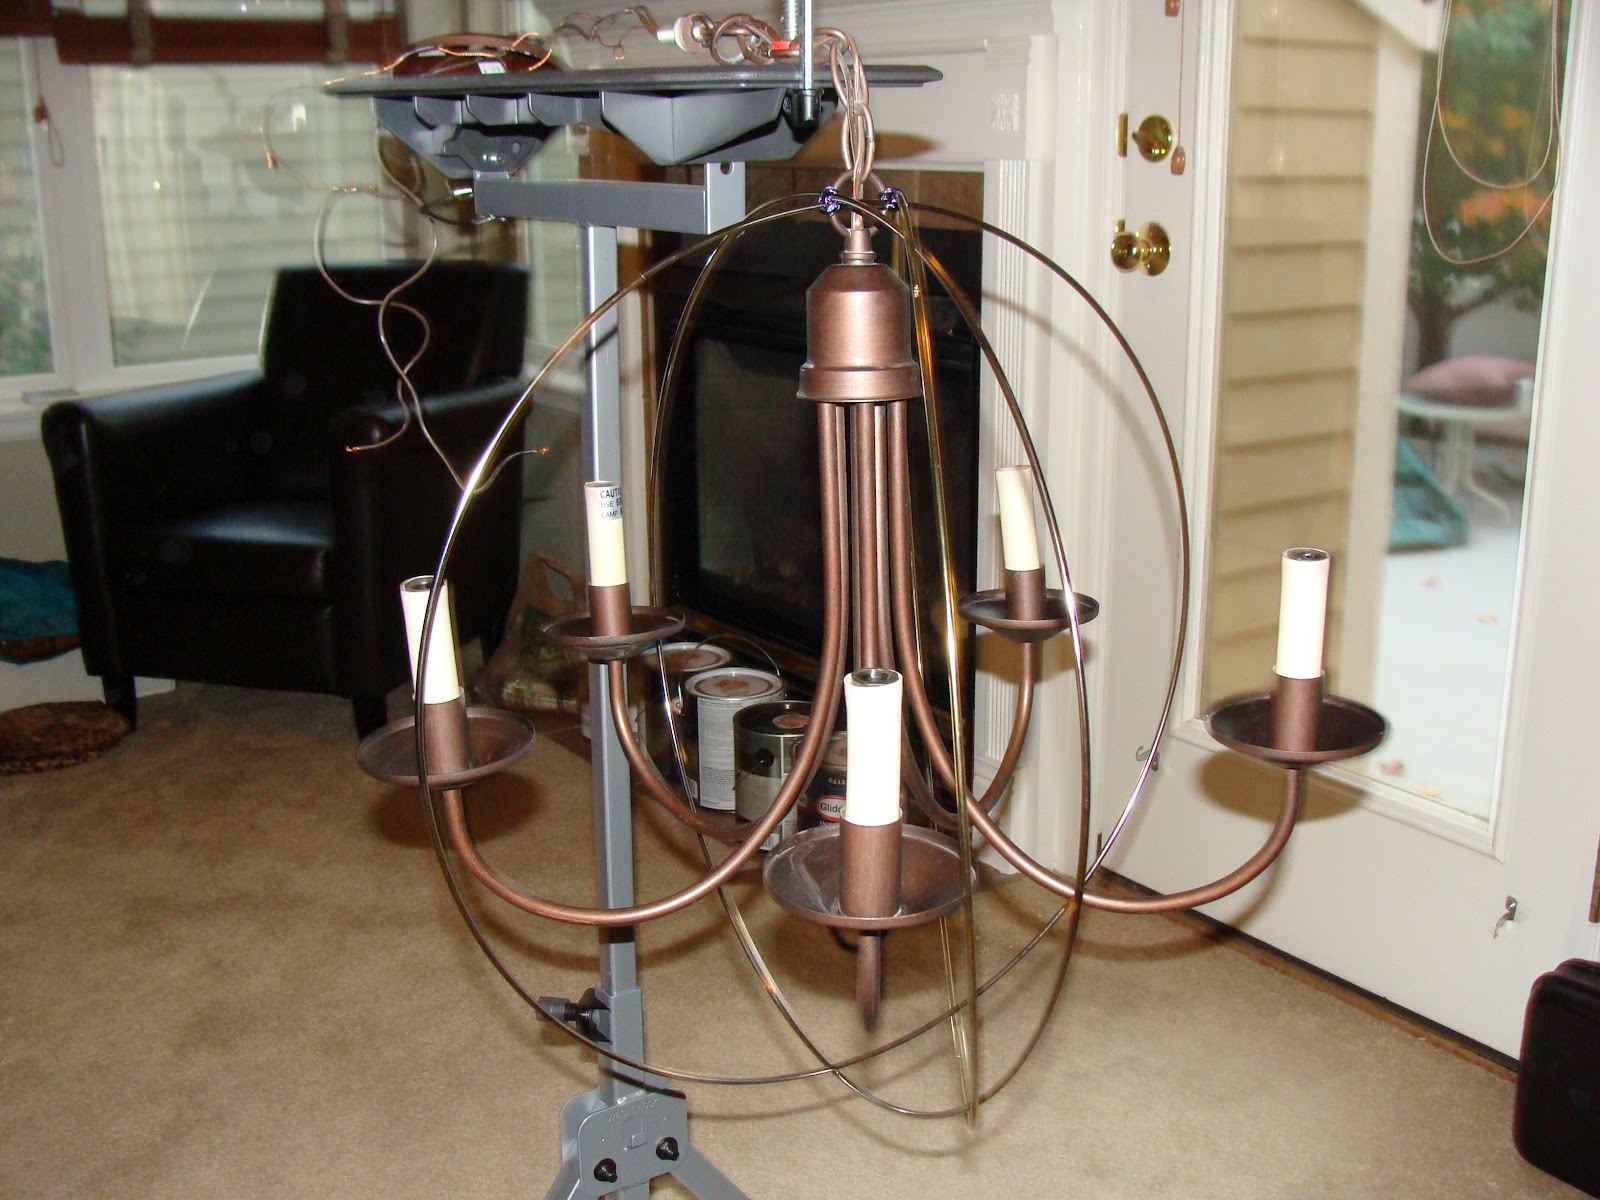
 The first thing I needed was something for the circles going around the chandelier. Since I can’t weld or bend pipes I needed a different solution. So as I was wandering around Hobby Lobby I found these hoops. I am not sure what they are used for, but they worked perfectly for me.

 I rigged up a hanging station so I could work on the chandelier. I just took my husband’s saw horse and clamped the light to hang it at a good height so I could sit a a chair and work on it.

 Now time to add the rings. I needed a way to secure them to the light, so I wire wrapped them. It seemed to work out just fine. Don’t worry too much about the colors, it will all get spray painted in the end.

Keep adding rings until you are satisfied. I think I added 5 or so.
After all the rings were added and I was happy I spray pained the entire chandelier in Oil Rubbed Bronze from Rustoleum. This is my favorite, I use it all the time.

 Once it is all spray painted you could stop there before adding crystals. There is a version without crystals on Restoration Hardware and it looks amazing. But if you want to add crystals read on.

I found crystals I liked at Save on Crafts.com. There are a ton of places to find crystals.
Then I started adding. I punched holes in the cups things (don’t know what they are called) and added crystals with jump rings. The photo is blurry, but you get the idea.

I used a metal hole punch like this:

I punched holes around the top and strung crystal garlands and added teardrops to the top.

 I strung crystal garlands from cup to cup. Just play around and add crystals until you get the look you are going for. This is the fun part! Be creative and add until it looks right to you!
Once all the crystals are added it is time to hang it up. We were replacing a can light with the chandelier, so we used a kit to help us out.
Another photo:

 And one more. Didn’t it turn out great! So excited, can’t wait for my next hack.

 Lesson learned:

  1. You can buy a chandelier with all the crystals on it and just add the rings. That might be a cheaper way to go if you can find it on sale or craigslist
  2. Be patient and take your time, this does take a little while to complete.


Outdoor lights makeover

So, I got these outdoor lights from a guy on Craigslist for free. Free is always nice, but there is a price to pay. They were very dirty and needed a coat of paint, very badly! I have been wanting to change out our outdoor lights for a while now, but my DH did not want to spend any money on it. So this is our solution.  At this point I have no idea if they even work… 
Here they are before the makeover, pretty bad! (sorry the lighting on the picture is not great, these were taken in my kitchen, in the spot with not a lot of light)

Close ups, pretty dirty. They need a lot of TLC.

I took them apart, carefully. I didn’t know what condition they were in. I turns out the glass is still good and all the parts are there and everything is in tact. I have high hopes that these will turn out ok! As you can see from the various photos the colors are all different, this is not a trick of light, they really were different colors. The sun had faded some and not as much on others.

Once they were thoroughly cleaned and dried it was time to spray paint them. I used Rustoelum oil rubbed bronze (my favorite color of spray paint) I used the one with paint and primer in it. So a few coats later I was done, don’t they look much better? I love the color and finish, I know they will look great! So excited to install them.

But before we can install them the old lights have to come down. Yuck, old brass coach lights that have seen better days. I am so excited to take these down! I have plans for them in the future…

Yah!! our new light is installed, and it works, whew! I was a little worried about that, but no need, everything worked perfectly! I looks wonderful!
I got a total of 5 lights, but I only needed 3. I have plans for the other 2, stay tuned…

Lessons learned:

  1. Make sure the light is cleaned inside and out!
  2. If you can check to see if it works before you hang it. That way you don’t go through the trouble of cleaning, painting, and hanging only to find out that it doesn’t work.

Pantry Door Chalkboard

I have been seeing pantry doors with chalkboard paint on them all over Pinterest. So, I decided to try it out. I am hoping that as we run out of items that my son and husband will write them on the chalkboard to let me know before I head to the grocery store. Then my plan is to take a picture of it with my cell phone and head to the store. We will see if this works…..

As you can see our door is very plain, nothing special. Now time to prep the door.

 Lightly sand the door and then clean it up, making sure there is no dust left. Add tape to prevent paint from going to the parts you don’t want paint.

 I used good ole Rustoleum chalkboard paint. I did read that you can make your own paint, has anyone tried that?

 Then I applied my first coat with a foam roller (as per the instructions). Make sure you read and follow all instructions.

 It really needs a second coat of paint.

 I added the second coat and let it fully cure for 3 days. After 3 days I took off the tape and rubbed chalk over the entire board to condition it. Now it is ready to use! I can’t wait to paint something else with chalkboard paint!!

Lessons learned:

  1. Read all the instructions. (I am terrible at this, but it is important to read and follow them)
  2. Use a foam roller brush
  3. Wait between coats. I painted on coat after work on a Monday and then after work on Tues I painted the other coat. 

DIY Witch’s hat

With Halloween right around the corner (I can’t believe it, but with October almost here, the year will be wrapping up pretty quickly) I know that I need to get started on my Halloween decorations.

So, I was wandering around my local big box hardware store and I saw these really cute witches’ hats and I thought it would be the perfect decoration for my porch. But I looked at the price and thought I could make one for cheaper than that (it was almost $4 for a hat that was about 4 inches in height)  Here is a picture of the hat I found:

So off to my local dollar store to see what I could find. I found a party hat and some Halloween garland, perfect!

So I cut out a circle (with a dinner plate as a guide) and glued this to the bottom of the hat. This made the brim. 
Then I smeared mod podge on the hat and started wrapping the garland around the hat. (I should make a note here, the garland came with little ghosts and skulls sticking out of the garland. I chose to cut them off, it made the hat too “busy” and not the look I was going for. So now I have a pile of ghosts and skulls that I am sure I will find something to do with soon. )

I wrapped garland all around the hat and brim. Then I added a contrasting garland color the bottom of the hat, just for a fun detail. That’s it, not much to it.

In all it cost me about $4, so no real savings, but it was much larger than the little hat I found at the store. And they were selling bigger hats for about $8, so that is a savings.

Finished hat! Doesn’t it look cute. I can’t wait to make more and line them up on my porch. Thoughts? Do you have a hat that you want to share? I would love to see it!

Lessons learned:

  1. I think I could make this with a tomato cage
  2. Wait for the end of the holiday for the sales and make them for next year.
  3. I used craft glue for gluing the brim on and the detail garland, but I am sure most any type of glue would work.

What else can I make? How about Christmas trees? The sky is the limit. 

DIY Custom Mantel

This picture on the left is before, just plain ceramic tile around the fireplace. After, it is a custom mantel.

So we have this plain Builder’s grade fireplace. Nothing fancy, but nothing wrong with it. It is just boring and plain and not really some thing we loved. So we decided to change it by building a mantel. This is a new project for us and I will try and explain everything that we did, but if you have questions please let me know.
I know that there are a ton of these fireplaces out there, so hopefully this will be inspiration for you to upgrade yours. 
Before we got started we looked at a lot of mantels and tried to get ideas. The problem with ours is that the fireplace is sandwiched between a window and door. This meant that we couldn’t build the top shelf part out, we had to make sure it was flat so that it did not interfere with the door or window.

We purchased a ready made surround from Lowe’s and built it up from there. The surround was a little too long, so we cut the top board down to fit our fireplace.

To get the surround to stay on the tiles we used Loctite power grip. There maybe other glues that might work a little better, but this one worked fine for us. Make sure you follow all the directions on the glue to ensure maximum adhesion. We didn’t want to screw into the tiles, so glue was the next best thing. We put the glue on and stuck it up on the fireplace and then put chairs up to the surround to help hold it in place and left it there to dry overnight.

Then it was time to build the top shelf. We wanted to make sure it was sturdy and secure so we screwed “L” brackets into the wall, not the tile. We decided that it was not secure enough so we created a brace that went from the shelf to the surround, and that was glued and screwed in place.

Then it was time for the fun to really begin. We started to add the crown molding. First came the trim that went next to the tile and surround. This trim came with the surround and looks great.

So far so good. It is hold the pictures up, nothing has fallen yet (whew).

We added crown molding below the shelf. Then we had to figure out what to do with the side. As you can see the molding couldn’t stick out from the sides or it would interfere with the door so Lyle decided to make it flush with the side and leave it at that. I think it was a perfect solution to our problem.

We added molding to the sides and detail to the top and sides. At this point it became a matter of building and creating and seeing what we liked. We would add then take away and add something else, eventually we landed on a design that worked for us and that we liked.

Now came the “fun” time of prepping the wood for painting. This did take awhile, but the better you prep the better the finished product and since this is a focal point we wanted to make sure it looked perfect. The sides had to be filled int with wood filler. This took a few times, but  it came out looking wonderful. Just putty it on and then let it dry and sand for a smooth finish, repeat as necessary. Make sure you follow all the directions.

Then we caulked all the seams and edges to have a smooth professional finish. Once again follow all the directions on the caulk. And we put wood putty in all the holes and filled in the nail holes for a nice smooth finish.

Then came time for sanding. Sand everything to a nice smooth finish. Take your time with this step, the better the finish the better the paint will look. Wipe off all the dust so the paint will stick better.

Once everything was sanded nicely it came time to prime and paint. Before priming and painting I put tape on the walls and edges and put a drop cloth down to contain the paint mess. For the primer I used 1 2 3 Primer with a foam brush. I didn’t want brush strokes and this worked out great.

With the primer on it doesn’t look very nice, but I know it will look better soon….

 This is  the first coat of paint. Not too exciting. We went with Kwal Aspen White, only because the rest of our trim is in that color. I didn’t want to repaint all our trim, and this really is a nice white that looks great. I lightly sanded between the primer and coats of paint for a smooth finish and the wiped off the dust before I painted the next coat.

 After 4 coats of paint we are finally done! We can’t believe that actually built a mantel and that it looks so great! It took 2 weekends, but it was worth it. What was the cost? Less than $250, but so worth it.


Questions?
Have you built a mantel? Share pictures, we would love to see it!
Lesson learned:
1. Don’t rush this project, it is worth it make sure you do it right and that it looks good. 
2. Foam brushes work well for the paint
3. Be prepared for some trial and error when working with the crown molding. It make take a few tries to get the look right.

Button letter

A few months ago my mom gave me a box of old buttons. It was fun to go through the buttons and remember what outfits them came from or what she made us. (my mother can create beautiful clothes, a talent that I do not have. But, that is a story for another day) Anyway, as I was going through them I thought it would be nice to showcase some of the buttons.

So, I found a wooden letter “S” at my local craft store. It wasn’t too expensive and with a 40% off coupon the price was even more reasonable. Then I painted the “S” in a cream color, but any color will do.

Then the fun started! I looked through the buttons and found similar ones (I was looking for all in the white/cream family) I wanted a uniform look with the colors, but the sky is the limit. A multi-colored letter would look awesome! Anyway, I digress, then I started gluing the buttons on. I just used craft glue, I am sure most any glue will work if it is strong enough to hold the weight. There was no real rhyme or reason to the gluing. I just started at the top and worked my way down filling in as needed. I stacked buttons on top of each other and made it more dimensional. Just keep adding until you think it is done.

Here it is will the buttons on.
Then I needed a way to display it. So, I glued it onto a 12×12 piece of scrapbook paper that I had that looked good with the buttons. Then I put it into a shadow box and hung it in my entry way in my house. If you don’t want to put it in a frame a ribbon on top would look cute, or magnets, or you can put a picture hanger on the back and hang it as is. The options are really endless.

How will you hang your letter? I would love to see what you come up with!

Garage overhaul

So for my first post for our blog I thought it would be fun to talk about our garage overhaul. But I did a terrible job of taking pictures during the process. So, use you imagination and picture a plain 2 car garage with just drywall on the walls (unpainted) and nothing on the floor and no storage. That was our garage for 3 1/2 years, yuck!

Well, what we did first is go the dump, yes the dump, and get paint. Our dump has a hazardous materials center and that is where you bring all your chemicals that you are no longer using and they will properly dispose of them for you. I pick out a few gallons (they will all about 1/2 full) that were about the same color and brought them home. We primed the walls since it had never been painted before and them we mixed all the paint from the dump together. By mixing it we made one consistant color that we were able to use on all the walls and celing.

After the painting was done we started on the floor. We really wanted to epoxy the floor and we found a Rustoleum kit that had everything we needed. We just needed to pick up brushes and some basic tools and the nonslip additive and we were good to go. Now, prepping the floor is key! We swept, cleaned and cleaned and cleaned some more all per the instruction that came in the box. Here is a picture of what we used:

We picked up the kit at our local home improvement store. After prepping the floor and the floor was dry it was time to epoxy the floor. You just mix the 2 parts together and then we added the non slip additive that you can buy separately and off we went. As we painted in smaller squares we added the decorative chips and finished painting in just a few hours.

After the floor was completely finished we let it dry and cure for the next week. It was hard but we did not go into our garage for 1 week. After the week was up we did the final touches. We decided to add a rubber baseboard to finish off the look. It was easy to install, just add glue to the board and press on wall. Once the base board was up we added some simple storage to complete the garage. We even replaced the single bulb that was lighting the garage for a florescent light, much better! Looks great, what do you think? What have you done to make your garage a showplace?

Lessons learned:

  1. Watch the video that comes with the kit. We watched it a few times and we watched Youtube videos as well. It helped a lot.
  2. Have help! We had a friend help and it was nice, but 2 people can do this, but 1 would be tough.
  3. Really clean the floor! we even power washed the floor and I think it helped a lot and made it look more professional.