Tag: office

DIY Halloween Erasers

Hello Everyone!

Update: Check it out this post has been added to Fun Family Crafts!!!

One of the best ways to spruce up your desk is to add some custom DIY erasers.  They are so easy to do and they look so cute on your desk at work or school. They also make perfect gifts, or they would be tons of fun to make at a party.

diy-halloween-erasers

Materials:

There are affiliate links below

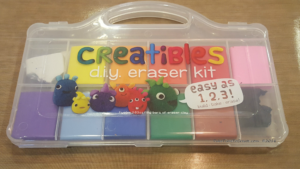
  • Eraser Clay (I found this one on line at Amazon, but there are different brands, so pick one that works for you)

ceatibles-diy-eraser-kit

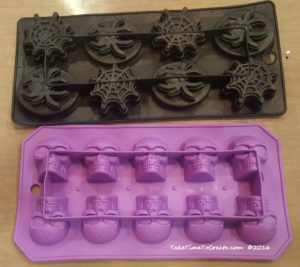
  • Molds (I used ice cube trays from the Dollar Store, or you can free form your designs)

mold-trays-for-eraser

  • Oven

Instructions:

The first thing you do is knead your clay. You want to warm it up and make it pliable and easy to work with.

knead-the-eraser-clay

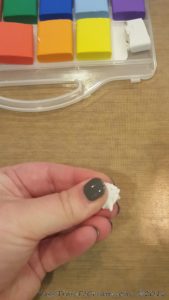
Once the clay is easy to work with then press it into a mold you like. ( I used a mold because shaping things out of clay is not the easiest thing for me. Molds just made the process a lot easier) You can make almost anything out of the clay. It is really easy to work with.

press-clay-into-mold

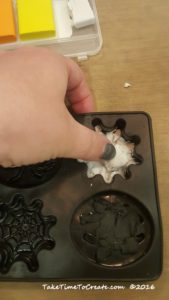
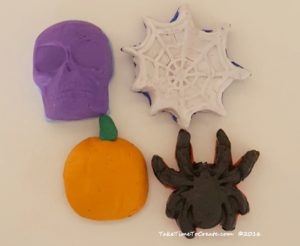
Once you have your design pop it out of the mold. I just put a little on the bottom of the mold then I popped it out and added a layer on the bottom of the design to smooth out the bottom. You can also add enough clay to fill the whole mold. It does make a larger eraser, but it looks really cool. You can layer colors or mix them to make a new color. There are so many possibilites.

diy-erasers

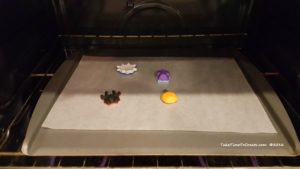
Bake the erasers according to the directions and let them fully cool before using.

bake-according-to-directions

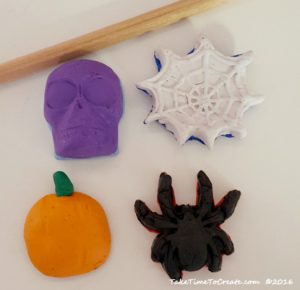
They actually work. When I first got this product I thought they might be a little gimmicky and not work well, but I was pleasantly mistaken they actually work really well!

diy-erasers-actually-work

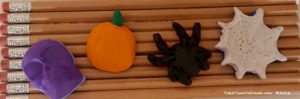
They turned out so cute I think I might need to make more for every holiday!


halloween-erasers

The Post DIY Halloween Erasers appeared first on Take Time To Create.


How to Reupholster an Office Chair

Hello everyone!

An office chair has got to be one of the most pieces of furniture that a person can own. You spend a ton of time in your chair so it should be comfortable and good looking. I had a chair that was wonderful, it worked great and I had it a long time. But it broke. So I had to search for a new one. After searching high and low I found one at a surplus store. It was in great condition and for only $15, I thought it was a steal. The only problem was the green fabric covering it. The color was ok, a dark green, but it was itchy and that was not ok. So I decided to recover so it didn’t drive me crazy sitting on it for 8 hours a day.

How to Reupholster an Office Chair

I think it turned out very cute. I found the fabric at Who Gives a Scrap. I talked about this awesome donation center last week. You can revisit that post here. They had this great upholstery fabric for only $2. Can’t beat that price. Here is how I went about recovering the chair.

Materials:

~Chair (this one wouldn’t be too bad if it wasn’t for the itchy fabric. Now I know why they had it for sale at the surplus store.)

How to Reupholster an Office Chair

~ Fabric (The stripped patter is cute and for only $2 I could pass that up.)

How to Reupholster an Office Chair

~ Staple gun, screw driver, glue gun, ribbon for edging

Instructions:

~ The first thing I did was take off the arm rests with the screw driver. I could have taken the whole chair apart and this might have made the process easier, but I decided to work around everything except the arm rests.

How to Reupholster an Office Chair

~ Then I measure the fabric and started stapling it on. The way this chair is constructed is a little weird. It has a plastic back and the original cover was Velcroed on, but I didn’t want to go that trouble so I decided to staple over everything.

How to Reupholster an Office Chair     How to Reupholster an Office Chair

~ I got the top part done then I went to town on the seat of the chair. The stripes made it easy to match the top to the bottom. I stapled everywhere then I went back and added more. I wanted to make sure everything held.

How to Reupholster an Office Chair     How to Reupholster an Office Chair

~ Once everything was secure and stapled on I hot glued on a tan ribbon that coordinated with the fabric. Then I put the arms back on that that was it. It took me a couple of hours to complete but it was worth it to not have an itchy chair.

How to Reupholster an Office Chair     How to Reupholster an Office Chair

Once I finished my son loved it so much he has asked me to do a chair for him. But if my chair is ever missing I know who to took it. Smile

How to Reupholster an Office Chair

© 2024 Take Time To Create

Theme by Anders NorenUp ↑

Follow

Get the latest posts delivered to your mailbox:

%d bloggers like this: